Eat Simply, Eat Well

Healthy recipes & tips to help you live the good life. by Ann Plough

Spicy Mung Beans With Spinach

May 4, 2016 by aplough

Mung-beans_spicy_logo_text_main_20160504

It’s the Year of the Pulse according to the World Health Organization. That means these Spicy Mung Beans are right on theme, but that’s not the reason you should make them.

Mung beans have one of the best nutritious profiles of any bean; unlike most other dried beans do not need to be pre-soaked; and absorb a variety of flavors easily, so you can dress them up to add into salads or serve with whole grains for an easy and delicious meal.

According to Indian tradition, mung beans help to detoxify the body, are beneficial for the liver and gall bladder and are good for people with high blood pressure, acidosis or gastro-intestinal ulcers. In addition, mung beans have a wealth of other health benefits including:

  • per 1 cup cooked: 14 g protein, 15 g fiber, 1 g fat, 4 g sugar
  • high levels of manganese, potassium, magnesium, folate, copper, zinc and various B vitamins
  • considered to help defend against lifestyle-related diseases including cancer, heart disease, diabetes and obesity
  • can be used cooked or sprouted
  • according to the Journal of Chemistry Central, “mung beans have biological activities including antioxidant, antimicrobial, anti-inflammatory, antidiabetic, antihypertensive, lipid metabolism accommodation, antihypertensive and antitumor effects”

Sources: Healing with Whole Foods and draxe.com

Mung-Beans_text-overlay_20160504

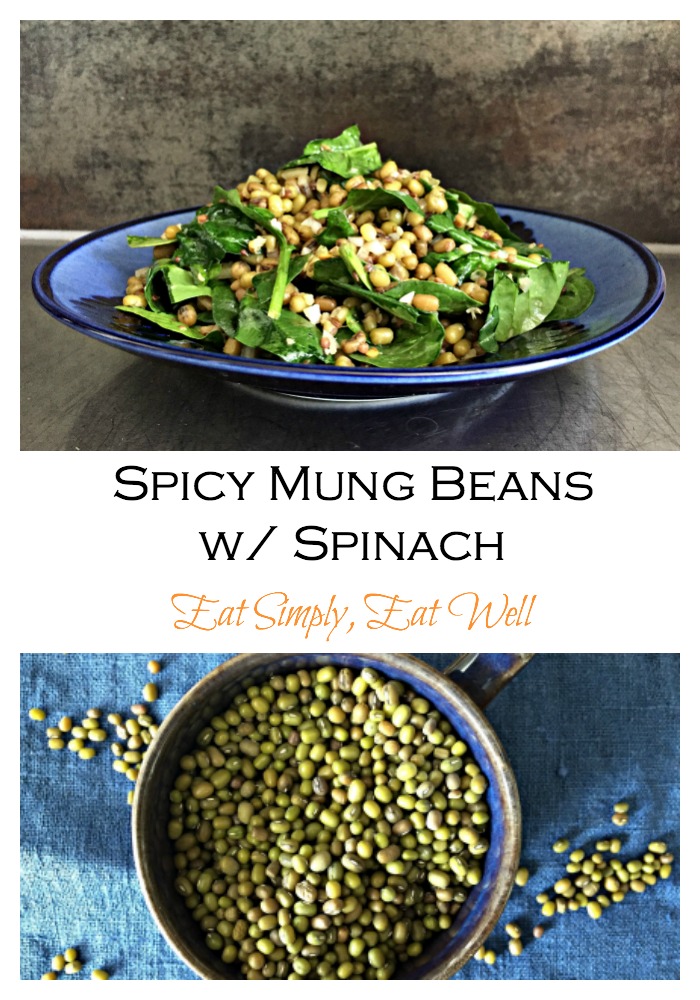
These little green beans are nutrition power houses, so you’ll benefit from adding them into your diet on a regular basis.

Cooked alone with just salt, mung beans can be a little bland, so I’ve created a recipe that calls for the mung beans to be tossed in a spicy marinade while still smoking hot so that the soak up all the flavor.

You can make these a few days ahead: they’ll stay good in an air-tight container in the fridge for up to five days. Unlike some other beans, mung beans don’t give you a gassy stomach – so you can use these without the fear of embarrassing yourself or suffering from other discomfort later. Great news, right?

Mung-Beans-spicy_overhead_logo_20160504

Spicy Mung Beans

First, cook the beans:

  • 2 1/2 cups / 1.2 liters cold water
  • 1 cup / 2.5 dl dried mung beans

Bring the water to a boil and add the mung beans. Reduce the heat to a simmer and cook for 25 minutes. You want the mung beans to be tender but with a slight firmness to them. Try not to overcook them – you don’t want them falling apart!

Then make the marinade:

  • 3 tablespoons olive oil
  • 1 teaspoon fennel seeds or aniseed
  • 1 teaspoon yellow mustard seeds
  • 1/8 teaspoon chili flakes
  • 1/2 teaspoon ground cumin
  • 1/2 teaspoon sea salt
  • 1/4 teaspoon freshly ground black pepper
  • 1/2 yellow onion, minced
  • juice of 1/2 lemon
  • 2 handfuls of spinach, rinsed and spun dry

Heat the olive oil over medium-high heat in a small pot. Add the fennel seeds or aniseed, mustard seeds and chili flakes. Place a lid on the pot and cook until you hear the mustard seeds begin to pot. Pour the oil and spices into a mixing bowl. Add the cumin, salt, pepper, onion and lemon and stir well.

Final steps:

Place the rinsed spinach leaves into the bowl on top of the marinade. Drain the cooked, hot mung beans and pour the beans into the bowl. Stir well to completely coat the beans in the marinade, then cover the bowl with a large plate for 5 minutes.

Serve warm or cold either as a side dish or on top of a nice green salad.

Makes roughly 2.5 cups / 5 dl

Eat simply, eat well,

Ann

Did you like this recipe? Do you have your own favorite way of cooking mung beans? Let me know in the comments below, and please share the recipe with your friends!

Have you signed up for the ESEW newsletter yet? Go get your copy by filling out the form at the top right of this page.

Mung-Beans_spicy_Pinterest_20160504

Filed Under: Main Course, Salad, Sides, Vegan, Vegetarian

Healthy Fried Rice

May 2, 2016 by aplough

Healthy-Fried-Rice_text_20160502

The word Fried Rice doesn’t always conjure up images of health food – but there’s no reason it can’t be a delicious and healthy dinner choice.

The first thing is to change white rice to brown if you haven’t already made the shift. White rice has very little nutritional value since the bran is removed, so basically our bodies process it quickly as a sugar source, causing an insulin spike, and that’s just no good for anyone.

If you eat a lot of fried rice, then switching to brown rice will do your body a big nutritional favor by adding a nice dose of healthy fiber along with along with significant amounts of magnesium and vitamin B6, and small dose of iron. Pretty great, hey?

This fried rice recipe is also loaded with cooked, steamed and raw veggies for to add flavor, texture and nutrients, as well as eggs for protein.

Even better – this fried rice recipe is super fast if you have cooked rice ready to go. Here’s a tip: whenever you make brown rice, make a big batch and freeze it in 1 cup /2.5 dl portions so that you can thaw it quickly and add it to dishes like this one, soups, or serve it up with some simple stir-fried vegetables. It’s away to make fast food at home in little time and still control the ingredients that go into your food.

We enjoyed this dish on a sleepy Sunday afternoon after a morning spent outside, and it literally took 15 minutes to make the entire thing – which means you can fit this into your schedule any day of the week and ensure a healthy dinner that everyone will love. 

And summer is coming!

Which means pretty soon there will be a bounty of fresh veggies coming out of gardens and farmers markets. Here’s the perfect way to use them up.

Enjoy!


Healthy-Fried-Rice_detail_logo_20160502

Healthy Fried Rice 

  • 2 tablespoons olive oil
  • 1 yellow onion, diced
  • 1 carrot, diced
  • 1 large or 2 small garlic cloves, peeled and minced
  • 1 cup/2 dl cubed fresh zucchini
  • 1 1/2/4 dl cup cooked brown rice
  • 1/2 teaspoon salt + more to taste
  • 1/4 teaspoon freshly ground black pepper
  • 3 eggs, beaten  + 2 tablespoons cold water
  • 2 large handfuls fresh spinach, rinsed and roughly chopped
  • 2 green onions, thinly sliced

In a large, heavy-bottomed frying pan over medium heat, warm the oil and add in the onion and carrot. Cook for 5 minutes or until onions are translucent. Add the garlic and zucchini and cook 3 minutes more. Add the rice, eggs, salt and pepper and stir in well. Allow the mixture to cook, undisturbed, for 5 minutes, then flip the mixture over in small portions and cook for 2 minutes more. Place the spinach on top of the mixture and put the lid on. Steam the spinach for 1-2 minutes until just wilted. Add the green onion, stir the onion through the mixture, and serve.

Serves 4.

Eat simply, eat well,

Ann

Did you like this post? Let me know in the comments below, and please share this with your friends!

Have you signed up for the ESEW newsletter yet? If not, scroll back up to the top of the page and fill out the form at the top right to get the recipes and tips in your mailbox. 

Healthy-Fried-Rice_Pinterest_20160502

Filed Under: Gluten-free, Main Course, Meatless Monday, Vegetarian

Stuffed Eggplant

April 27, 2016 by aplough

Stuffed-Eggplant_forkandknife_title_20160427

If you’ve been reading this blog for a while, it’s no secret that I love eggplant. Once roasted, this odd purple vegetable goes from stiff and a bit rubbery to smooth and luscious, and it pairs well with tomatoes, onion, lemon and olive oil to make a superbly easy and satisfying main course.

So often vegetables are pushed to the sides of our plates, served up alongside a hunk of meat, but it’s time to of put vegetables where they belong: front and center as the main course. 

Stuffed-Eggplant_Roasted_20160427

You can, of course, serve this stuffed eggplant as a side dish, but I assure you, once you’ve tasted these, you’re not going to be out looking for meat! Filled with a mixture of whole wheat couscous, fresh cherry tomatoes, spring onion and cilantro, and flavored with olive oil, lemon, smoked paprika and chili – these beauties are good served warm or at room temperature – which means you can make them ahead, use the leftovers for lunch, or even freeze the extras for a delicious meal later.

The middle east has a version of stuffed eggplant which is a thing of legends: Imam biyaldi (the Imam fainted). The story goes that a young Turkish bride was given 12 large pots of the finest, most expensive olive oil for her husband. She made a stuffed eggplant dish stuffed with tomatoes, onions, garlic – and copious amounts of olive oil. Her husband loved the dish so much that he asked her to make it every single day. She did – for 12 days. On the 13th day, the stuffed eggplant was absent from the table. “Why?” asked the disappointed husband? “my dear, we are out of olive oil and I cannot make it until you purchase some more.” Upon hearing that the expensive gift had been completely used up, the Imam fainted. Imam biyaldi.

My version uses olive oil too, and flavors of the middle east, though it is not like the traditional Turkish dish. I think you’ll love this, though! The recipe can be easily scaled up or down depending on the size of the crowd you are serving, and any leftovers will be fought over the following day. I typically serve 2 eggplant halves per person; though you could also serve one half plus a salad for a lighter meal.

Stuffed-Eggplant_plated_1_20160427

Stuffed Eggplant

First, prepare the eggplant:

  • 2 medium-sized eggplants
  • olive oil, salt and pepper

Heat oven to 200°C/400°F.

Cut the eggplants in half lengthwise through the stem. Lay the eggplants cut-side up on a parchment-lined baking tray. Using a small paring knife, cut a cross-hatch into the cut side of the eggplant. Sprinkle each eggplant generously with salt and pepper and drizzle with olive oil.  Bake for 40-45 minutes until golden brown and very soft. Remove from oven.

Stuffed-Eggplant_eggplant-collage_20160427

Make the filling:

  • 1 cup/ 2.5 dl dried, whole wheat couscous*
  • 2 cups / 5 dl boiling water
  • 1 package cherry tomatoes
  • 1 small bunch of cilantro = 1 cup chopped stems & leaves; reserve the top leaves for garnish.
  • 2 green Spring onions, thinly sliced
  • 1/2 teaspoon + 1/2 teaspoon salt
  • 1/4 teaspoon pepper 
  • 1/4 cup/ 1/2 dl extra virgin olive oil
  • Zest and juice of one organic lemon
  • 1/2 teaspoon smoked paprika
  • 1/8 teaspoon chili powder

*To make it gluten-free, use millet, cooked according to packet instructions.

Pour the couscous into a small bowl and add 1/2 teaspoon salt and the boiling water. Cover with a plate and allow it to absorb the water for 5 minutes.

Cut the cherry tomatoes into into fourths and place into a medium-sized bowl. Add the chopped cilantro, green onion, remaining 1/2 teaspoon salt, pepper, olive oil, paprika, chili powder, lemon zest and lemon juice. Mix well to combine. Check the couscous to make sure it has absorbed all of the water. Fluff it lightly with a fork, then add it to the tomato mixture. Stir well to combine. Taste; adjust seasoning if necessary.

Top each eggplant half with 3/4 cup / 1.5 dl of the couscous mixture, pressing it down into the eggplant shell. I find it’s easiest to do this with my hands, but you can do this however you wish. Transfer the stuffed eggplant to individual serving plates and garnish with the remaining cilantro.

Serve warm or at room temperature.

Serves 2-4.

Eat simply, eat well,

Ann

Did you like this post? Do you have your own version of stuffed eggplant? Let me know in the comments below, and please share it with your friends!

Have you signed up for the ESEW newsletter yet? Make sure you don’t miss the recipes and tips I send out in to subscribers. Scroll back up to the top and fill out the form on the right-hand side!

Stuffed-Eggplant_Pinterest_vertical_20160427

Filed Under: Main Course, Meatless Monday, Uncategorized, Vegan, Vegetarian

  • « Previous Page
  • 1
  • 2
  • 3
  • 4
  • …
  • 8
  • Next Page »

Find me on social media

  • Bloglovin
  • Facebook
  • Instagram
  • Pinterest
  • Twitter

Looking for something?

Eat Simply, Eat Well 's gallery on Punk Domestics
  • Bloglovin
  • Facebook
  • Instagram
  • Pinterest
  • Twitter

Copyright © 2025 · Foodie Pro Theme by Shay Bocks · Built on the Genesis Framework · Powered by WordPress