Eat Simply, Eat Well

Healthy recipes & tips to help you live the good life. by Ann Plough

Vegan Coconut Scones

August 18, 2016 by aplough

Do you love baked goods but just kind of wish some of them were a little healthier? These vegan coconut scones are the answer to that.

20160818_Vegan-coconut-scones

I have to admit: I love baking. I love the process of creating the product; love the smell of it baking in the oven; love the moment when the timer dings and I can pull that delicious thing out of the oven to barely cool before digging in. Don’t you?

But nowadays I try to really limit white flour and sugars, many of my old baking favorites need to be reworked in order to fit into my new way of eating. It doesn’t always work out well. Sometimes, using an alternative for the flours or a different kind of sugar or choosing to leave out eggs can make it really difficult to create a successful product. (As a full disclaimer: I do use eggs – often. They are a great source of protein, and a staple in my diet – I just didn’t want to use them here.). The risk is the product won’t hold together and instead, you’ll have a crumbling mess instead of a cookie, muffin or cake. Or, you’ll change out the sugar and you’ll have a puffy product where you wanted a flat one or a chewy product when you’d been hoping for cakey. It’s tricky sometimes, but so worth experimenting with to find out what works.

I was craving scones. I wanted something that could replace both a biscuit and the sweeter scones often served with coffee or tea, but also wanted to experiment with using coconut oil to replace butter and plant-based milk to replace cow’s milk. I wanted something that was delicious all on it’s own, but suitable with everything.

Could I make these vegan? Turns out, yes I could. And since coconut itself has a natural sweetness, I opted to take the (small) risk of leaving out the sugar as well.

The results are really delicious.

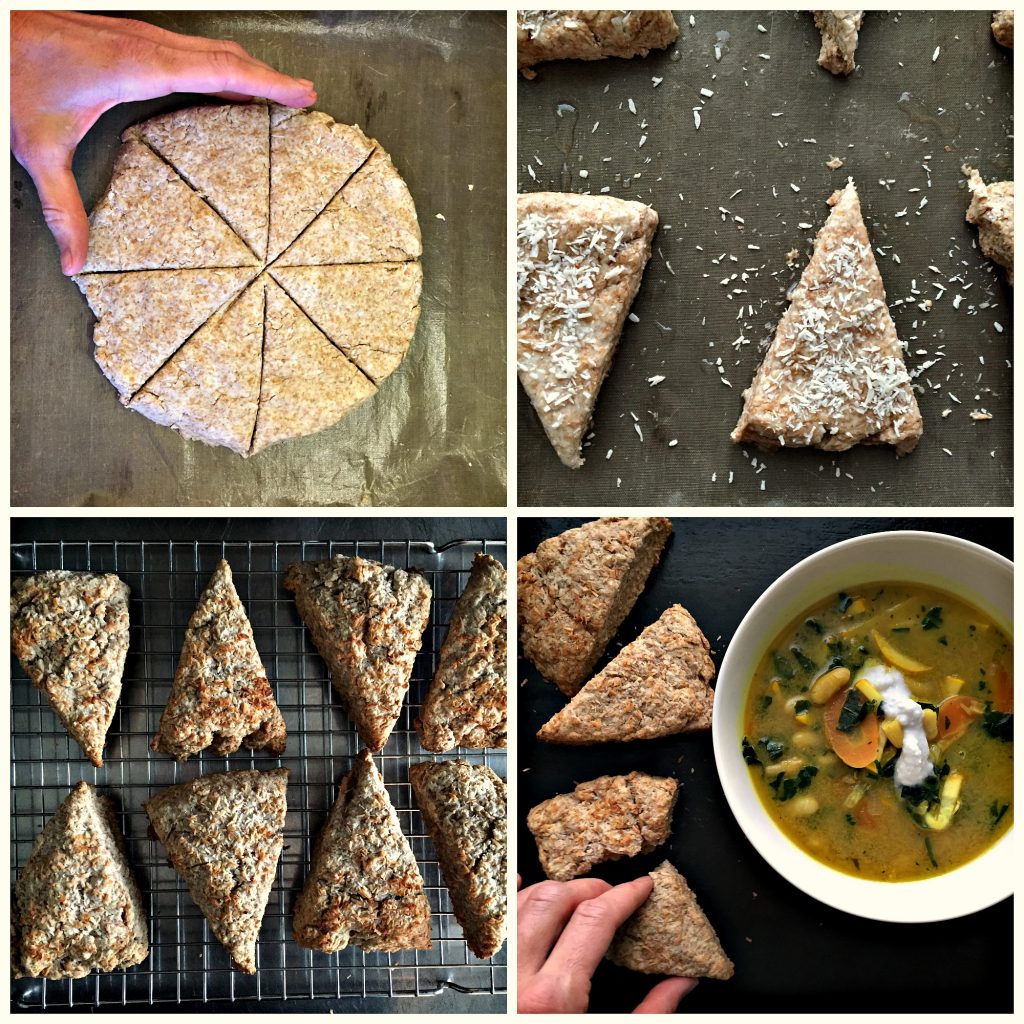
These simple, healthy, vegan coconut scones are super versatile: you can take them to the sweet side with a mixed berry chia jam (or any other jam of choice) or work them into a savory meal and serve them with one of your favorite soups. 

20160818_vegan-coconut-scones_sweetorsavory

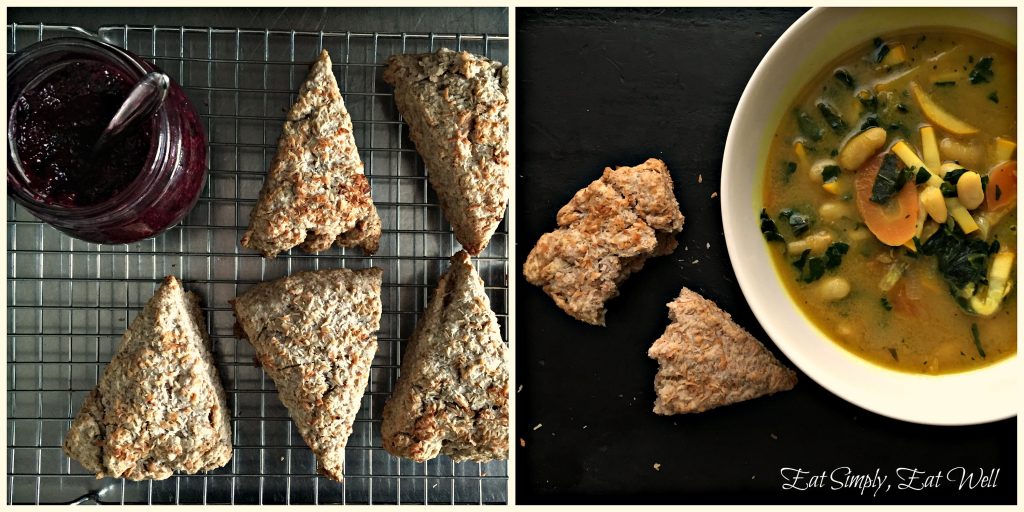
Packed with good fats, all the fiber and nutrients of whole grains, and no added sugar, eggs, or dairy, you’ll find that these suit pretty much any occasion. If you or someone you’ll be serving these to has a gluten sensitivity – no problem! Simply substitute your preferred gluten-free flour mix for the whole wheat flour. If you can, try to get a gluten-free mix that contains a lot of whole grains so that you’ll be getting good nutrients and fiber from the flour. Unfortunately, a lot of commercial gluten-free flour mixes use refined flours, and while gluten-free, are really just another form of junk food.

Note: you’ll be using a chilled can of coconut milk with this, so, pop one in the fridge in the morning of or the night before the day you want to make these. Sorry – but that small hassle is worth it!

20160818_vegan-coconut-scones_square-prep

Vegan Coconut Scones

  • 2 cups whole wheat flour 
  • 1/4 cup desiccated coconut
  • 1 tablespoon baking powder
  • 3/4 teaspoon salt
  • 1/4 cup cold coconut creme (from chilled can of coconut milk)
  • 1/4 cup coconut oil
  • 3/4 cup coconut water (from chilled can of coconut milk)
  • 2 tablespoons melted coconut oil + 2 tablespoons desiccated coconut for the tops of the scones

Preheat oven to 400°F/200°C. Line a baking tray with parchment paper.

Combine the flour, coconut, baking powder and salt in a medium-sized baking bowl. Add the coconut creme and coconut oil, and use a pastry blender or fork to mix the fats into the flour until the mixture forms lumps about the size of peas. Pour in the coconut water and stir until it begins to clump.

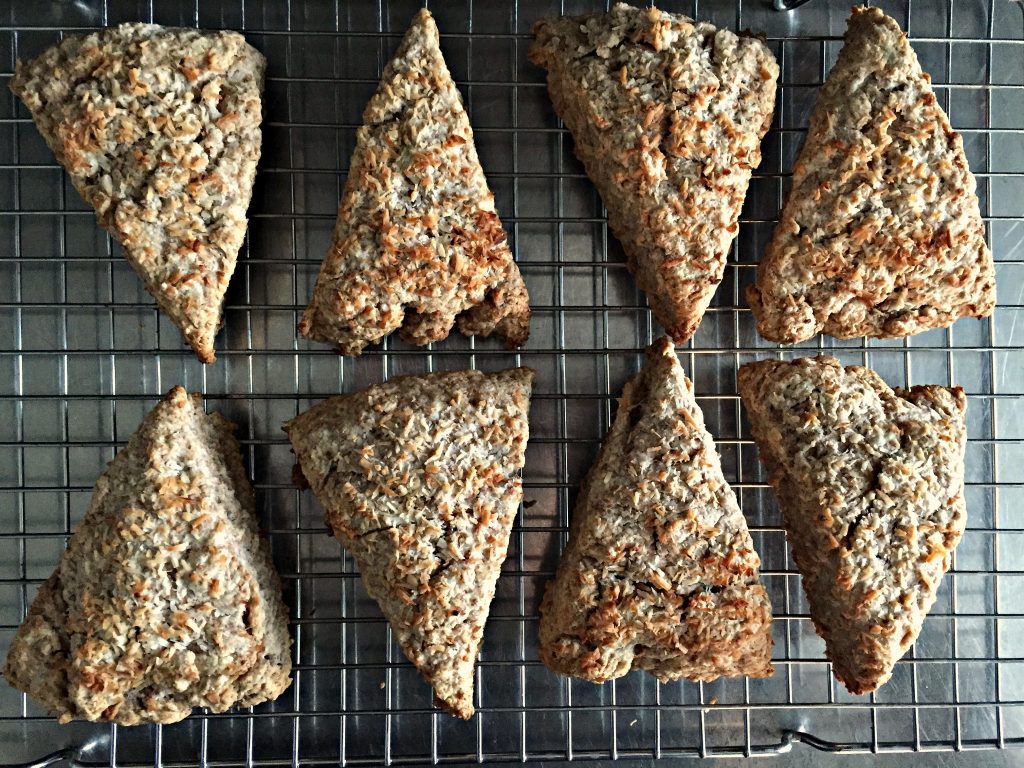
Gather the mixture in your hands and gently press it into a ball. Transfer the ball of dough to the baking sheet and press it into a 1″/2.5 cm high round disk. Cut the disk into 8 even triangles. Separate the triangles and space them out evenly on your baking tray. Brush the top and sides of each scone with coconut oil and sprinkle desiccated coconut over the top of each one. Bake for 10-12 minutes until puffed and golden brown. Remove from oven and transfer to a cooling rack.

Makes 8 scones.

Did you like this recipe? I’d love to hear from you in the comments below!

Are you missing out on the ESEW newsletter? Scroll back up to the top of the page and sign up for our newsletter with recipe tips and tricks for busy, hungry, good-food-loving people. 

Eat Simply, Eat Well,

Ann

20160818_vegan-coconut-scones_pinterest

Filed Under: Appetizers, Bread, Breakfast, cake, Dairy-free, Dessert, Sides, Snack, Vegan, Vegetarian

Tomato Cheddar Pie

July 14, 2016 by aplough

Tomato Cheddar Pie. Just look at this thing.

Tomatoe_Pie_logo

Summer doesn’t get any better than this: long, light days. Clear blue skies. Mostly warm. Scattered showers to keep the dust down and the garden watered. And produce ripening almost faster than we can pick it. Down in my small garden patch, the cherry tomatoes are really starting to take off, each small orb a delightful sweet & sour mouthful. And of course, eating them fresh is always a good idea, but if you want to take them up another notch, why not pie?

Tomatoes_raw

Now pie. That’s a really good idea.

This Tomato Cheddar Pie was inspired by a recipe in Fine Cooking from the Aug/Sept 2013 issue, and has been modified slightly to suit my own taste. I think you’re going to love it, especially if you have a bowl of tomatoes in your kitchen begging to be consumed right now.  The base is buttermilk biscuit which creates a nice flaky layer upon which the rest of the ingredients sit. The tomato juices blend with the herbs and cheese, but thanks to a sprinkle of corn flour over the base, it doesn’t turn into a soggy mess.

Tomato Pie_raw

A few notes: 

  • if you’re gluten-free, feel free to sub in your favorite gluten-free flour
  • if you don’t use dairy, sub in your favorite nondairy cheese and use the olive oil option instead of butter
  • I love the combination of chives, oregano and basil in this, but get creative – the tomatoes can take it! It’ll be delicious either way.
  • Serve a wedge of this with a large salad of fresh summer greens and you’ll have fans gathering around your table.
  • If you reheat this, I recommend doing so in the oven for best results.

Tomato Cheddar Pie

Preheat the oven 200°C/425°F.

To prepare the buttermilk crust:

  • 1 3/4 whole wheat flour (or the gluten-free flour of your choice)
  • 2 teaspoons baking powder
  • 1/2 teaspoon sea salt
  • 6 tablespoons cold butter (or 6 T olive oil, added together with the buttermilk for a vegan option)
  • 1/2 cup buttermilk (or 3/4 teaspoon oat milk + 1 teaspoon lemon juice) + extra if the dough feels too dry
  • 1 heaped tablespoon fine cornmeal

Combine the flour, baking powder, sugar and salt in a bowl. Add the butter to the flour mixture, and using a pastry blender or a fork, mash the butter into the flour mixture until the butter is the size of peas. Pour the buttermilk over the flour-butter mixture and stir to combine, using your hands to shape it gently. Don’t over process – you just need it to hold together. If you handle it too much, the crust will be tough.

Wet your hands so your fingers won’t stick to the dough. Press the dough into the bottom and up the sides of an oiled 10″/25 cm tart tin. Sprinkle the cornmeal over the base of the crust in an even layer.

For the filling:

  • 20 large cherry tomatoes cut in half or 3 large tomatoes cut into slices
  • 2 tablespoons fresh chives, chopped
  • 2 teaspoons dried oregano
  • 1/2 – 3/4 cup cheddar cheese, grated on the large holes of a box grater
  • 1 tablespoon olive oil
  • 1/2 teaspoon salt
  • 1/4 teaspoon ground pepper
  • 1/4 cup fresh basil leaves

Sprinkle half of the chives, oregano and cheese over the bottom of the tart crust. Arrange the tomatoes, cut side up, to cover the bottom of the tart. Sprinkle the salt and pepper evenly over the tops of the tomatoes. Drizzle with olive oil. Sprinkle the remaining chives, oregano and cheese over the tops of the tomatoes. Place the pie into the hot oven and bake 20-25 minutes until the crust is golden brown around the edges and the tomatoes begin to brown as well.

Remove from oven and cool 10 minutes. Sprinkle the fresh basil leaves over the top, and serve.

Serves 6-8.

Eat Simply, Eat Well.

Ann

Did you enjoy this post? Please let me know in the comments below, and share it with your friends on social media!

Tomato_Pie_Pinterest

Filed Under: Breakfast, Main Course, Meatless Monday, Uncategorized, Vegetarian

5-Minute Berry Parfait

April 20, 2016 by aplough


Berry-Parfait_title_20160420

5-Minute Berry Parfait

This beautiful dessert has got to be one of the easiest, fastest desserts you could ever hope for. Just four ingredients, this lovely parfait is the perfect afternoon snack, quick breakfast on the go or makes a great dessert. Any way you eat it, you’ve gotta love its simplicity.

The secret to the creaminess is the silken tofu – an ingredient available nearly everywhere.

Berry-Parfait_process_2_20160420

Tofu is made by first soaking dried soybeans overnight and then grinding them to a pulp. The pulp is then pressed through a cheesecloth to remove the milk – producing soy milk. You could bring the soy milk to a boil, pour it into jars and enjoy it fro there – it’s really delicious.

To make tofu, the soy milk is heated and then some kind of acid – vinegar, lemon juice – is added to make the milk coagulate and form curds. The process is much like making ricotta cheese, actually. the curd mass is spooned into a tofu mold and the excess liquid is drained away.

Silken tofu is simply tofu that has been drained in a mold, but hasn’t been pressed, so it contains higher levels of moisture than the firm tofu you might want to use in stir fries. It has a texture similar to a full fat Greek yogurt – but with a lot less fat and none of the dairy, making it a great option for people with lactose intolerance or who want to simply avoid dairy. It’s creamy texture lends well to desserts like this one – or to dips and spreads, such as a tofu mayonnaise.

Berry-Parfait_four_20160420

5-Minute Berry Parfait

Tofu can be a great, healthy addition to your diet:  

  • Per 100g it has: 55 calories, 2.5 g fat, 2.1 g carbohydrates, 6.0 g protein 
  • it is good source of calcium, manganese and copper
  • It’s real food and close to its whole food form and undergoes much less processing than most soy consumed in food products today.
  • Much of the soy grown in the world today is GMO soy and heavily sprayed with pesticides, so it’s really important to spend the money and buy organic soy products. Check your labels!
  • As this article by Bon Appetit says, there has been a lot of research done around soy and whether or not you should be eating it. As with so many products, it depends…and everything should be eaten in moderation. Most scientists agree that moderate amounts of soy from a good source offer multiple health benefits.

Personally, I love soy and eat it once a week or so. Desserts like this one are a wonderful way to include it in your diet, so get out your blender and let’s get rolling!

Berry-Parfait_single_logo_20160420

5-Minute Berry Parfait

5-Minute Berry Parfait

  • 1-300g package silken Tofu (e.g. Pehmeä Jalotofu)
  • 2 cups / 5 dl mixed fresh or thawed frozen berries
  • 1 – 2 tablespoons pure maple syrup (depends on your test and the tartness of the berries)
  • 1 teaspoon grated lemon zest
  • 2 teaspoons hemp hearts or Chia seeds

Combine the tofu, 1 1/2 cups/4 dl of the berries, maple syrup and lemon zest in a blender. Blend on high speed until smooth. Taste; and add more maple syrup if you prefer it sweeter.

To make the parfaits:

  • pour a heaped spoonful of the remaining mixed berries into the bottom of four short, clear glasses.
  • add 2-3 heaped tablespoons of the soy-berry mixture to each glass
  • pour another spoonful of berries over to form another layer
  • divide the remaining soy-berry mixture between the four glasses and spoon the remaining berry mixture on the top
  • sprinkle each parfait with 1/2 teaspoon of hemp hearts or Chia seeds, or both.

Serves 4.

Eat simply, eat well,

Ann

Did you like this post? If so, please leave a comment below and share it with your friends!

Have you signed up for the ESEW newsletter yet? If not, scroll back up to the top of this page and fill out the form on the upper right-hand side so you can get the free recipes and tips I send out to subscribers.

Berry-Parfait_Pinterest_20160420

Filed Under: Breakfast, Dairy-free, Dessert, Gluten-free, Snack, Vegan

  • 1
  • 2
  • 3
  • …
  • 6
  • Next Page »

Find me on social media

  • Bloglovin
  • Facebook
  • Instagram
  • Pinterest
  • Twitter

Looking for something?

Eat Simply, Eat Well 's gallery on Punk Domestics
  • Bloglovin
  • Facebook
  • Instagram
  • Pinterest
  • Twitter

Copyright © 2025 · Foodie Pro Theme by Shay Bocks · Built on the Genesis Framework · Powered by WordPress