Eat Simply, Eat Well

Healthy recipes & tips to help you live the good life. by Ann Plough

Pan-roasted Cauliflower with Roasted Smoked Garlic and Cilantro

May 21, 2015 by aplough

pan-roasted-cauliflower-garlic-cilantro

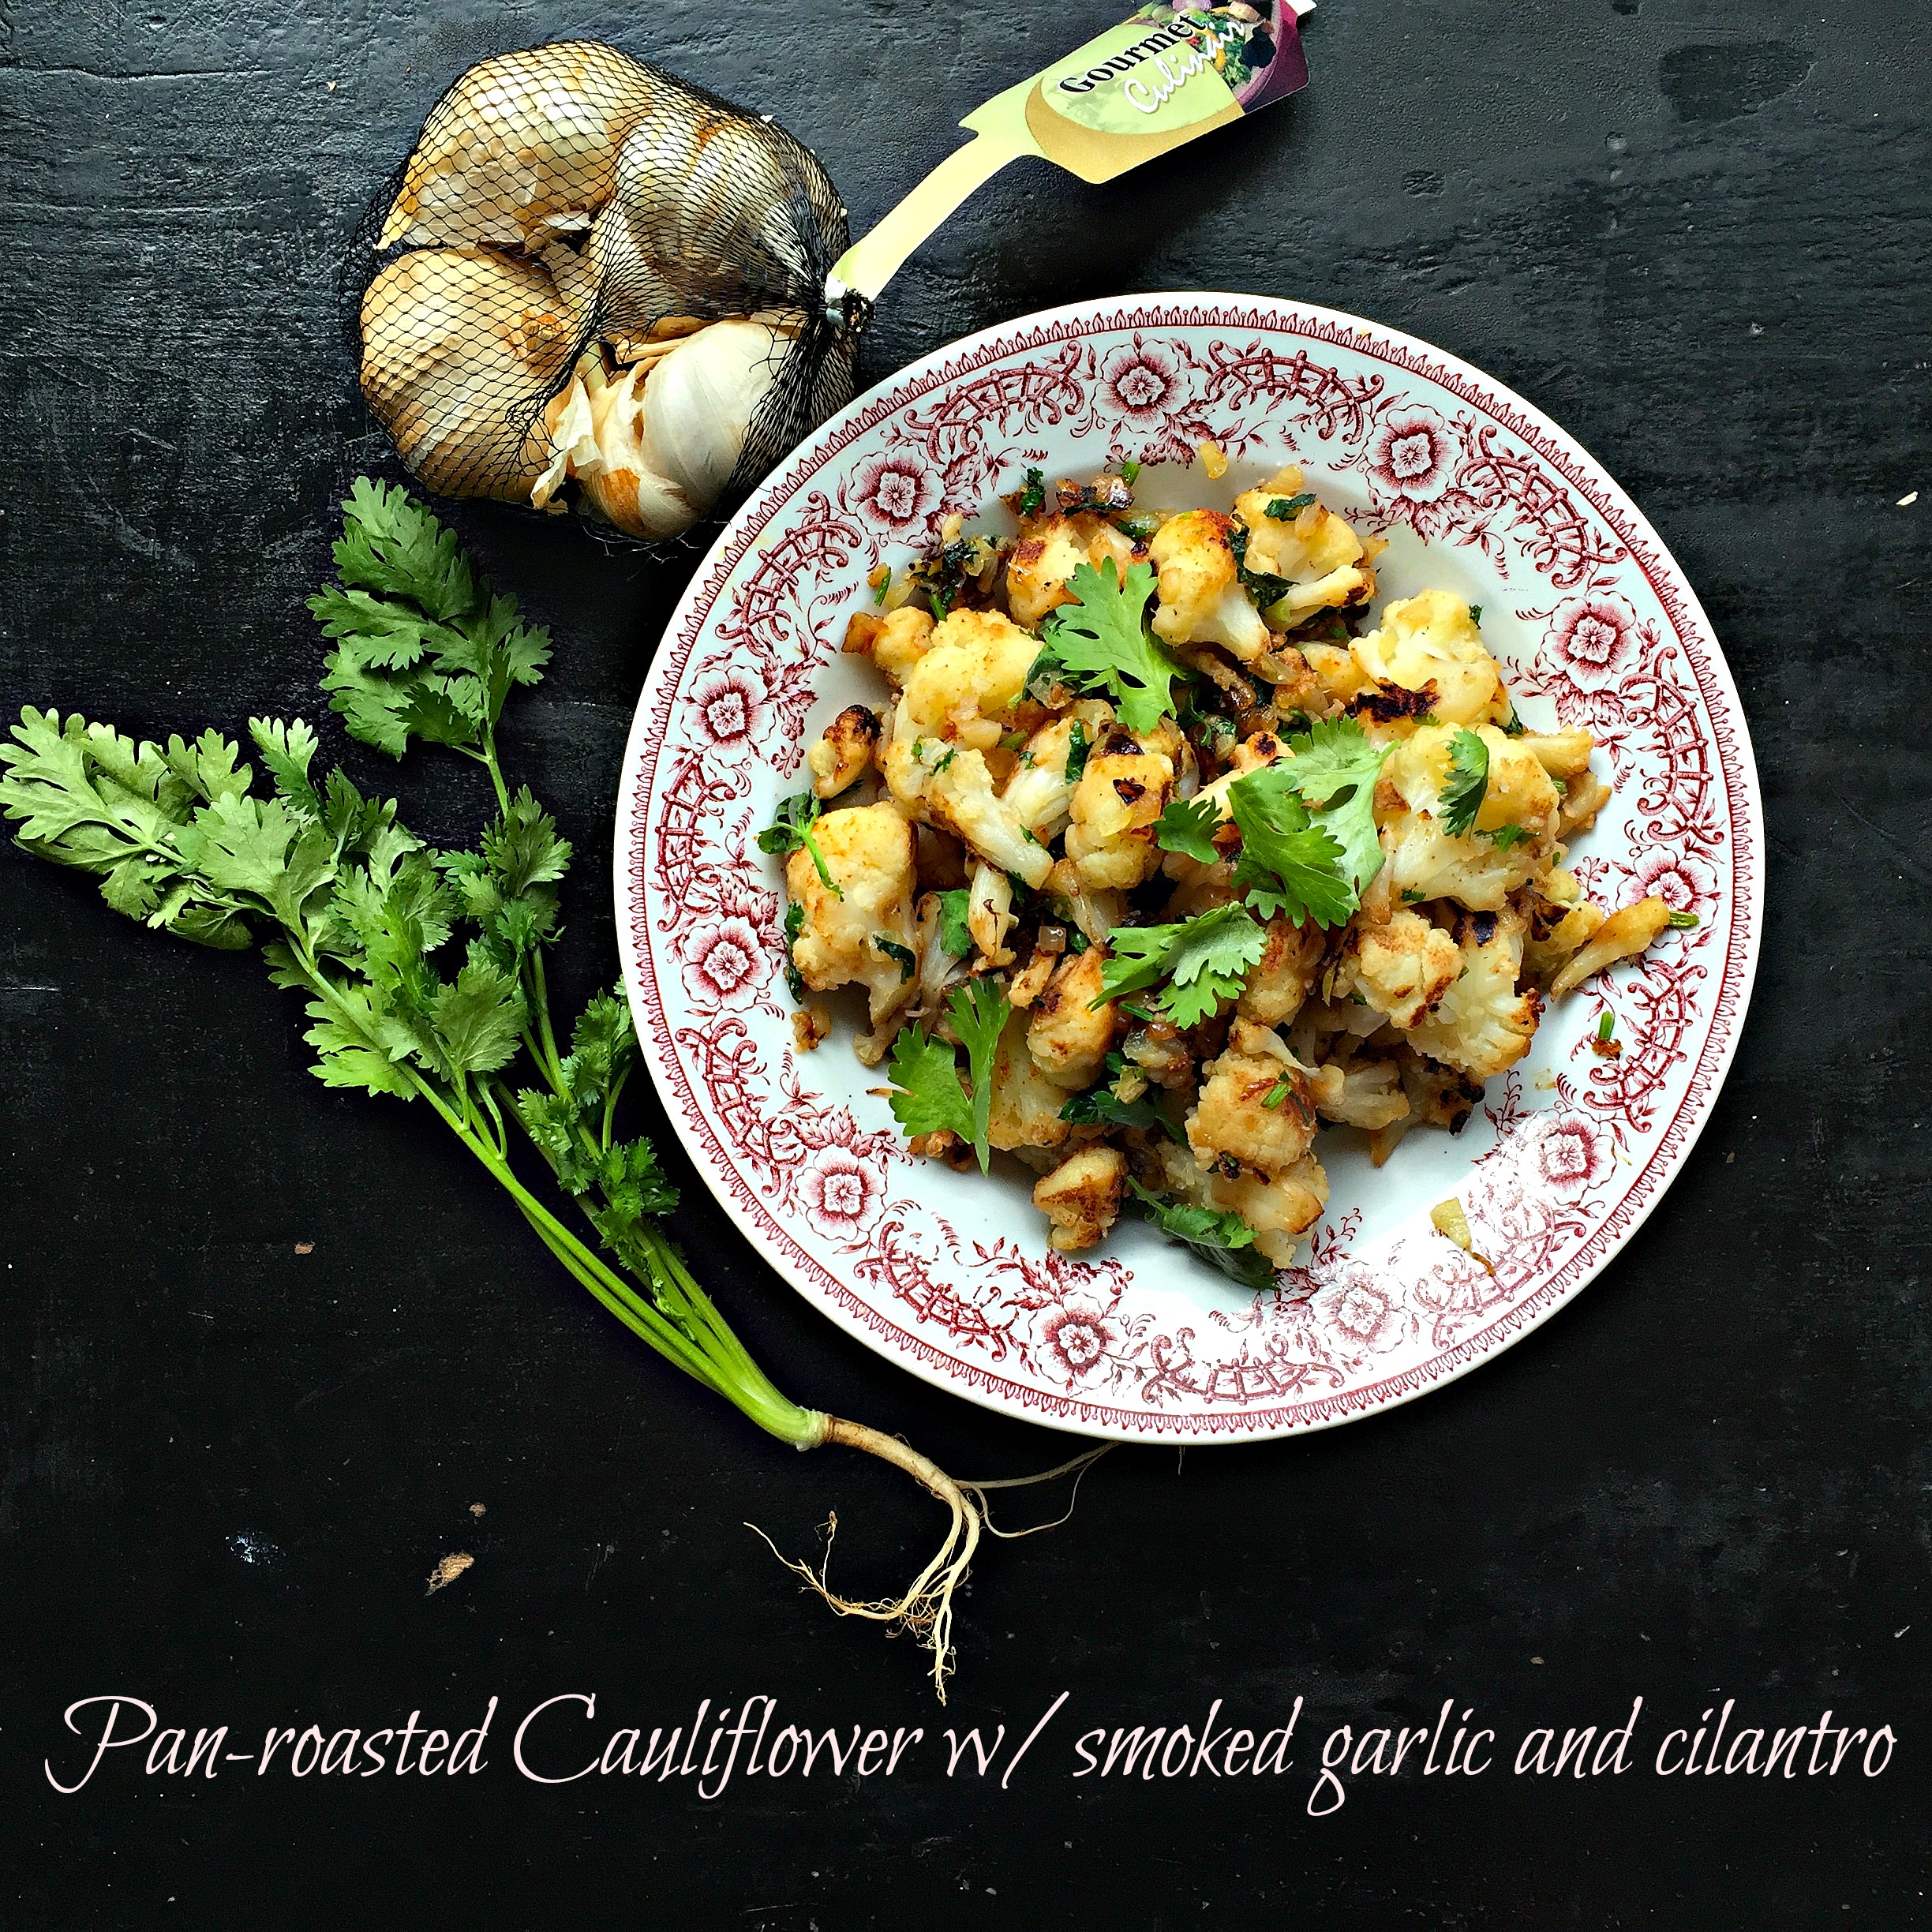
Here is a dish loaded with flavor that can be made ahead and refrigerated or served immediately. This pan-roasted cauliflower can be made as easily with frozen cauliflower as it can with fresh, with no compromise in flavor whatsoever. Serve it hot, straight from the pan, or cold; or reheat it as suits you. It makes a great side dish for any meat dish or alongside flavorful lentils or beans; it pairs well with a meat burger or a veggie burger; and really shines on a plate full of a variety of vegetables and salads – so make a huge pan and bring it to your next potluck.

If you don’t have smoked garlic, no stress. Just use fresh garlic as noted in the recipe, but less of it, and serve this dish up with pride. Or if you’re like me, you’ll dip your fork in again over and over until suddenly there is none to share but you are feeling inexplicably satiated and happy, and considering how soon you can make it again.

Pan-roasted Cauliflower with Smoked Garlic and Cilantro

  • 1/2 head fresh cauliflower cut into florets or 500g frozen cauliflower
  • 1 yellow onion, diced
  • 1 head smoked garlic, roasted (see note) or 6 cloves fresh garlic, minced
  • 1/4 cup fresh cilantro, leaves and stems chopped
  • 1/2 teaspoon salt
  • 1/4 teaspoon freshly ground black pepper
  • 1/8 teaspoon ground Cayenne pepper
  • 2 teaspoons lemon juice

Heat 1 teaspoon of oil in a pan over medium-high heat.  Add the onions and cook until the onions are soft and translucent. Add the cauliflower.  If using fresh cauliflower, add 2 tablespoons of water.  If using frozen cauliflower, no water is needed. Cover the pan with a lid and cook for 5 minutes. Remove lid and allow the cauliflower to continue to cook and the liquid to evaporate.  Use a spatula to flip the cauliflower occasionally as it begins to brown and crisp.

Once the cauliflower is nice and crisp, 5-7 minutes, remove from heat and stir in salt, roasted, smoked garlic and cilantro. Sprinkle with lemon juice and serve.

Serves 2-4 as a side dish.

Note: To roast the garlic, preheat oven to 200°C/400°F. Wrap an entire head of smoked garlic (or use normal garlic if you can’t find smoked) in aluminum foil. Place in the oven and bake for 40 minutes. Remove; allow to cool; then squeeze each of the garlic cloves out of their paper shell onto a plate. Roughly chop the garlic. If you are in a rush, you can simply chop the garlic and add it to the pan once most of the liquid has evaporated from the cauliflower. You won’t get the same depth of flavor, but it will be delicious nevertheless. You can also use regular garlic if you can’t find the smoked version for a slightly different flavor profile.

Filed Under: Appetizers, Sides Tagged With: cauliflower, cilantro, vegan

3-Ingredient Ice Cream (non-dairy)

April 23, 2015 by aplough

3-ingredient-ice-cream

Can you feel the summer coming on in?  Can you? Oh yes. The weather is heating up, even way up here in the cold, dark north, where it isn’t really so dark anymore at all.  Nowadays the sun rises just before I do, 5:37, and sets just before 9:00 PM.  There are a lot of productive daylight hours available, plus a few extra for the slacking (ahem) research I do on social media.  And the temperatures are rising, too: a balmy 11°C today!  Things are definitely improving.

I was working from my living room today, with the sun beaming in through the windows making it feel like a summer day in July. I happily went to change into something lightweight with short sleeves. I realized that now is the perfect time to share with you the simplest frozen treat you’ll ever be happy get your spoon into:  3-ingredient, non-dairy ice cream.

A couple of years ago, frozen banana ice cream hit the blogosphere and food story headlines as the best thing since, well, ice cream itself.  It’s comprised of one ingredient: frozen bananas.  The bananas are blended up directly from their frozen state into a unbelievably sweet, creamy and delicious snack. You won’t believe there’s no added sugar, dairy, or anything dodgy.

This 3-ingredient ice cream takes that concept one step further by allowing you to create different flavors using banana as your base.  Feel free to play with this, but do get those bananas in your freezer right away so you can start by tonight, at least.

I suggest slicing the bananas before you freeze them as it makes blending them much easier.  In fact, if you have room in your freezer, spreading the slices out on a pan or plate not only makes them freeze faster, it also makes it faster to grab a handful, pop them in the blender, and get on with making this fabulous anytime treat.

Did I mention that this is a healthy indulgence?  You’ll get only natural sugars and good quality coconut fat as you consume one spoonful after the other, along with a good dose of potassium from the bananas and antioxidants and fiber from the berries (or other fruit you choose).  Sounds like the perfect post-workout snack to me!

3-Ingredient Non-dairy Ice Cream

2 frozen bananas (sliced before freezing)

2 cups of your favorite frozen berry or fruit (I used raspberry)

1 can organic coconut milk, 400 ml

Place all of the ingredients into a blender.  This works best if you have a powerful blender that can easily process frozen ingredients, but if you don’t, just stop the blender several times through the blending process, use a spatula to loosen and frozen chunks stuck near the blade, and blend again, until thick and smooth.

Now if you’re desperate for a cold treat, feel free to serve immediately and dig in.  It will be super soft but hard-to-resist-delicious. If you can stand to wait, though, you’ll get something even better, verging on sorbet.  It’s well worth the 3 or so hours it will take in your freezer to get there.

Serves 4.

Did you like this recipe? Let me know in the comments below and share with your friends!

Filed Under: Dessert, Snack Tagged With: non-dairy, vegan

Roasted Beet Salad

April 15, 2015 by aplough

RoastedBeetSalad

Why do we peel beets?

This is a question I asked myself yesterday while staring down at 400g of raw beets that were waiting to go into the oven.  I decided that I was going to end the madness then and there; here and now.  No more peeling these gorgeous, deep red roots.  So I scrubbed them and rinsed them to remove any excess dirt, cut away the parts that looked a little less edible, piled them into a casserole dish with the lid firmly in place, and shoved the whole thing into a 400°F/200°C oven to roast for 60 minutes.

Once out of the oven, I let them steam as the cooled, lid still in place, until they were room temperature and easy to handle.  At this point, I’d usually peel them.  Not this time.  This time, I cut off and discarded the bottoms of the beets and then sliced through the tender flesh, creating burgundy disks, and through again to create matchsticks – which I then transferred into a bowl where the salad dressing lay waiting.  A quick toss, a little extra dill, and this salad was ready to go.  Yes – the board was still dripping with bright pink beet juice, and the tips of my fingers were a bit stained too, but none of that crazy, senseless wrestling with the harmless skin of the beet.

So go ahead – save yourself the time, the energy, the mess – and leave them whole.

This is a salad that I could enjoy by the bowlful.  It’s also a beautiful addition to a plateful of other roasted veggies and grains, or as a side dish.  We ate it with roasted cauliflower and smoked garlic; cooked chickpeas; cooked whole oat groats; and a bit of Moroccan sweet potato salad.  The only sad thing was that we ran out of this salad way too quickly.  But it’s easy to make again – just let your oven do most of the work, and leave those peels where they belong: on the beet. You won’t even notice.

You can make this and serve it immediately, or make it a day ahead. It’s best at room temperature or slightly warmed.

Roasted Beet Salad w/ dill, mustard, sesame & lemon

400g/1 pound beets

3 tablespoons fresh or frozen dill, roughly chopped

zest of one lemon

juice of 1/2 lemon

2 tablespoons sesame oil or extra virgin olive oil

1 tablespoon pure maple syrup

1/2 teaspoon sea salt

1 tablespoon unhulled sesame seeds

1 tablespoons yellow mustard seeds

Preheat oven to 200°C/400°F.  Scrub and rinse the beets and cut away any visible blemishes.  Place them in a greased casserole dish with a fitted lid.  Place the casserole dish in a hot oven and roast the beets 60 minutes or until tender when pierced with a fork.  (may take slightly longer if your beets are large; you can also cut large beet in half to speed the cooking process).

While the beets roast, make your vinaigrette by combining the dill, lemon zest, lemon juice, oil, maple syrup, and salt in a medium-sized bowl.  Set aside to marinate.

Pour the sesame seeds and mustard seeds into a small pot and place over medium-high heat.  Shaking the pan slightly every 10-15 seconds, allow the seeds to toast until they begin to hop and pop and steam begins to rise.  Pour the immediately into the bowl with the marinade.

Once the beets are ready, remove from the oven and allow them to cool with lid firmly in place until you can easily handle them; at least 15 minutes. Remove the beets from the pan; cut off the bottom and discard it. Cut the beet into slim disks and then cut the disks into matchsticks. Transfer the beets to the bowl with the marinade and toss well to coat. Add extra dill for garnish, if desired.

Serve immediately, or make it up to one day in advance.  Best when served at room temperature.

Serves 4 as a side dish.

Filed Under: Salad, Sides Tagged With: beets, vegan

  • 1
  • 2
  • Next Page »

Find me on social media

  • Bloglovin
  • Facebook
  • Instagram
  • Pinterest
  • Twitter

Looking for something?

Eat Simply, Eat Well 's gallery on Punk Domestics
  • Bloglovin
  • Facebook
  • Instagram
  • Pinterest
  • Twitter

Copyright © 2025 · Foodie Pro Theme by Shay Bocks · Built on the Genesis Framework · Powered by WordPress