Eat Simply, Eat Well

Healthy recipes & tips to help you live the good life. by Ann Plough

Roasted Celeraic with Wild Mushrooms and Pearl Barley

October 3, 2013 by aplough


Roasted Celeraic with Wild Mushrooms and Pearl Barley

I’ve bet you’ve seen celeraic:  the knobby, bulbous, root covered vegetable looks a bit like an unshapely brain or turnip gone awry.  This root vegetable is grown the world over and its taste is reminiscent of the celery stalk.  It can be roasted, fried, boiled or eaten raw – and adds a wonderful flavor to soups and casserole.  Sometimes called celery root – it’s really not the same thing.  I bought one celeraic at the Slow Food Farmer’s market in Fiskars last weekend and have been waiting all week for the chance to cook it up (Jenny’s beautiful pictures captured the market scene so well – thanks Jenny!).  

Faces of Celeraic, part 1
Faces of Celeraic, Part 2

Thanks to Jamie Oliver and his book Save with Jamie, which I picked up during a recent business trip to London, today I tried celeraic roasted in a cast-iron casserole dish on a bed of barley & wild mushrooms.  Jamie’s new book is fantastic – I highly recommend getting it and perusing the pages with an eye not simply for saving money, but in search of inspiration:  as is often the case when people look to get a delicious but low-cost meal on the table, Jamie uses a lot of vegetables in his recipes.  In fact, many of the recipes are vegetables only, letting the flavors of high-quality vegetable shine, just as they should, especially this time of year when many vegetables are being harvested at their peak of flavor and ripeness, and should be celebrated.

In the spirit of highlighting the vegetables, I made a riff on Jamie’s roasted celeraic, which he descriptively calls Zombie Brain, but instead of cooking it up as two dishes that were combined for serving, I put everything in my trusty 2-liter/quart cast iron covered casserole dish and shoved it in the oven for a good long roast.  I also skipped the truffle oil, cream and mustard because I didn’t want to use them,  and changed the quantities of the herbs, used wild mushrooms instead of button and generally had a good time playing with the recipe.

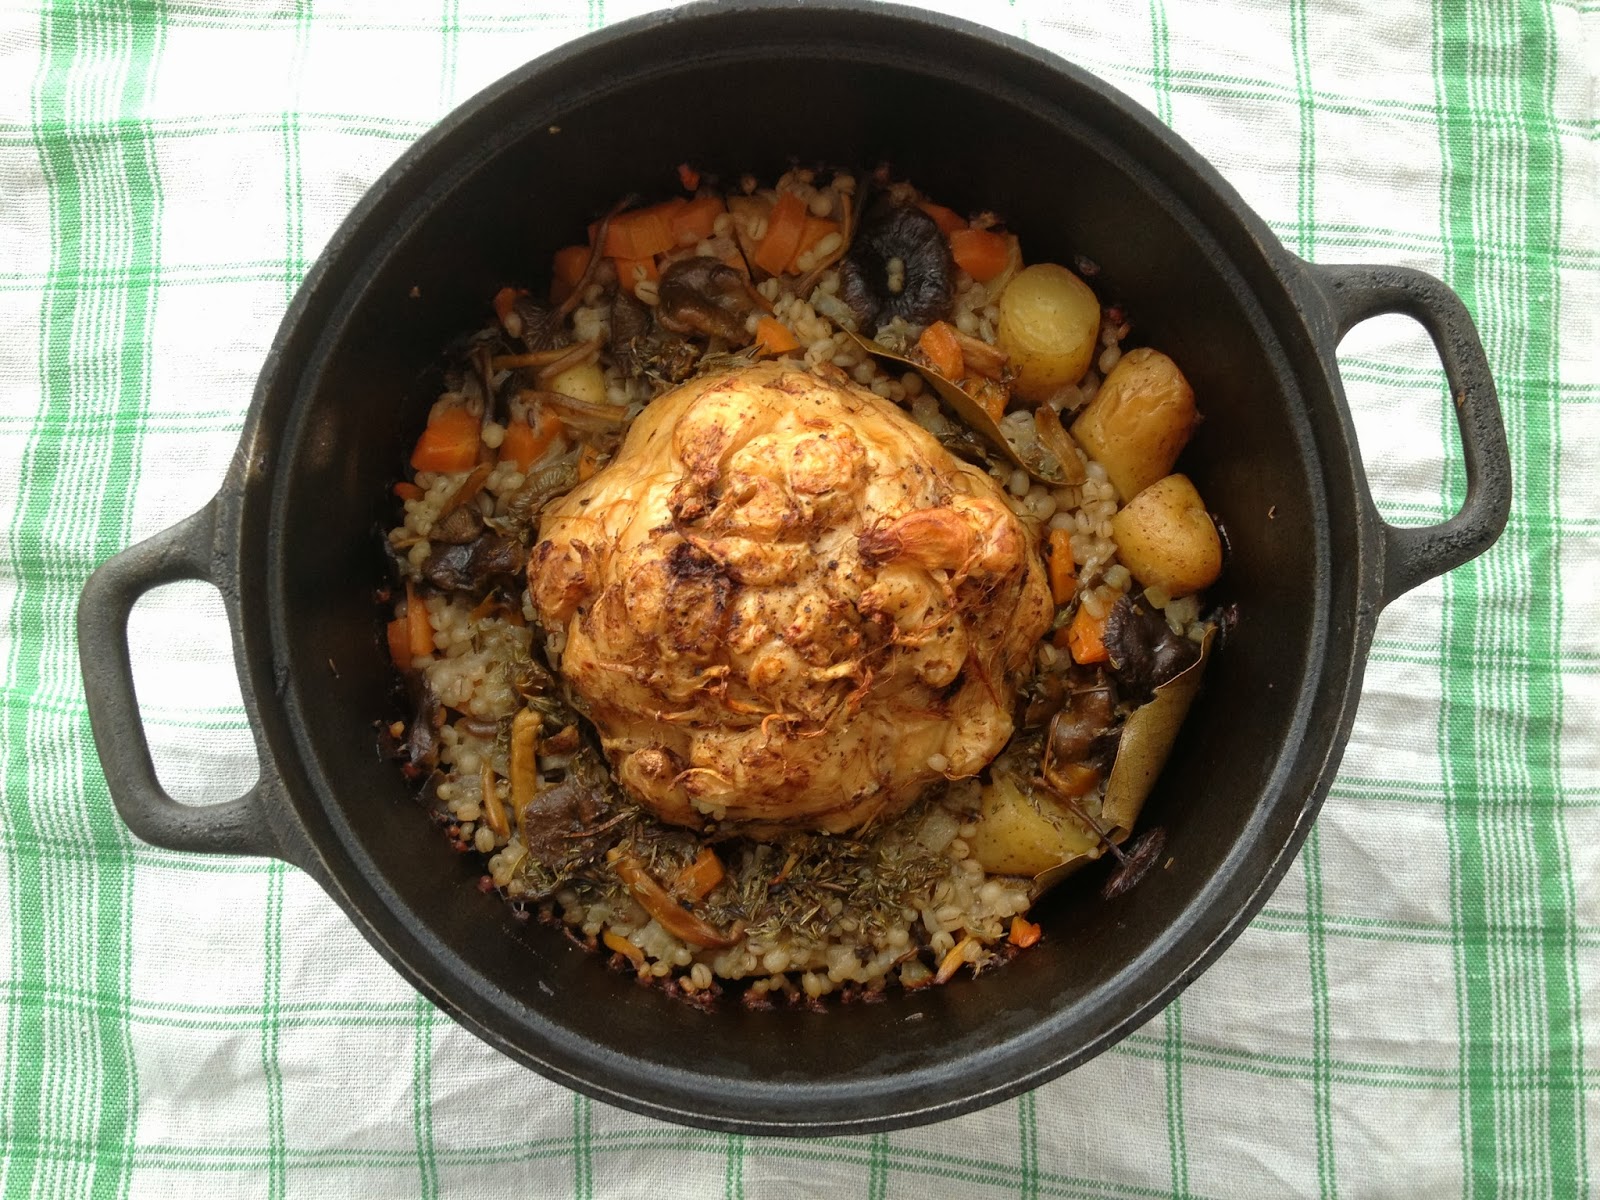
Still on the stovetop, butter just added.  Now into the oven…

Because of the flavors of the wild mushrooms, the variety of vegetables and herbs, and the long roast, there is no need to add any sort of broth to this dish.  Plain old tap water will serve you well here, and the dish comes out of the oven fragrant – smelling of herbs and garlic and a scent I couldn’t quite name, with a flavor deep with umami and very satisfying.  Fresh out of the oven, the celeraic looks for all the world like a little mini pork roast, and can be sliced up into thin slices in the same way.

Sliced celeraic served with roasted barley, mushrooms and vegetables

Make this on a weekend; or alternatively, make this some weeknight when dinner is over and you’re planning to spend the evening lounging on the couch with a good book.  It comes together in 10 minutes or so, and can be refrigerated to be reheated the next day.  It’s the perfect Fall or Winter dish.

Note:  if you use dried mushrooms instead of fresh, rehydrate them by pouring boiling water over the top and allowing to sit for 5 minutes.  Add both the mushrooms and the soaking water to the casserole dish and proceed with the recipe, subtracting the amount of soaking water from the amount of water in the recipe below.

Up close & personal:  Roasted Celeraic with Wild Mushrooms & Pearl Barley


Roasted Celeraic with Wild Mushrooms and Pearl Barley
inspired by Jamie Oliver’s Save with Jamie

2 tablespoons olive or vegetable oil
one onion, diced
1 liter/quart wild mushrooms or 1 cup dried & rehydrated with 1 cup boiling water (I used yellow foot mushrooms / suppilovahvero)
3 cloves garlic, peeled and left whole
2 carrots, peeled and roughly chopped
1 cup large potato, peel on and cut into chunks
3 bay leaves
1 teaspoon dried thyme
1 1/2 teaspoons salt
10 grinds of fresh ground pepper or heaped 1/4 teaspoon
1/2 cup pearl barley (could replace with brown rice to make gluten-free)
1/2 liter water / 2 cups water
1 celeraic
1 tablespoon butter, optional (omit to make recipe vegan)
salt and pepper to sprinkle

Preheat oven to 200°C/400°F.

Heat a 2 liter/quart cast iron casserole dish over medium-high heat (you can also do this in a separate pot if you are using a ceramic casserole dish instead).  Add the oil, onion and mushrooms and cook, stirring occasionally, until the mushrooms start to release their liquid, about 2 minutes.  Add in the remaining ingredients except for the celeraic, and bring to a boil.  Reduce heat and simmer for 10 minutes.

Scrub the celeraic under cool running water to remove and dirt around the roots.  Turn off the heat, stir the vegetable mixture well, and push the celeraic, root side up, down into the mass of vegetables.  Place the butter on top of the celeriac, if using.  Sprinkle the celeraic with a pinch of salt and a grind or two of pepper. Place the lid on the casserole dish and place it in the oven.

Allow to roast, undisturbed, for 90 minutes to 2 hours until the celeraic is golden brown and can be easily pierced through with a butter knife.

To serve, slice the celeraic into thin slices as you would a pork roast, and serve up the slices with spoonfuls of the mushroom barley mixture.  Finish with a sprinkle of fresh chives.

Serves 4.

Filed Under: Main Course, Meatless Monday, Uncategorized, Vegetarian

Canning Tomatoes – it’s easier than you think

September 1, 2013 by aplough

Home-canned tomatoes are a beautiful sight.
Can you believe it?  This is post #100 for Eat Simply Eat Well.  It’s been so much fun writing this blog.  Thanks for your feedback.  Thanks for stopping by every now and again to enjoy.  I’m looking forward to many more months of sharing recipes that hopefully make you want to get off the couch and get cooking.  

Of course I say this as I come back from a long break – By now you’re probably wondering where I’ve been and if all I’m going to be talking about from here on out is tomatoes.  It’s summer!  What can I say:  it’s seems like all of nature has been erupting with a bounty of good things to eat, so if I’m not working (or eating), I’m out collecting and preparing the good stuff to save for later.  It’s been a great season:  cucumbers turned into Dill Pickles and Bread & Butter pickles; Jams:  wild raspberry, blackcurrant, bilberry, apple jelly; applesauce; dried apples; chanterelles; fresh caught perch – now fileted and in the freezer; both frozen & dried red bolete mushroom; both frozen & dried boletus edulis = porcini – which have been so abundant this year that I cannot actually pick all the ones I’ve been finding.  And then there have been tomatoes.  Not from my garden – those failed miserably and were still green at picking time last week, but there are plenty of other great sources, so go get a box because canning them just got easier.

If you have ever canned tomatoes – you know the normal drill:

  1. Get a big pot of water and set it to boil over the stove.
  2. Get your jars washed and sterilized – either boiled in the canning pot, on the rinse cycle in the dishwasher, or in the oven.
  3. Rinse your tomatoes.  Cut an “x” in the top.  Drop them into the boiling water.  Wait a little bit.  Pull them out with a tong or spoon or ladle, splashing water all over you, the counter, the stove, the floor…
  4. This step differs depending on what camp you are in over whether you need to stop the cooking process so the peel will come off, or if you need to get the peel off quickly and get them cooking to kill the enzymes that cause “float” (more on that in a minute)
    1. the first option is that you also have a large bowl with ice cubes floating in it.  You shock the tomatoes, peel the skin off with your fingers and dump them in another bowl.  By this time you have a least 3 bowls and 2 pots going (one for the hot water, one for the lid) and a third pot (your canning pot) quite possible waiting in the wings.  You have spoons and pots everywhere.  You’re hot and sweaty, a tad bit stressed, possibly slightly grumpy
    2. the second option is that you dump the tomatoes you’ve pulled out of boiling water, put them on a counter top/in a strainer; peel quickly; dump them into a wide, shallow pan, and bring quickly to a boil.  You’re nearly as sweaty and grumpy as you would be with option 1.
  5. When all the tomatoes are peeled, you pull out your sterilized jars from wherever they are, dump your fresh lids into their own pot of hot water, and begin transferring the tomatoes into the jars, wiping the rims, sealing with the hot lid, and setting them in the canner for a nice long boil (35 minutes for pints/0.5 liter and 45 minutes for quarts/1 liter).
Whew.  Feels like a big, hot, sweaty, drippy, messy project.  And it doesn’t take a lot of review of the above five steps to realize that the combined effort of steps 3 & 4 are enough to make many people turn away from the stove top, grab a cookie, and head back to the couch.
What if I were to tell you that you can mostly skip those steps all together, still dispense of the annoying tomato peel AND eliminate the problem of tomato float?
Peeling almost done…
Yes, Yes!  some of you are thinking. 
Wait – what’s tomato float?  Some of you may be wondering.  It’s a harmless, but cosmetic side effect that comes when an enzyme in the tomatoes that causes the pulp to separate from the juice isn’t killed quickly enough.  Heat kills it – but what happens normally is that the tomatoes are boiled so the outside of the tomato is cooked in order to get the peel off, but the inside is raw.  They are then shoved into jars this way, sealed, and then into the hot water canning bath where the heat rises, but not quickly to eliminate the effect of the enzyme.  You’ll know you have tomato float when you have a mass of tomatoes pushing up toward the top of the jar above a quantity of clearish liquid.  It’s safe to use, it’s just not pretty.
I discovered this trick by chance, and only because I happened to make roasted salsa just before I was planning on canning tomatoes.  My goal wasn’t to get rid of the skin – just to char it.  So I heated the oven as hot as it would go on the broil setting.  I halved as many tomatoes as would fit and laid them face-down on a parchment lined pan, placed the pan 4″/10 cm from the top of the oven, and set the timer for ten minutes.  The skins weren’t quite broiled at this point (for the salsa I let them go a little longer) but what did happen is that the skins puckered and split a bit, and when I tested one, pulled very easily away from the tomato.  
A new, time-saving, mess-saving technique was born.  There will be no more of the hot water dipping for those juicy, red or golden orbs.  Here’s how I now can tomatoes:
2-2.5 kg/4.5-5 lbs of nice, ripe tomatoes
bottled lemon juice
makes 3 pints/0.5 liter jars
  • Get your canning jars ready & sterilized.  My favorite is to use the shortest cycle on the dishwasher with no detergent (assuming your jars are clean and only need sterilization; otherwise wash them).  But whatever method you are comfortable with is fine.
  • Turn your oven on to the highest broil setting.  Line a baking tray with parchment paper
  • Rinse about 5 lbs of tomatoes.  Slice them in half. Lay them cut side down on the baking tray.  Get happy with it: you can pack them in nice and tight.  Place the tray in the oven for 10 minutes.
  • Meanwhile, get a small pot of water heating for the lids.  Place a large frying pan or other wide, shallow pan and place it on the stove.  Get your funnel handy.  Set a pair of tongs and a fork nearby.  This is going to be easy.
  • When ten minutes is up, pull the pan out of the oven, place in on a heat-proof surface.  Using a fork and a pair of tongs, grab the skin of each tomato at the top with the tongs, hold the tomato in place with the fork, and pull the skin back toward the stem end and off.  Discard the skin.  Repeat with the remaining tomatoes. 
  • Peel tomatoes using a tongs and a fork.
    1. Crush the tomatoes with a fork or a potato masher.  Pour all of the tomatoes into the wide, shallow pan.  Bring to a boil over high heat; reduce to medium-high, and boil for 5 minutes to kill the enzymes I talked about earlier. At this point, turn off the heat underneath the pot you’ll use for lids.  Add the lids and let them heat up.
    2. Boil crushed tomatoes for five minutes.
    3. Place your jars on the counter top.  Add 1 tablespoon of bottled lemon juice to each pint/0.5 liter and 2 tablespoons of bottled lemon juice to each quart/1 liter.  Note:  DO NOT use fresh lemon juice.  It’s not acidic enough and your tomatoes will not be shelf-stable.  Ladle in the tomatoes to fill each jar, leaving 1/2″/1.25 cm of space (head room) at the top of each jar.  Wipe the rim with a clean, damp towel.  Place the lid on top (or lid and ring if you are using the two part lid system – they don’t have these in Finland) and seal until it’s finger tight.  One way to make sure you don’t over-tighten is to stick your pinky finger out while you tighten the lid – try it!  It works.  You’ll get it just right. 
    4. Place the jars in a canning pot or tall stock pot.  If you have a canning rack, place the jars on the rack.  If you don’t, place a folded dish towel at the bottom of the pot to prevent direct contact between the heat source and the glass jar. Cover the jars with 1/2″/1.25 cm of water.  Bring to a boil.  Once boiling start timing the processing time:  35 minutes for a pint/0.5 liter; 45 minutes for a quart/liter).
    5. When the processing time is up, turn off the heat and let the jars rest for 5 minutes.  Remove the jars from the pot and set onto a thick dishtowel on the countertop.  Allow them to cool, undisturbed, until they are room temperature.  The tomatoes will be shelf-stable and good to use for at least one year.

    Sounds easy, right?  It is.  And you’ll love having your own tomatoes to use up all winter.  What are you waiting for?  Peak season for tomatoes is now.

    Oh – and that tomato float issue?  Solved.  Nothing but pure crushed tomatoes, top to bottom.  Enjoy!

    Filed Under: Uncategorized

    Preserving Tomatoes: Roast & Freeze

    July 21, 2013 by aplough

    In the Winter we can only dream of this.

    My house smells like tomatoes.  Roasted tomatoes, to be exact.

    For the past week, fresh, ripe, sweet tomatoes have followed me around.  From the farmer’s markets in Kotka and Hamina to the local grocery store; from favorite blogs to cookbooks; in my own garden – I’ve had tomatoes on my mind.  So when I came across fresh Finnish tomatoes being sold for €1.29 per kilo, and discovered that they were selling them in 5 kg boxes, I gleefully grabbed one and marched on home, dreaming of canning and jamming and stewing them for sauces and salsas and spreads.

    All great ideas to be sure, but there is something much easier and so tasty, that the the first 5 kg box was quickly followed by another 5 kg box, marching steadily down the same path via the oven and into the freezer.

    Roasted Tomatoes.  

    I have talked about these before.  It’s what I do with tomatoes in the winter – when I desperately want the flavor of tomato, but the watery, flavorless versions that grace supermarket shelves in the winters just simply don’t satisfy. Somehow the roasting takes away the sad blandness of a winter tomato and transforms it into something that elevates the recipe into which it’s being added.

    Slice.  Salt.  Oil.  Roast.  

    And then:  I started researching for those salsas & sauces.  Inevitably, Google led me to Food in Jars, that wonderful website for all things that can be preserved in a glass receptacle with a lid.  Marissa shared that one of her favorite ways to preserve tomatoes is to Roast and Freeze!  Why hadn’t I thought of this before?  The recipe is so easy it’s hardly a recipe at all.  But it needs to be here, because the next few posts on this blog are going to include recipes using roasted tomatoes, so we’ll be needing them soon.  Marissa suggests an overnight method:  cut the tomatoes, and salt and oil, put them in the oven overnight at 200°F/95°C and wake up to something glorious.

    So that’s what I did.  With 10 kg of tomatoes.  That’s a lot of tomatoes.  They are finally done.  I have now opened all of the windows to let the warm summer breezes take care of the lingering perfume of roasted tomatoes.  As for the tomatoes themselves, we’ll be working through those in the dark months of winter.

    It’ll be no problem – you see, I’ve been practicing already. The first thing that happened was J ate a handful directly off of the pan.  That’s a good sign that we’re moving in the right direction.  The next 10 or so went into omelettes, snuggled up next to goat cheese (recipe to follow – sorry to tease!).  Then a shy cup tossed into a risotto with fresh mozzarella (another recipe coming).   Then I start to dream of putting them in sandwiches. Toasting a fresh slice of ciabatta and topping it with a slice of good cheese and these tomatoes.  Making a tart and layering these tomatoes over the top just before it goes into the oven.  Tossing them into pasta with a little fresh parmesan and some chopped fresh herbs.

    I’m getting hungry.  I think I’m gonna need another 10 kg of beautiful summer tomatoes.

    Early morning sunlight.  Roasted Tomatoes.  Happy Day.

    Roasted Tomatoes for Preserving
    based on the method suggested in Food in Jars.

    Tomatoes in your desired or available quantity
    Salt
    Olive Oil

    Heat your oven to 200°F/95°C.  Slice the tomatoes into quarters, or if they are small, in half.  Arrange them cut side up on a parchment-lined oven tray.  Sprinkle them lightly with salt and drizzle olive oil over the top.  Put them in the oven, shut the door.  Go to bed.  Sleep well.  Wake up to the most wonderful smell of roasting tomatoes.

    The best thing to do is put these in the oven right after dinner – say 6:00 or 7:00.  That way, 10 – 12 hours later (yes, that’s how long it takes, but remember – you’ll be sleeping through most of it) when you are waking up, they’ll be done and you won’t spend the day peeking into the oven to check their progress and driving yourself crazy.

    Once the tomatoes are done, remove them from the oven and allow them to cool on the countertop.  Once they are cool – transfer them to large plates or trays, or if your freezer is large enough, place the pans into your freezer to allow the tomatoes to partially freeze (or thoroughly if you have something else to do and need to come back to them later).  Transfer the semi-frozen or frozen tomatoes to labeled Ziplock / MiniGrip bags and return to the freezer.  The reason I do this is to prevent the tomatoes from freezing together in one solid mass.  This way, I can take 2 or 20 out of the freezer as suits my recipe without needing to thaw a whole bag.

    5 kg of tomatoes yields 3 one-liter / -quart bags.

    Filed Under: Uncategorized

    • « Previous Page
    • 1
    • …
    • 20
    • 21
    • 22
    • 23
    • 24
    • …
    • 50
    • Next Page »

    Find me on social media

    • Bloglovin
    • Facebook
    • Instagram
    • Pinterest
    • Twitter

    Looking for something?

    Eat Simply, Eat Well 's gallery on Punk Domestics
    • Bloglovin
    • Facebook
    • Instagram
    • Pinterest
    • Twitter

    Copyright © 2025 · Foodie Pro Theme by Shay Bocks · Built on the Genesis Framework · Powered by WordPress