Eat Simply, Eat Well

Healthy recipes & tips to help you live the good life. by Ann Plough

Lemon Tart, Revised

February 19, 2012 by aplough

Come on over.

I have eaten 4 pieces of lemon tart in the last two days.  That’s a lot of lemons.  And eggs.  I am going to blame it on Harvey.  I don’t know Harvey.  I only know the recipe called Harvey’s Lemon Tart, by Marco Pierre White.  The ingredient list was fantastic:  vanilla bean in the crust.  Lemon zest and juice of 5 lemons in the filling.  9 EGGS!  Harvey said we shouldn’t skimp on the filling because the tart (that is, ONE tart) should be nice and full.  The tart pan should be 20 cm in diameter, he said.  The oven at 120°C.

Off we went, Johanna and I, to the local store to pick up our lemons and eggs and butter and cream to make Harvey’s tart.  We followed Harvey’s directions to the letter.  (or rather, Johanna did. I was busy with making the main course of Reindeer Lindström Burgers which you’ll have to try out as well!

I don’t own a tart pan of any size.  I do own a cheesecake pan that is roughly 28 cm in diameter.  We used this. The crust was baked first, at 220°C, and with the vanilla bean and lemon zest, smelled divine.  The cold lemon filling mixture (or rather half of it – there was WAY more filling than needed for one tart) was poured into the hot crust to seal it off so there would be no leakage.  Other than the butter dripping from the cheesecake pan (I guess I need to buy a tart pan with a removable bottom), this worked quite well.  We baked the tart at 120°C for 30 minutes as instructed, pulled it from the oven, and let it cool for one hour.  At this point, the filling was still…sloshy.  There was no way it was going to set.  Meanwhile, Johanna had made another tart with the leftover crust and filling, and the skeptic (yes, that would be me) had raised the oven temperature to 150°C.  After 30 minutes, this one looked beautiful, but not quite “jiggly”.  We cooked it 10 minutes longer, and what a beauty it was!

The garden will have to wait.

The perfect lemon tart to bring a bit of sunny Spring joy to a snowy winter day.  Despite Harvey’s poorly designed instructions.  Many thanks to Marco Pierre White – the vanilla bean in the crust is subtle genius.  And to Johanna for finding the recipe and making it so that I could take pictures and write this post.

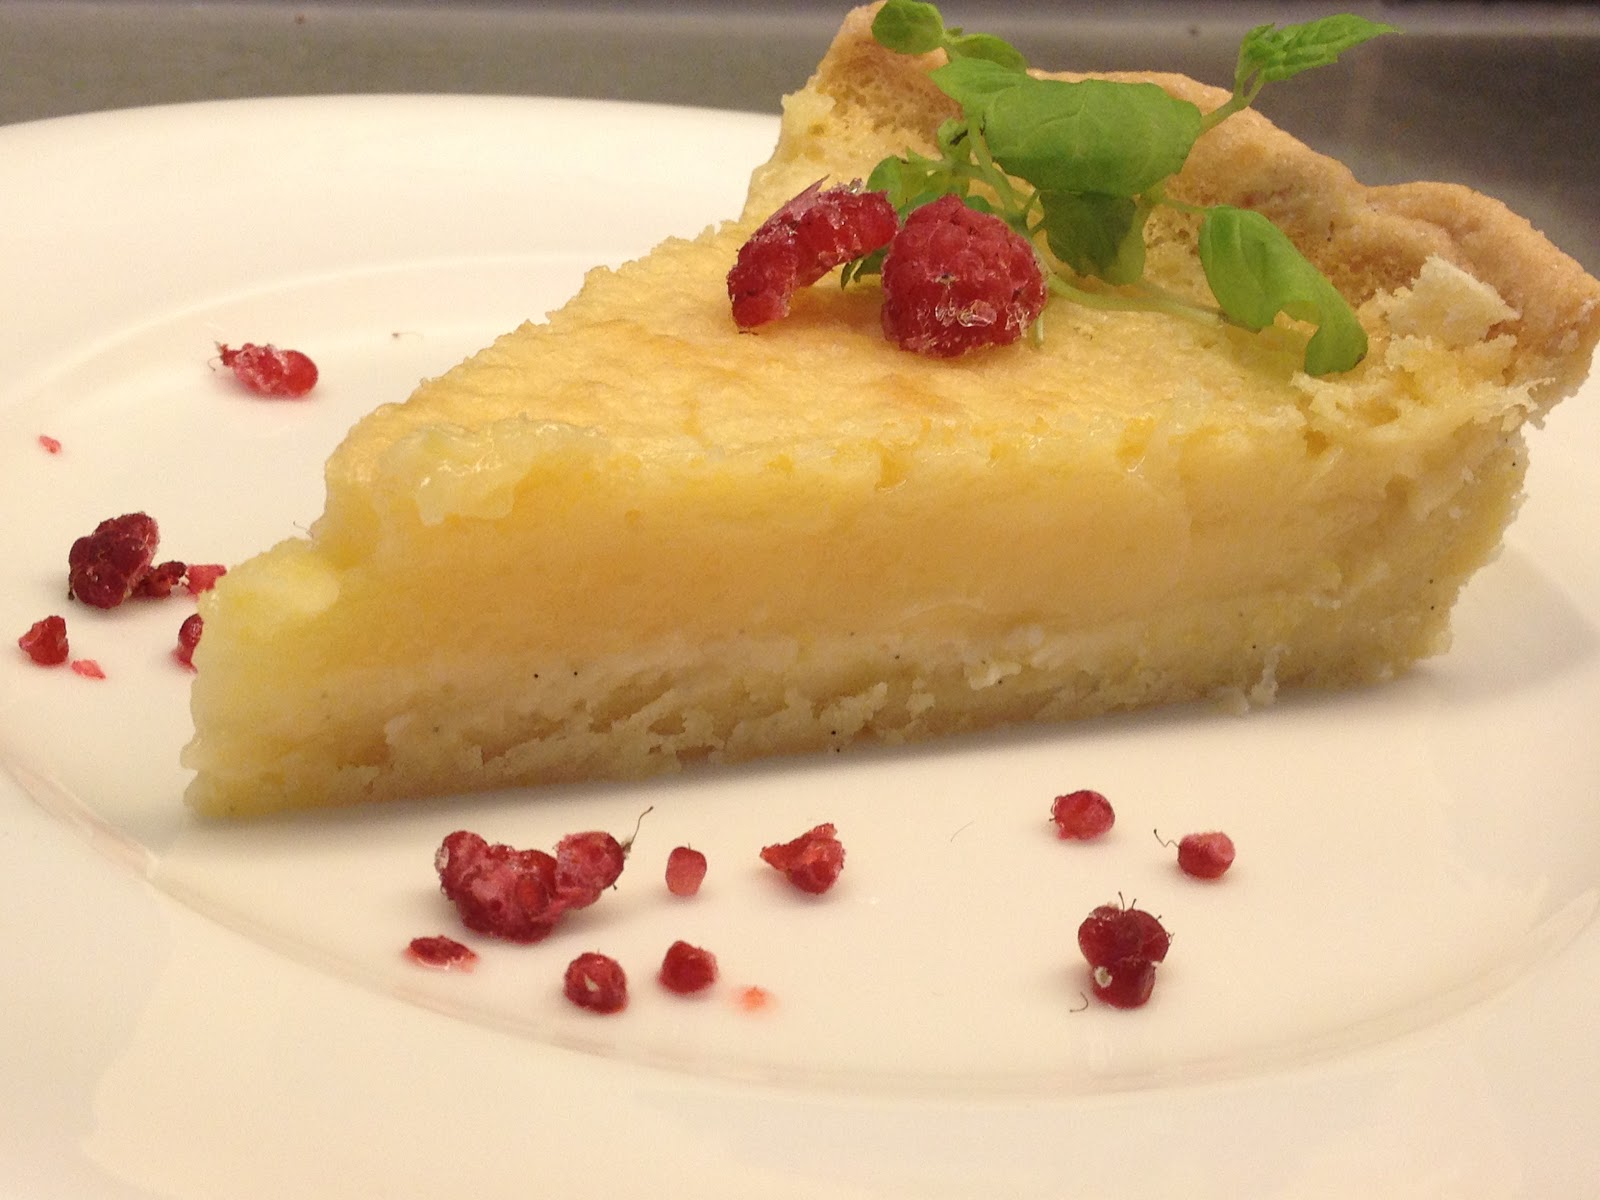
We took a chance and popped the second tart back into the oven to bake again.  30 minutes later, it was a little cracked in the middle from the early shaking to detect the level of sloshiness, but otherwise beautiful.  The perfect tang and zip of lemon next to the sweetness of the sugar and the delicate snap of a crust.

A few notes:  Use organic lemons, and wash them first in warm water. You will using a fair amount of lemon zest, and you don’t want the wax and toxins from non-organic lemons to mess up your beautiful tart.  If you don’t need two tarts, freeze the second (just wrap it highly in plastic cling wrap, then aluminum foil before freezing).  Then you have a lemon tart at the ready when you need one.

Here is the modified recipe below – leaving Harvey to his own devices, though keeping most of his ingredient proportions intact, and making this one simply:

based on Marco Pierre White’s Lemon Tart
makes 2 tarts & freezes well, though the crust won’t be crisp coming out of the freezer
Note:  revisions made from the recipe on the Caterer and Hotelkeeper website

Rustic beauty

Pastry Crust
500 g plain flour
175 g powdered sugar
250 g unsalted butter
grated zest of one organic lemon
1 vanilla pod, split open
2 eggs, beaten

Sift the flour and powdered sugar on a work surface and work int he butter with a pastry cutter or a fork. Make a well in the center of the flour mixture and add the lemon zest, scrape the seeds from the vanilla bean pod, and add the 2 eggs.  Combine the mixture with your fingers until everything is combined into a smooth dough.  Divide the dough into 2 parts, flatten each half into a disk, wrap in plastic wrap, and refrigerate for 30 minutes. 


Preheat oven to 180°C.  Roll out the pastry crust onto a lightly floured surface that is that is large enough to line a 20 cm tart tin, (or a 9″ pie pan would work just fine as well…or a cheesecake pan as we used).  Lay the rolled pastry over the tin and press it lightly into the bottom and sides.   Repeat with the second crust.  Prick the pastry crust all over with a fork, and bake the pie crusts for 10 – 15 minutes in the oven, or until lightly golden brown. 


Reduce oven temperature to 150°C.


Lemon Filling

Winter dose of Sunshine

9 eggs
400 g white granulated sugar
grated zest of 2 organic lemons
juice of 5 organic lemons
250 ml of whipping cream

While the crust is cooling in the fridge, make the lemon filling.  Whisk the eggs, sugar, and lemon zest together in a large bowl until smooth.  Add the lemon juice and the cream, and stir with a rubber spatula until evenly combined.  Try not to add too much air as this will form bubbles that you’ll need to skim off later.  Allow the filling to rest until the crust has finished baking.  Divide into two equal parts.


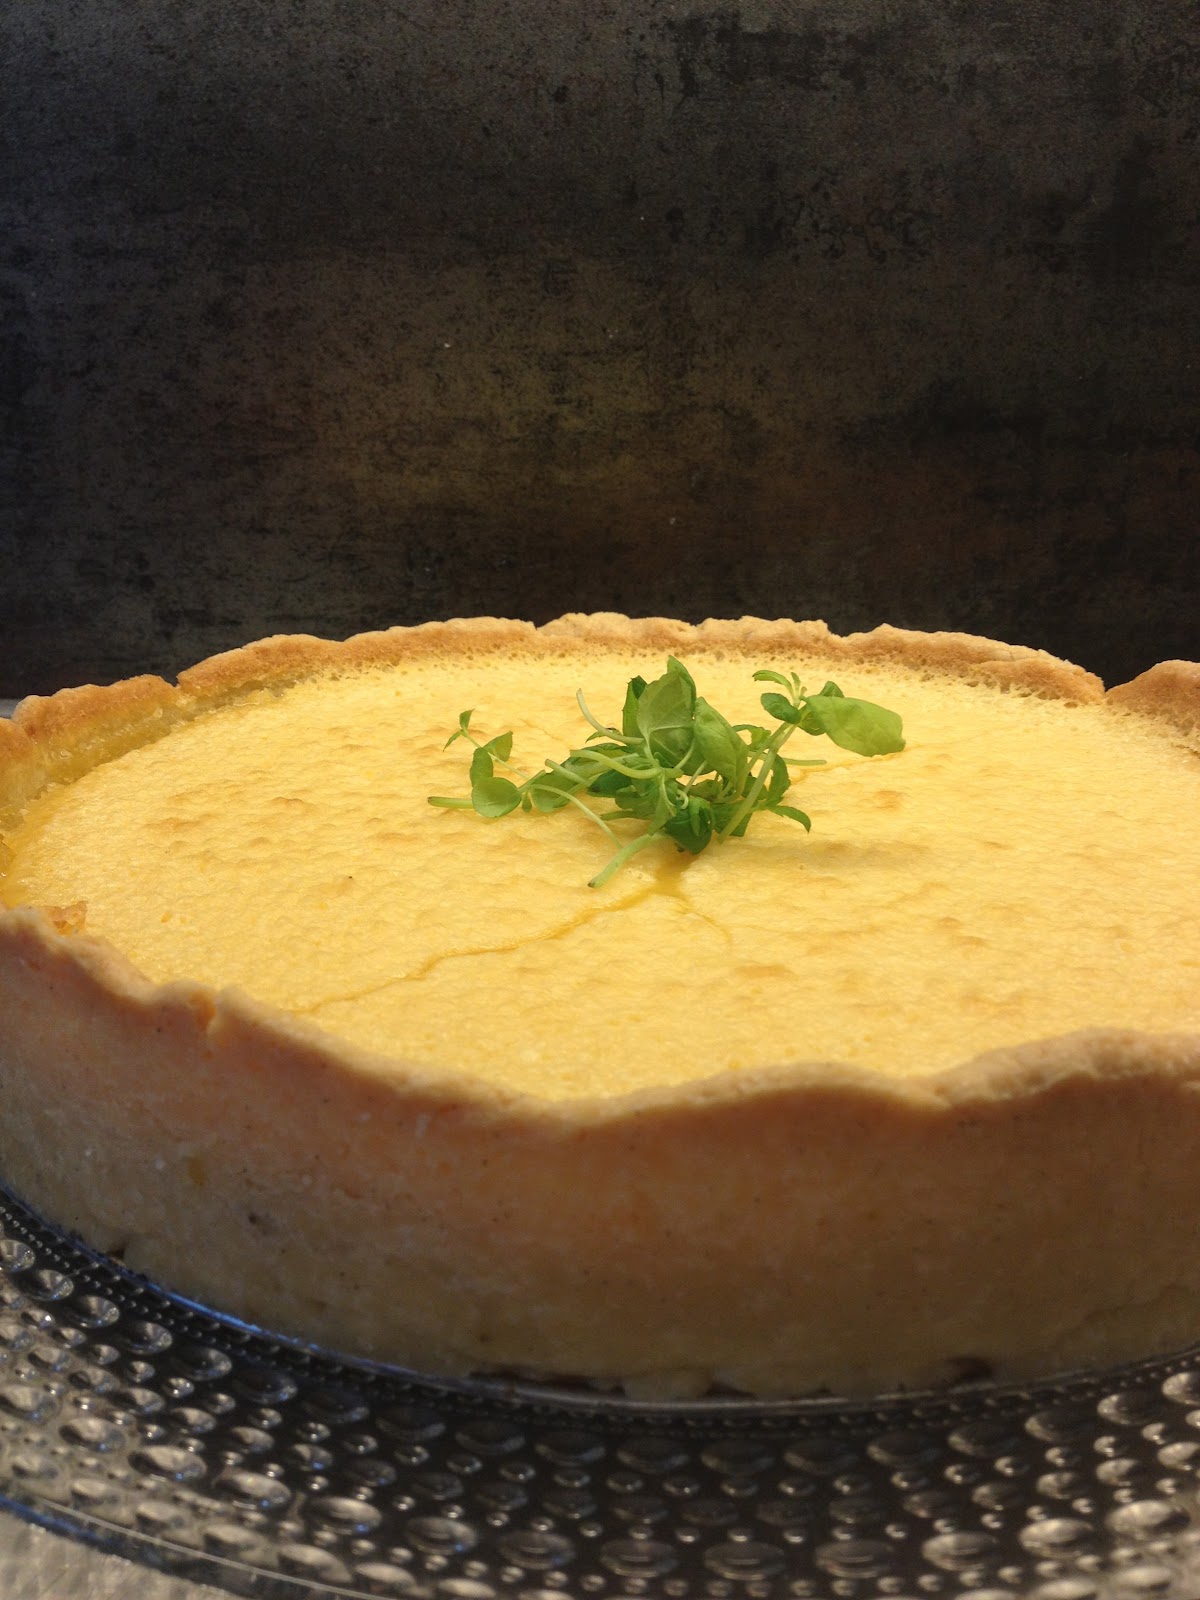
When the crust is baked and ready, remove any foam or bubbles on the surface of the lemon mixture and pour the lemon mixture into the hot pie crusts.  Bake in the 150°C oven for 30 – 40 minutes, until the center of the tart is slightly firm but still jiggles.  Remove from the oven and cool for at least one hour.

For garnish
50 g of powdered sugar
fresh mint sprigs
fresh berries (raspberry, blackberry or blueberry look beautiful)

Using a sifter or a wire strainer, lightly dust powdered sugar around the edge of the tart (optional.  I’d run out of powdered sugar at this point, which is why you can’t see any in these pictures).  Place a few fresh mint sprigs in the center and toss a few fresh berries onto the tart, or serve the berries on the individual serving plates.  Each pie serves 8.

Filed Under: Uncategorized

Craving Simplicity: Winter Snow, Work Days, Warm Soup

February 15, 2012 by aplough

This color reminds me of Spring

I don’t know about you, but after a long, full day on the job, I look forward to something good to eat – but I am not usually in the mood to wait long for it. Week night food prep needs to be fast, because chances are good that by the time I get around to getting dinner together, I haven’t eaten for 5 – 6 hours, and I am tempted to grab the nearest snack to settle the rumbling in my stomach. 30 minutes from start to finish – that’s a good goal, and even better if most of that time is spent with something bubbling on the stove or cooking in the oven, while I wrap up my work day, check the mail, put stuff away, and beep-beep-beep!  the kitchen alarm announces that dinner is served.

Extra Sharp Cheddar adds zing

I like dinner prep to be fast – but I don’t like Fast Food – that is, junk food. No pre-packaged, cook-it-up in the microwave, E-code filled, preservative loaded fare for me. I still want my dinner to be creative, colorful, and healthy.  I still want the table set – complete with a cloth napkin because I don’t like the paper ones for home at all – and I prefer to enjoy whatever it is I’m eating with my husband, a friend, or both! Every dinner is a chance to slow down for a moment and enjoy life’s simple pleasures,  and every meal I cook is a chance to experiment with flavor combinations and preparation methods.

It’s winter, and baby, it’s cold outside. I want soup. In fact, it’s been snowing non-stop for days and days, and even after a quick loop out skiing on the trails behind our house, it’s still soup I’m craving. Veggie soup – with a kick. So here we go:

Broccoflower Soup with Cheddar and Cumin

2 Tablespoons olive oil
1 onion, diced
1 large garlic clove, minced


Heat the olive oil in a medium-sized stock pot over medium-high heat.  Saute the onion and garlic until tender and translucent, about 5 minutes.  Add 1 Tablespoon of flour and stir to combine.  


Stir in:

My inspiration

2 cups chicken broth

1 cup water
Stir with a wooden spoon to mix completely, then add:
3 cups of broccoflower, broken into florets (1 head of broccoflower)
1/8 teaspoon pepper flakes
Bring to boil, lower heat to a simmer, and let mixture bubble for 10 minutes or until the broccoflower is tender.  

Remove from heat and puree mixture with an immersion blender, or pour carefully into a stand blender and blend until smooth.  Add:
So simple, so delicious.
3/4 cup sharp cheddar, grated
1/2 teaspoon salt (or to taste)
1/4 teaspoon ground black pepper (or to taste)
1/2 teaspoon ground cumin
1/2 cup milk
Whisk until the soup is completely smooth.  Serve hot.

Serves 4.  Enjoy with fresh bread or good-quality crackers (suolakeksit tai näkkileivät).

Filed Under: Uncategorized

You know it’s cold when the weather warms up 15° and your breath still freezes

February 11, 2012 by aplough

Parked for the winter

 February in Finland is cold.  Bone-chilling cold.  When I complain that we’ve hit -23°C in Helsinki, I quickly get notes from my friends in the north reminding me to count my blessings:  it’s -32°C in Oulu, I’ll hear, or -27°C in Jyväskylä.  This is too cold for human beings.  Or at least too cold for this Seattle girl, who thinks of February as the beginning of spring, particularly when reminded by certain dear friends living on the west coast that it is possible to see small blooms appearing outside already (you know who you are!), when all I can see for miles is a frozen, snow-covered landscape.

-23°C

But today, the weather has warmed up, and it was -5°C.  Beautiful!  Sunny!  Skiing weather…and down on the shores of Uunisaari, apparently it was swimming weather as well.  At any rate, it was a balmy day by Finland’s February standards, so I went out shopping after enjoying a long girls’ chat with a good friend over a fresh munkki and a copy of coffee.  (Thanks A – it’s always good to catch up!).  I can feel the beginning of spring in the air, and the cheerful yellow tulips on my kitchen table give me hope that it’s not far away.  Spring in Helsinki doesn’t mean blooming tulips, though – it means longer, brighter, sunnier days, when the snow glints off the frozen land and sea, and sports enthusiasts get their boots on to enjoy the prime weather.  It’s a beauty all its own.

Wandering through the small boutiques in Eira, stopping for coffee and quiche at Cafe Succes (that’s not a misspelling btw), in and out of organic food shops and my favorite chocolate Chjoko, I came home with, among other things, two fresh potato rieska from Eat & Joy Maatilantori’s shop in the Kluuvikeskus, baked this morning in their brick ovens, and as beautiful as could be.

Prepped.
Rosemary Garlic Olive Oil

After all that wandering, I was definitely hungry, but not in the mood for starting from scratch. Using the rieska as a base, I took advantage of the fresh winter pears and pulled together a quick meal for a lazy Saturday night.  It took longer to warm the oven to 250°C than it did to put the rest of this together, so this one will be returning to our table in near future.  Easy.  Delicious.  It disappeared quickly. Nothing left but a drip of olive oil as evidence…

You could almost eat it raw…

Rieska isn’t available outside of Finland, though you can make it yourself.  If you don’t feel like doing that, a soft flour tortilla could work, or else some thin flat bread or use the same topping on a pizza dough.

Potato Rieska / Perunarieska 
If you can’t buy your own, or are feeling ambitious – they are actually pretty easy to make.  From Parasta Kotiruokaa  by Aura Liimatainen.  For another recipe and pictures, check out Scandic Foodie‘s recipe.

Nothing beats fresh rieska baked in a stone oven, but if you heat your home oven to it’s maximum heat, you can still get pretty decent results.  


2 1/2 dl or 1 1/4 cup mashed potatoes, cooled
1/2 teaspoon salt
1 egg
1 dl / 1/2 cup wheat flour
1 1/2 dl barley (ohra) flour or 3/4 cup (you can use all wheat flour if you don’t have barley flour)

Heat your oven to at least 250°C/500°F.

In a bowl, mix together all ingredients until the come together to form a smooth dough.  Divide the dough into two parts, and on a large pan covered in parchment paper, using hands covered in flour, form the dough into oval shaped rounds about 1/2″ thick.

Bake in the oven for 15 – 18 minutes until golden brown.  Remove from oven and cool.

Makes 2 large rieska.

Pear, Blue Cheese, Red Onion and Rosemary Rieska Pizza

Preheat oven to 250°C / 500° F.

In a small bowl combine:
1/4 cup or 1/2 dl olive oil
2 Tablespoons chopped rosemary
1 garlic clove, minced


Heat in the microwave for one minute, and set aside.


To assemble the Rieska Pizza:
1 large Rieska
1 pear, sliced, then each slice cut into quarters
1/4 red onion, thinly sliced
1/3 cup or 3/4 dl blue cheese, crumbled

Serves 2.


Place the rieska on a pizza stone, or place on a parchment paper.  Brush the olive oil mixture over the top of the rieska.  Top with the pear, red onion and then blue cheese sprinkled over the top.  Toss a few fresh rosemary leaves over the top and place in the oven.  (the parchment paper can be placed directly onto the wire oven rack.  Bake 8-10 minutes or until slightly golden brown.  Serve immediately.

Filed Under: Uncategorized

  • « Previous Page
  • 1
  • …
  • 45
  • 46
  • 47
  • 48
  • 49
  • 50
  • Next Page »

Find me on social media

  • Bloglovin
  • Facebook
  • Instagram
  • Pinterest
  • Twitter

Looking for something?

Eat Simply, Eat Well 's gallery on Punk Domestics
  • Bloglovin
  • Facebook
  • Instagram
  • Pinterest
  • Twitter

Copyright © 2025 · Foodie Pro Theme by Shay Bocks · Built on the Genesis Framework · Powered by WordPress