Eat Simply, Eat Well

Healthy recipes & tips to help you live the good life. by Ann Plough

It’s been a long wait: Risotto with Porcini, Mozzarella and Preserved Lemon

March 5, 2012 by aplough

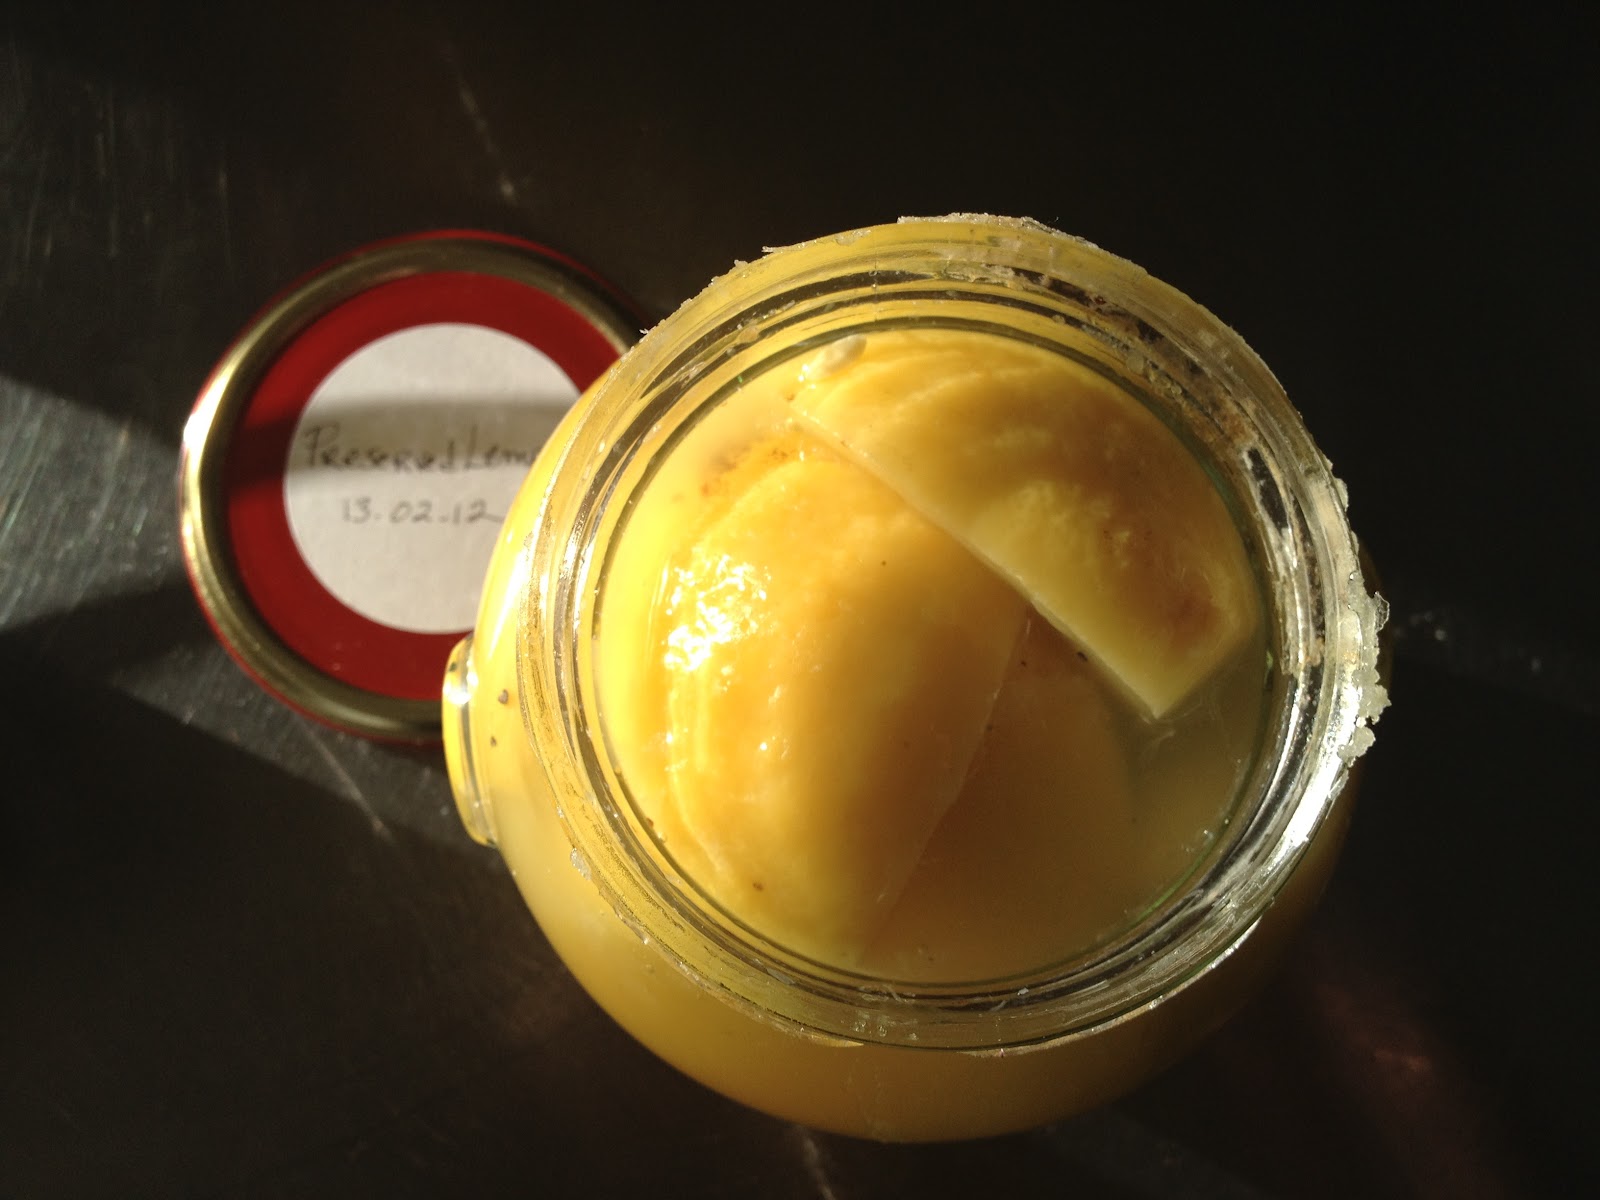
Preserved Lemons in Spring Sunshine

Three weeks is a long time to wait for food.  Of course I’ve had other things to fill my plate with along the way, but for weeks now, I’ve been alternately admiring and shaking a jar of preserved lemons sitting on my countertop.  Seems everyone is making these lemons – they are in nearly every food blog.  Since I found and excellent recipe and instructions from Alana at Eating from the Ground up, I’ll direct you there to make your own.  Just keep in mind as you read this recipe, though, that if you didn’t get caught up in the fun before I did (you may have a jar sitting waiting for this recipe at your house too – that would be perfect!), then you will need to wait three weeks for your own lemons, or get yourself off to a grocery store that sells them.  And please, please use organic lemons.  You’ll be eating the peel.  You don’t want toxins and bug killer in there.

That isn’t the only thing that inspired this recipe though:

1)  I have jars full of dried mushrooms that I picked during last year’s bountiful fall:  Porcini (Herkkutatti), Black Trumpet (Mustatorvisieni) and Yellow Foot (Suppilovahvero) – not to mention the ones sitting in my freezer, filling up 1.5 drawers in there.  It’s a good problem to have, it really is, but…summer is coming.  Which means more mushrooms and berries, and other good stuff from the Finnish woods around here, and I know that at the first sign of a ripe, edible anything out there, I’ll be out of the house with basket in hand, collecting like a pilgrim for the long, cold winter ahead.  This long cold winter is ending – Finally!  Time to use up some of those beautiful porcini.

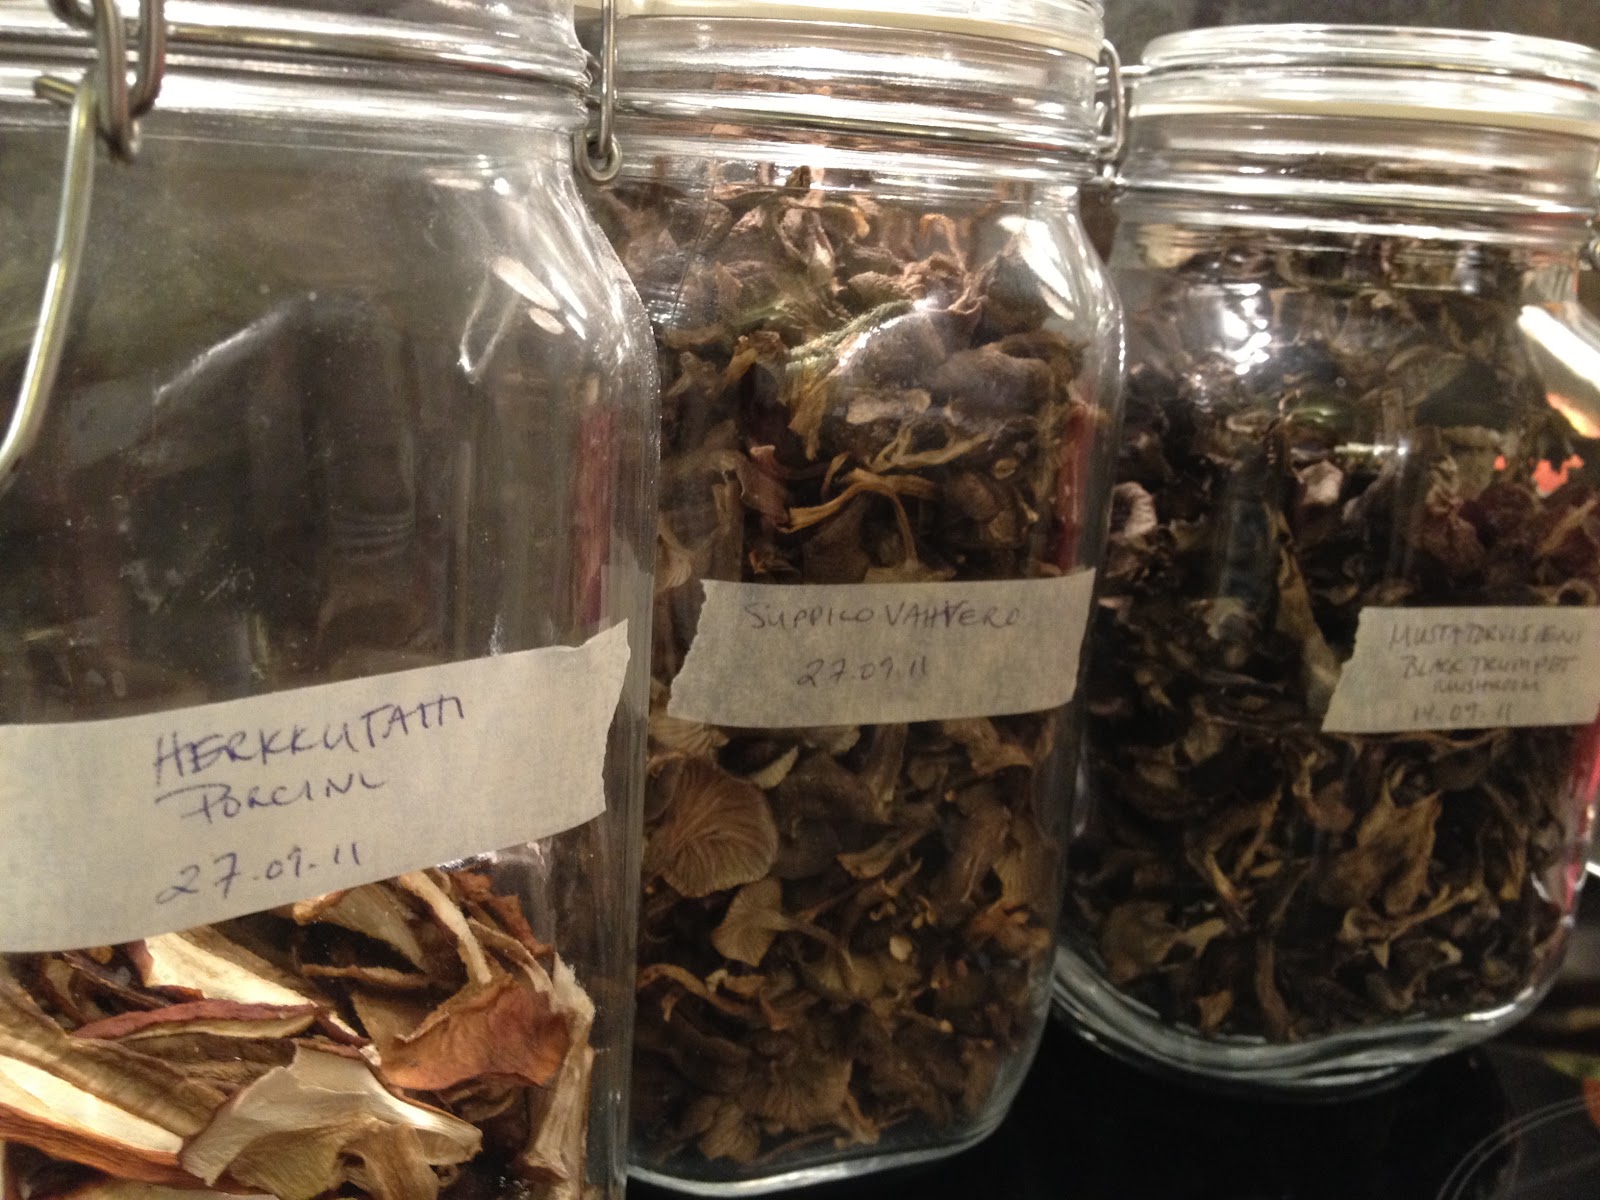
Porcini, Yellow Foot, Black Trumpet Mushrooms

2)  Homemade Bouillon!  Expect a theme for a while on this.  I can’t get over how good this stuff is.  If you haven’t tried it yet, please do yourself a favor and go make some.  I have the ingredients for another batch in my fridge, and will get it in the freezer as soon as possible.  Seriously – it is so easy to do, and you can’t believe the extra flavor it adds to your meal.

3)  Fresh Mozzarella.  Enough said.  Even more to smile about if it had been Bufala Mozzarella, but this stuff worked just fine

4)  A cupboard full of rice – brown rice, jasmine rice, red rice, wild rice, arborio rice… um…make that two bags of arborio rice.

Risotto is perfect for a sunny winter day.  I hope you’ll enjoy it.  The recipe doubles easily, especially since I halved it so that there wouldn’t be leftovers and I’d have an excuse to make something else tomorrow…  The lemon flavor is quite prominent in here – it sings way out in front on a bright note so that the mushroom flavor sits deeply in the background and supports the lightness of the lemon.  If you don’t like a strong lemon flavor, try using half or two-thirds the suggested amount of preserved lemon.  If you don’t have preserved lemon, leave it out (I don’t suggest using fresh lemon – but I’ll leave that up to you).

Risotto with Porcini, Mozzarella and Preserved Lemon


Risotto with Porcini, Mozzarella and Preserved Lemon

1.  Measure out 1/4 cup of dried porcini mushrooms/herkkutatti into a heat-proof bowl and cover with bowling water to just submerge them.  Set aside.

2.  Prepare the Homemade Bouillon from my previous post, or use 4 cups of vegetable broth from your preferred source.  Bring it to a simmer in a separate pot and allow to continue to simmer while you cook the rest of the risotto.

3.  Putting it all together:
     1 shallot, peeled, halved and sliced thinly
     1 garlic clove, minced or diced very small.
     2 tablespoons olive oil
     1/4 preserved lemon, fruit scraped away so just  the peel remains, diced small

Heat the olive oil in a (6 quart/6 liter) pot over medium heat.  Add the shallot, garlic and lemon and stir until the shallot and garlic are tender and translucent; 2-3 minutes.

Using a slotted spoon or your fingers, take the mushrooms out of the water (save the liquid) and add them to the pot with the shallot mixture.  Stir and cook for 1 minute.

Add:
     1 cup of arborio rice

and stir constantly for 2 minutes until the rice is lightly toasted.  Add the reserved mushroom liquid all at once, bring to a simmer and cook gently over medium heat (the mixture should bubble slightly and constantly.  When the rice has absorbed nearly all of the liquid, add another cup of liquid.  Allow the rice to absorb most of the liquid once again, stirring frequently.   Repeat 2 more times, until you have 1 cup of liquid remaining.  The mixture should begin to look quite creamy and thick.  Add the remaining broth, 1/2 cup at a time.  Taste the rice – it should be al dente, that is, feel slightly firm to your teeth when you bite it.  This is perfect.  Remove it from the heat and add:

     1 cup mozzarella, chopped into cubes.

Stir thoroughly so that the mozzarella melts and incorporates into the risotto.

Serves 2 for a main course or 4 as a side dish.

We followed this with lemon tart that was in the freezer left over from this adventure.  The perfect bright flavor at the end of a wonderfully satisfying meal.   Yes, the three week wait for those preserved lemons was more than worth it.

Summer is coming!

Filed Under: Uncategorized

Homemade Bouillon – and your weeknight dinner made simpler

March 4, 2012 by aplough

Oh…the joy of a deleted post.  Let’s try this again!

I discovered something this weekend that made me very happy:  Homemade Bouillon.   It is simple, easy, and so much better than the canned stuff – which I dislike – or the homemade vegetable broth I had relied on up to this point.

Carrot Ginger Soup with Rye Crackers and Tete de Moine cheese

Why do I care about Homemade Bouillon so much?  I love to make soups and stews and risottos, and other dishes that start with a broth of some sort.  When I get home from work on a week night, the last thing I want is a dried up bouillon cube or a broth from a can or jar – generally full of preservatives and E-codes and dubious sounding ingredients.  My growling stomach is definitely not going to give me peace long enough to spend 90 minutes making homemade vegetable broth either.  I usually have chicken broth, because I make and freeze it by the 1/2 liter every time we have roast chicken (often!).  But sometimes I want a purely vegetarian dish, or else the flavor of chicken doesn’t suit what I’m making (hello beef stew!).  Homemade vegetable broth didn’t have the round, full flavor I was looking for in a soup either, but was the best I had up until yesterday.

Enter 101 Cookbooks and the recipe for Homemade Bouillon.  The blog author Heidi listed the ingredients by weight, but I knew I wasn’t going to be happy doing that.  I am willing to weigh ingredients for jam and baking, but not for this.  But, she also assured her dear reader that the Homemade Bouillon is highly adaptable to what is in my fridge, and that one should experiment, so off I went.

One note:  the salt volume will seem extremely high in this.  Keep in mind that it is heavily diluted with water when you actually cook with it so there isn’t that much salt in an individual batch of the finished vegetable broth.  You can make it without salt, but if you do so, freeze in ice cube trays or individually on a pan which you then put into the freezer, otherwise it will be extremely difficult to use.  If you do use salt, you’ll find the bouillon doesn’t freeze solid, so you can scoop it out of the freezer container when you are ready to use.

This is so easy to use and makes such a great base for cooking.  I just made this yesterday afternoon, and have already been inspired to make 2 soups.

Chopped and ready to use

Homemade Bouillon
adapted from and inspired by the 101 Cookbooks blog

2 large carrots, peeled and chopped
1/2 fennel bulb, chopped
1 leek, white and light green parts only, halved and chopped into half moons
2 celery ribs, chopped (if there are leaves, add those too)
3 shallots, peeled and halved
4 garlic cloves, halved
4 sun dried tomatoes, preserved in oil
Rosemary leaves from two large rosemary sprigs
1/2 cup loosely packed parsley leaves
1/3 cup peeled, chopped turnip (nauris)
1/3 cup peeled, chopped celery root
4 Tablespoons olive oil (or oil from the sun dried tomato jar)
125 g sea salt (this is the only thing I weighed.  If you insist on not weighing it, it’s approximately 3/4 cup)

Mix all ingredients except the olive oil and salt in a large bowl.  Working in batches, pour the vegetables into a food processor and chop until they form a fine, rough, paste.  Transfer vegetable paste into another large bowl and repeat until all vegetables are chopped into a paste.

To the vegetable paste, add the olive oil and the salt.  Stir well to combine.  

Reserve some paste to store in the refrigerator for immediate use – it will last about a week.  Store the rest in freezer containers and freeze to use as needed. 

To use:  Heat 2 Tablespoons of olive oil in a pot or pan.  Add 1 heaped Tablespoon of the Homemade Bouillon and fry until the vegetables are soft and fragrant.  Add 2 cups of cold water and heat to a simmer.  Your vegetable broth is ready to use!

Can you feel the sunshine?

Carrot Ginger Soup
you won’t taste the potato in this soup, but you need it to create the thick smooth texture.

2 carrots, peeled and chopped
1 large potato or 2 small potatoes, peeled and chopped
2 cups vegetable broth, see above
1/2 teaspoon ground ginger.

Put all ingredients into a suitable sized pot.  Bring to a boil; reduce heat to medium low and simmer until vegetables are fork tender, about 20 minutes.  Puree with an immersion blender or in a stand blender until smooth.  You may need to add water to thin soup and make it easier to blend. 

Serves two.

for Turnip Soup:
omit carrot and replace it with 1 1/2 cups chopped, peeled turnip.  Omit the ginger.  Proceed as directed.  Turnip soup has a sharp flavor that I love.  If you’d prefer it less sharp, add a teaspoon of creme fraiche or sour cream to each serving.  I also recommend topping it with a fresh grinding of black pepper

Turnip Soup with creme fraiche and fresh ground black pepper


Filed Under: Uncategorized

After Rudolph, the real Reindeer came for Dinner

February 20, 2012 by aplough

I’m game for this meal anytime!

When I was growing up, in Seattle, WA, we talked about reindeer and Santa Claus in the same sentence:  as in the eight pulling the fat, white-bearded, red-suited man’s sleigh:  “on Dasher, on Dancer, on Prancer on Vixen.  On Donner, on Cupid, on Bonner and Blitzen…and the most famous of all…Rudolph, the Red-nosed Reindeer!”  The light from Rudolph’s bright red nose was Santa’s way of finding the chimney attached to your house above your stocking on Christmas eve.  He definitely wasn’t dinner.

But it’s not Christmas, Santa won’t be making an appearance for a while, and living in Finland, I’ve enjoyed my share of reindeer meat.  There are reindeer herders in the north of Finland who raise the animals as people do cattle or lamb in other countries.  There is a season for fresh reindeer, which  is nearly over now that the Spring is fast approaching, so it’s time to buy it now and eat up.  The most typical form is a shredded reindeer, stewed for a long time in it’s own juices with pepper, salt, bay leaf and served up with mashed potatoes and lingonberries, which grow all over in the Finnish forests in late August and early September.  My freezer is full of lingonberries I picked myself.  I haven’t, however, adopted the habit of shooting my own reindeer, so alas, my home food supply is seriously lacking in that department.

You can get good quality reindeer from local markets here – from beautiful reindeer center cut roasts, cooked to medium rare and served with roasted potatoes and green beens, to the shredded reindeer mentioned above, to a small packet of freshly ground reindeer on demand at the Hakaniemi market, picked up by a good friend on her way to your house to concoct a dinner with you.  That, my friends, is the best kind.

Reindeer from Finnish Lapland (full disclosure: not my photo)

Now I understand if you’re living in a place where reindeer is not readily available.  Don’t let that stop you from enjoying the recipe you’ll see at the bottom of this post.  If you know someone (yourself, your husband, brother, friend, neighbor, work mate) who likes to hunt, barter a few pounds of ground game:  that deer he/she is proud of, make the burgers on this page, and invite that person over for dinner.  You’ll all be happy about it, trust me.  At least about the burgers, that is.  I make no guarantees about your dinner company.

These burgers, called Lindström burgers (pihvit) are something I’d only had once before. When Johanna suggested we make them with wild game meat, I was all ready to try it. Hirvi (moose in Finnish) was not to be found but Poro (reindeer) was, and I have to say that of all the times I’ve enjoyed a meal with reindeer, this one was the best. The beets and vinegar with the capers and potato mellowed the “gaminess” of the meat to create the perfect blend of flavors. Those of you who eat game know what I mean.

Serve the Lindström burgers without a bun.  Instead try a combination of quinoa and amaranth combined with chives, salt and pepper, or cook up some mashed potatoes to go with it.  Traditionally these are served with a  creamy mushroom sauce, but we amped up the meal by serving them with fresh Tzatziki, and I could have eaten this again and again. Rosemary, Hazelnut Green Beans on the side made for the perfect meal.  Finished off with this Lemon Tart, there were no complaints around my table.  There won’t be around yours either, I dare say.

Reindeer Lindström Burgers

The original recipe came from Soppakellari‘s blog, who had adapted a recipe by Polkkapossu (the food blog world is a beautiful for thing for sharing and adapting and passing good food along.  Thanks to both!).  She made hers with ground beef and served them with mushroom sauce, and didn’t use oatmeal – I am sure they were delicious!  So if you don’t have a side of deer in your freezer, no worries, you can still enjoy these at home with another type of ground meat.

So here they are Soppakellari’s Lindström pihvit made Polkkapossu’s way and adapted to give us a new way to enjoy reindeer:

Reindeer Lindström Burgers


450g / 1 pound ground reindeer meat
1 medium size yellow onion
15 small capers
3 raw beets, peeled, grated, and pan cooked in 3 Tablespoons of red wine vinegar
2 small potatoes, peeled and shredded
2 eggs
3/4 dl ruokakermaa/ 3/8 cup half&half (sorry!  the conversion is a little weird – can’t we all just use metric?)
1/4 teaspoon fresh ground black pepper
1 1/2 teaspoon sea salt
1 1/2 dl / 3/4 cup oatmeal

In a blender or a food processor, combine the onion, capers, beets and potatoes and combine until the mixture is roughly chopped (it should be a bit chunky – you don’t want it to be smooth at all, more like a salsa texture).  Transfer the mixture to a medium-sized bowl and add the reindeer meat, eggs, cream, salt and pepper and the oatmeal.  Mix all ingredients together with your hands until just thoroughly combined.  Do not over mix. 


Heat the oven to 225°C/425°F.  While the oven heats, let the mixture rest for at least 10 minutes to allow the oatmeal to absorb the moisture from the other ingredients and for the flavors to combine.  Line an oven pan or cookie sheet with parchment paper and set aside. 


Divide the mixture into 12 equally sized balls.  Heat a frying pan over medium high heat.  Flatten each ball into a patty like a burger and fry on each side until they are slightly browned.  Place all of the reindeer burgers onto the parchment covered pan, and cook them in the oven for 15 minutes.  


While the burgers cook, make your Quinoa & Amaranth Pilaf, Rosemary & Toasted Hazelnut Green Beans, and Tzatziki.  

Rosemary,  Roasted Hazelnut Green Beans


Tzatziki
can be made ahead – the flavors taste better if they are combined together and then refrigerated for at least an hour


1 cup Greek yogurt
1 cup shredded cucumber, skin on, preferably organic
2 Tablespoons of fresh mint leaves, chopped
1 garlic clove, minced
1 Tablespoon grated lemon peel
1/4 teaspoon salt
1/8 teaspoon black pepper

Place all ingredients together in a small bowl and mix with a spoon to combine thoroughly

Rosemary & Toasted Hazelnut Green Beans


250g / 1/2 pound green beans, ends trimmed
2 shallots, sliced thinly
2 Tablespoons olive oil
2 Tablespoons fresh rosemary, roughly chopped
1/2 cup hazelnuts, roughly chopped

Heat a frying pan over medium heat.  Add 1/2 cup of warm water and bring it to a simmer.  Add the beans to the pan and cook, stirring slightly, until they are a bright green.  Remove beans from the pan and set aside on a plate.  Pour out the leftover water. 


Return the frying pan to the stovetop over medium heat.  Add the olive oil to the pan, allow it to heat up for a few seconds, and add the shallots.  Cook the shallots 2-3 minutes until the begin to soften, the add the hazelnuts and rosemary.  Stir the mixture until the hazelnuts are toasted a nice golden brown.  Add the beans back to the pan and toss to coat.

Quinoa & Amaranth pilaf


1 dl / 1/2 cup dried quinoa
1 dl / 1/2 cup dried amaranth (if you don’t have it, use all quinoa)
2 Tablespoons freshly chopped chives or 1 Tablespoon dried
1/2 teaspoon salt
1/4 teaspoon fresh ground black pepper
5 dl / 2 1/2 cups cold water

Combine all ingredients in a small pot.  Place over high heat, bring to a boil, reduce heat to low, cover, and let simmer for 15 minutes.  Toss the mixture with a fork to fluff.  

The dinner serves 4

Filed Under: Uncategorized

  • « Previous Page
  • 1
  • …
  • 44
  • 45
  • 46
  • 47
  • 48
  • …
  • 50
  • Next Page »

Find me on social media

  • Bloglovin
  • Facebook
  • Instagram
  • Pinterest
  • Twitter

Looking for something?

Eat Simply, Eat Well 's gallery on Punk Domestics
  • Bloglovin
  • Facebook
  • Instagram
  • Pinterest
  • Twitter

Copyright © 2025 · Foodie Pro Theme by Shay Bocks · Built on the Genesis Framework · Powered by WordPress