Eat Simply, Eat Well

Healthy recipes & tips to help you live the good life. by Ann Plough

Finland meets Italy: Reindeer Osso Bucco

April 15, 2012 by aplough

Best enjoyed together, with no rush to be anywhere else

I can’t seem to get enough of reindeer right now!  A friend of mine was up in Lapland a couple of weeks ago and sent me a text message:  “Ann, I’m at a reindeer farm.  Are you interested in getting some reindeer meat?”  Oh, yes please!

Reindeer is something that feels essentially Finnish to me.  I first ate it in a small village about 100 kilometers south of Rovaniemi, in a dish called “poronkäristys” or “shredded reindeer”.  It was seasoned simply with salt & pepper, cooked until tender, and served with mashed potatoes and lingonberry.  The flavor was slightly gamey, and the meal delicious.  Shredded reindeer is the most common way that I’ve been served reindeer.

There are reindeer herders across Lapland, throughout Finland, Sweden and Norway. A reindeer herd can be quite large, and the animals are considered to be only semi-domesticated, as they roam freely across the pasture land – much like cattle on large ranges in the US.  Don’t ask a reindeer herder how many reindeer he owns, though – it’s like asking your neighbor how much money he has in the bank – it’s considered very rude.  While the industry used to be self-regulated for the most part, the increase in the size of herds led the Finnish government to regulate the herd size.  Reindeer have been herded for centuries by the Sami people, and are in important part of their economy.  Reindeer are used for the meat, hide, and more recently, and innovative startup from Oulu called ArteBone has created a way to use reindeer bone as a bone graft substitute.  Reindeer are used in some cases for transportation, and much less commonly for milk.  A versatile creature indeed!  This is a food blog, not a reindeer blog, so I’ll leave it at that, but go here to learn more about reindeer herding.

Now back to the eating part…

Reindeer Shanks (potkakiekot)

My friend came back with some new cuts of reindeer that I’d never used before:   500g of reindeer roast and 500g of reindeer shank (poron potkakiekot):  it’s basically like veal shank, with the leg bone cut into little circles so that what you have are rounds of meat with a bone in the center.  My father-in-law suggested Osso Bucco (Italian for Hole in Bone) as a way to use the reindeer shank, and though I’d never made nor eaten it before, how could I resist?  We had a Saturday of spring cleaning planned, so what better time to put something in the oven that benefitted from hours of cooking, so that we could benefit by having a meal simmering away, ready whenever we were hungry enough to stop dusting and find some sustenance?

I don’t know what Osso Bucco is supposed to taste like.  I found many different recipes online and cobbled them together to create something that took advantage of the local Finnish ingredients I had on hand:  the reindeer shanks, juniper berries, dried porcini, Malmgård wheat flour fresh ground the day before.  I had the greater portion of crushed tomatoes in the fridge from making soup earlier in the week, and some preserved lemon I’ve wanting to use with something, so my Reindeer Osso Bucco was born.  Feel free to adapt for your tastes and available ingredients.  Let it simmer in the oven on a medium temperature until the meat is falling off the bone.  Serve with mashed potatoes and Gremolata (recipe follows) for a meal that is so deeply satisfying, you’ll wonder where it’s been all of your life.

Plan for 3 hours total for this meal:  1 hour (more or less) of prep time and 2 hours in the oven.  Traditional Osso Bucco calls for straining and pressing the vegetables and catching the liquid in a bowl, and then cooking the liquid with a thickening agent and pouring it back over the shanks.  I rather like the look and flavor of the vegetables with the reindeer shanks, so I served my Osso Bucco up rustic style.

Reindeer Osso Bucco

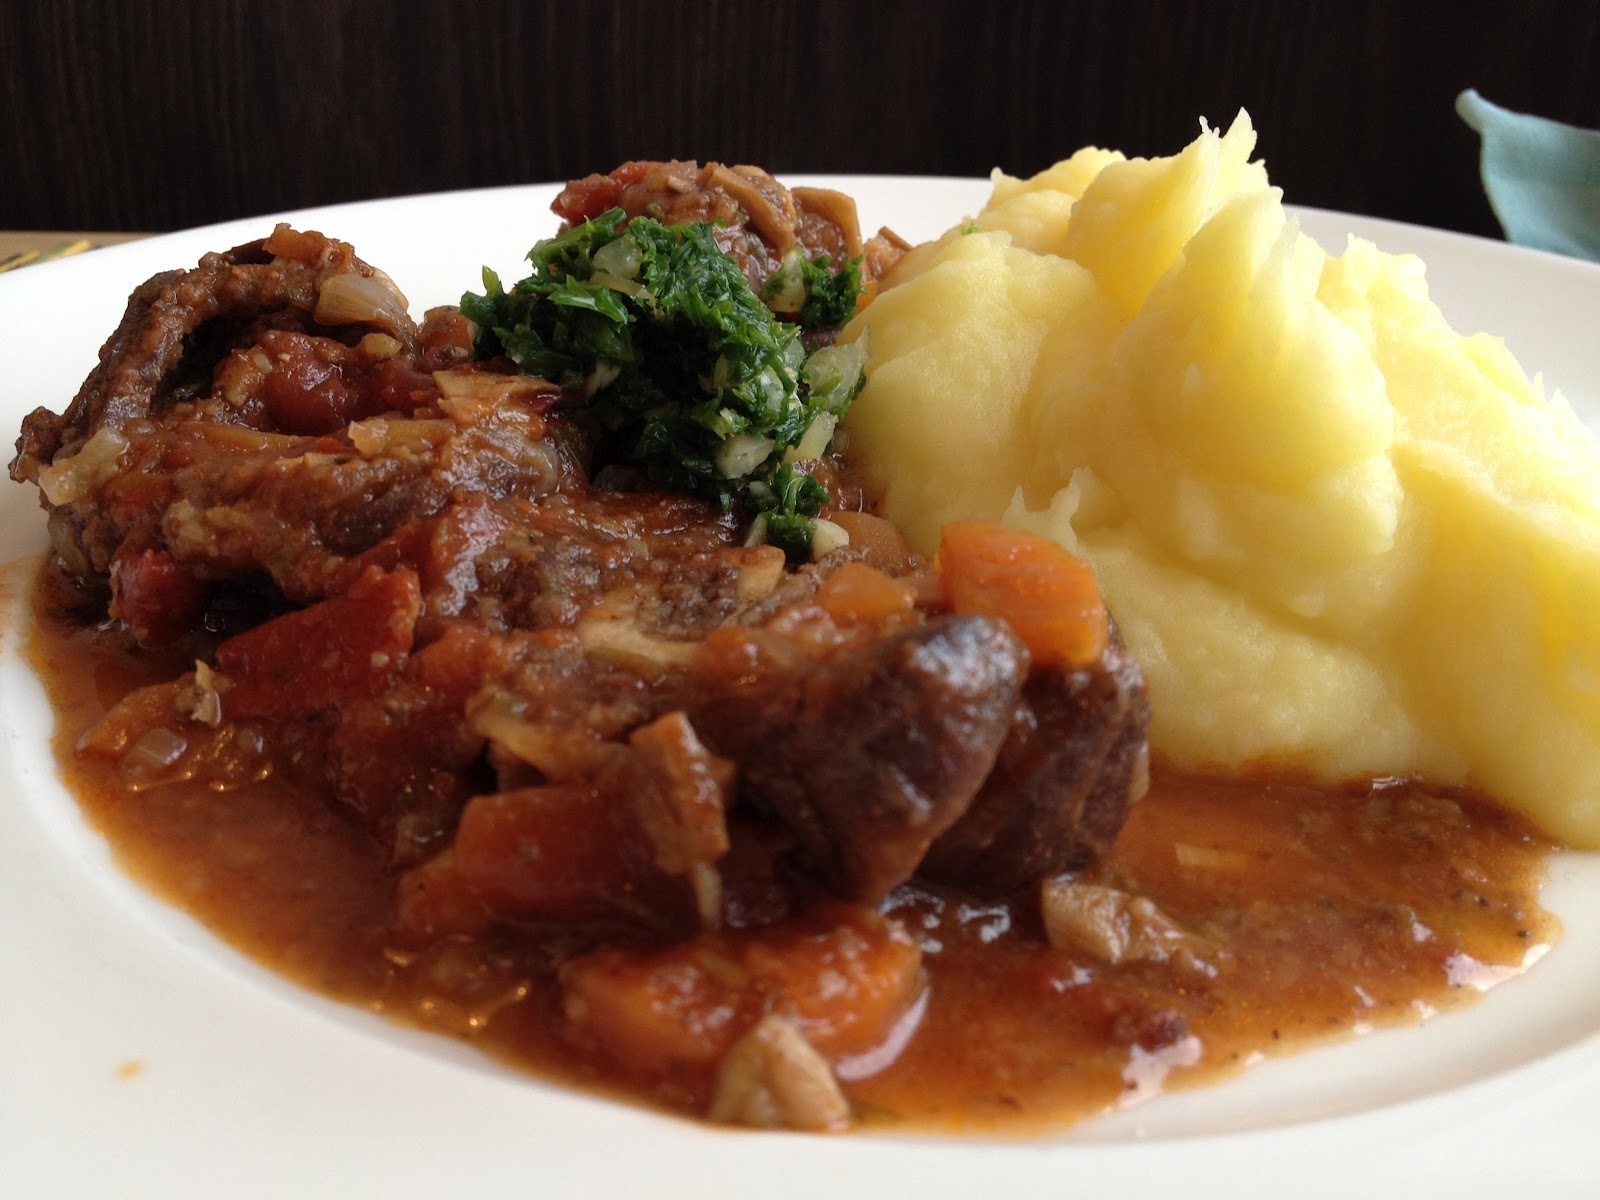
Osso Bucco, Mashed Potatoes and Gremolata – this is slow food!

Preheat oven to 160°C/325°F

Step 1. Mix together in a small bowl:
1/2 cup wheat flour
1/2 teaspoon fresh ground black pepper

Dredge
500 g reindeer shanks (veal, deer, moose, elk or other shanks would also work well)

in this mixture so that both sides are coated with flour.  Set aside.

Step 2. In another small bowl combine:
10 g (about 3/4 cup) dried porcini (herkkutatti)
1/2 cup boiling water (or enough to cover the mushrooms)

Set aside so the mushrooms can soak for at least 15 minutes.

Step 3. Pour into a large frying pan over medium heat:
2 tablespoons of olive oil

Add
1 onion, halved and sliced
2 garlic cloves, peeled and chopped

Step 4. Cook until the onion is translucent and tender, remove from pan and set aside in a small bowl.  Add to the pan:
1/4 cup bacon, diced (about 4 slices)

Frying the flour-covered shanks

Fry until the bacon is slightly crisp and the fat rendered.  Remove the bacon from the pan with a slotted spoon, leaving the fat behind, and add it to the bowl with the onion. Add the flour-covered reindeer shanks to the pan in a single layer, and fry on both sides until they are browned, about 5 minutes per side.

Step 5. Place the reindeer shanks in a single layer in the bottom of a dutch oven or casserole pan.  Arrange the onion bacon mixture over the top of the reindeer shanks.  Set aside.

Step 6.  In the same frying pan as before, heat 1 tablespoon of olive oil and add
3 carrots, peeled and chopped
2 tablespoons of Homemade Bouillon 
1 cup water
       or
1 celery rib, diced & 1 teaspoon salt
(note: the flavor will be better if you use Bouillon.  If you don’t, replace all of the water in this recipe with vegetable broth to retain the flavor balance).

Cook until the carrots are tender; about 7 minutes.

After 2 hours of slow simmering

Add to the pan:
1 can crushed tomatoes
2 cups of water
1/2 cup red wine (optional)
1 bay leaf
1 tablespoon chopped fresh parsley
8 juniper berries (frozen or dried)

Squeeze the porcini (from step 2), reserving the liquid, and roughly chop them.  Add the porcini and their liquid to the pan as well.  Bring the mixture to a boil, reduce to a simmer, and cook for 5 minutes over low heat.

Step 7. Pour the vegetable mixture over the reindeer shanks in the dutch oven/casserole pan.  The shanks should be covered by the liquid.  Cover the pan with a lid or tightly with aluminum foil, place in your preheated oven, and cook for at least 2 hours, so that the meat is tender and falling off of the bone.

Gremolata with Preserved Lemon

When there is about 15 minutes of cooking time, boil your potatoes to make mashed potatoes and mix together the Gremolata, recipe below.

Gremolata
1 cup fresh parsley, roughly chopped
4 garlic cloves, diced by hand
1/2 preserved lemon, diced or grated rind of one lemon 
(I used preserved lemon and the flavor was incredible.)

Mix together in a bowl at least 10 minutes before serving to allow the flavors to blend.

Serves 4 hungry people.

Filed Under: Uncategorized

Bilberry Lime Muffins

April 12, 2012 by aplough

Nope, that’s not a typo.  I made Bilberry Lime Muffins.

About 5 miles from where I grew up in Clearview, Washington, there was and still is a blueberry farm called Mountain View Berry Farm.  The farm has been around for years, and my family has gone there to pick blueberries for as long as I can remember.  We’d drive down to the farm in our big yellow Suburban with it’s 5-speed double clutch, pull into the familiar yard of the farm, load up with gallon size coffee cans that had been fitted with a stiff wire that could be hung from a belt to make the picking easier, and we’d walk down the hill to the blueberry patch, carrying big, white or blue 5-gallon pails.

It was huge.  The patch was huge, the bushes were huge and the berries were (mostly) huge.  We didn’t pick the itty bitty Rancocas – though the flavor was good, they grew too tiny and too sparse for our limited levels of patience.  We’d dive straight into the Concord and Stanley section, where the blueberry bushes stood much higher than my head (even now) and the berries hung like dusty blue grapes, waiting to be picked into our mouths (most common) or buckets.  We’d pick until our bellies and buckets were full, moving on (or starting in) into the section with the larger berries:  the Dixies and the Blue Crop and the Early Blues.  They were good days in the sun.

Back home, we packed them up into freezer boxes for eating during the winter, and ate handful after handful, all the way home and for the days after while the fresh ones lasted.

I have no idea where that missing muffin went…

Mountain View Berry farm was my first employer, too, as it was for most of my siblings.  In the winter, I’d prune the bushes.  In the spring, we’d hoe down the weeds and horsetails growing around the base of the plants.  In the summer, we were joined by other kids, aged 12 and up, to pick the berries into buckets, pour them in to flats, which were then shipped off to grocery stores or bought by people stopping by the farm who didn’t want to pick their own.  I was a fast picker – my goal was to hold card #1.  It had no importance other than bragging rights, but hey, you take what you can get.  We were paid by the flat, and more flats meant more money for extra schools clothes beyond what Mom & Dad bought us.  These were good days in the sun too.

Many years later, I was asked if I wanted to go blueberry picking in Finland, that is, “mustikka poiminen”.  In Finnish, there are “mustikka” and “pensas mustikka”, which are both commonly translated as “blueberry”, with the latter being the domesticated blueberry found in some gardens in Finland, but not very common at all.  The “mustikka” is not a blueberry – it is a “bilberry”, found in the forests of Canada, France, and throughout Scandinavia, for example, and are a much tarter, bluer berry than I grew up with (and makes a much better jam & pie because of the flavor intensity in my opinion).

Going…

Off we went into the beautiful Finnish woods, armed with 8-liter red plastic pails in one hand and a plastic picking instrument in the other.  The berry picker has many plastic tines, like a comb that are attached to a bucket-like compartment that catches the bilberries as they are skimmed off of the bushes by the fork tines. The bilberry bushes grow close to the ground, with their berries scattered up and down the branches.  They are incredibly slow and tedious to pick by hand, and the Finns have cleverly invented an instrument that takes most of the work out of picking.  In a good patch, you can pick 8 liters (quarts) of blueberries in an hour – or one red bucket full.  The berries are then poured a little at a time on to a plastic mesh screen, through which the berry stems and leaves drop and the good berries are easily separated from the bad, quickly ready to use or freeze.   It makes for a perfect summer afternoon – especially in the long-awaited Finnish summer sun.

We have a lot of bilberries in our freezer from last summer’s pickings – it’s time to use them up!  You can use blueberries to replace the bilberries in this recipe, and they’ll be equally delicious. They come together really quickly, and are low-fat besides.  What are you waiting for?

These will store well in an airtight container at room temperature for 3 days – if they last that long.  They also freeze well.

Bilberry Lime Muffins
Adapted from the Basic Muffins recipe in Joy of Cooking

Preheat oven to 400°F/200°C

Going…

In a large bowl combine:

2 cups of flour
1/2 cup of sugar or packed light brown sugar
4 teaspoons of baking powder
1/2 teaspoon salt
1/4 teaspoon fresh ground nutmeg

In a separate bowl whisk together:
1 egg
1 cup milk or buttermilk 
3 tablespoons of olive oil
zest of one lime

Pour the egg mixture into the flour mixture and stir until just combined.  Do not over mix.  Add:

1 1/2 cups fresh or frozen bilberries (or blueberries if that’s what you have)

Mix until the berries are distributed throughout.  Line a 12-cup muffin tin with cupcake liners and divide the batter evenly among the liners.  Bake for 25 minutes or until the tops are golden brown and a toothpick inserted in the middle comes out clean.

Remove from oven and allow to cool for 5 minutes before eating.

Makes 12 muffins.

Gone.

    Filed Under: Uncategorized

    Chasing away the winter with Cornbread & Chili

    April 11, 2012 by aplough

    Cornbread & Chili.  Now there is a combination to love.

    Cornbread:  Serve immediately!


    Nobody is really certain where Chili came from, but the first recorded recipe of it is a Spanish one from 1519, the time of the Conquistadors in Mexico, according to Wikipedia.  See the full Wikipedia story here.  It’s too long for me to retell here, and I want to get on to the recipes!

    “Next to music there is nothing that lifts the spirits and strengthens the soul more than a good bowl of chili.” – Unknown


    Delicious with a topping of shredded cheddar cheese

    There are more versions of Chili than there are states in the U.S. union, but hey, part of the fun here is that you can mix and match your own ingredients to make the kind of chili that will make you happy.  Some say that real chili doesn’t have beans at all.  Some prefer it with a combination of meat and beans.  Most will say that chili without meat is a “why bother”.  Some like it red, some like it white, some like it spicy, some like it mild.  Some like it with just beans (one or a variety), beef, tomatoes and chili peppers or chili flakes or chili powder.   Particularly popular in Texas, it’s been a favorite of mine for years.

    I like it hot & spicy, with red meat, a lot of vegetables, tomato sauce and chunks, a smoked chili (chipotle), a variety of beans (kidney and black) and cooked a long time at a low simmer so all the flavors meld together.  If I have reindeer, I cook it with that.  My guess this is a close version to that used by Texas pioneers when cooking up venison chili.

    I keep my cornbread simple and serve it up with real butter.  The deep-throat heat keeps the winter chill away, and we’ve had plenty of chill and not enough Chili this winter.

    Chipotle Chili with Beef, Beans and Vegetables

    1 onion, diced
    2 cloves garlic, minced
    3 T olive oil

    Heat the olive oil in the pan and add the onion and garlic.  Cook over medium heat until the garlic and onion are translucent and tender.  Add:

    1 lb/400 g ground beef
    (substitute ground turkey; or reindeer & other game meat here if you have it – so good!)

    Cook until the meat is thoroughly browned.  Add to the pan and stir:

    1 can of crushed tomatoes
    2 cans tomato sauce
    1 can black beans, drained
    1 can kidney beans, drained

    Bring to a boil and reduce heat to medium.  As the sauce bubbles, chop and add:

    2 red, orange or yellow peppers, chopped into medium-sized chunks
    3 carrots, peeled, cut in half lengthwise, and sliced into half moons
    1 cup of fresh or frozen corn
    1 dried chipotle chili, chopped small, stem removed (other chiles can be substituted)
    1 tablespoon italian seasoning
    1 teaspoon salt
    1/4 teaspoon pepper

    Bubble & Simmer for a nice, long time

    Stir the mixture until thoroughly combined, place the lid on the pot, and allow the chili to simmer for 45 minutes to an hour – even longer if you have the time as the flavors get better and better the longer the cook and meld together.  Taste; add salt & pepper if needed

    Serve hot with cornbread.

    Cornbread

    Preheat oven to 230°C/450°F

    In a large bowl whisk together:

    1 3/4 cup cornmeal
    1 teaspoon baking powder
    1 teaspoon baking soda
    1 teaspoon of salt

    Whisk together until foamy in another small bowl:

    Fresh, organic eggs

    2 eggs

    Add:

    3 tablespoons olive oil
    2 tablespoons of honey
    2 cups of buttermilk*

    *(if you don’t have buttermilk, use 2 cups of milk and 1 teaspoon of white vinegar or lemon juice.)

    Pour egg & milk mixture into bowl of dry ingredients and whisk just until combined.  Place 1 tablespoon of olive oil into a oven-proof skillet and put it in the oven.  Heat it for 2 minutes.  Remove from oven; swirl to distribute oil evenly around the pan; and pour in the cornbread batter.   Return the pan to the oven and bake until gold brown and the top feels firm when pressed, 20 – 25 minutes.

    Serve hot with chili.

    Filed Under: Uncategorized

    • « Previous Page
    • 1
    • …
    • 42
    • 43
    • 44
    • 45
    • 46
    • …
    • 50
    • Next Page »

    Find me on social media

    • Bloglovin
    • Facebook
    • Instagram
    • Pinterest
    • Twitter

    Looking for something?

    Eat Simply, Eat Well 's gallery on Punk Domestics
    • Bloglovin
    • Facebook
    • Instagram
    • Pinterest
    • Twitter

    Copyright © 2025 · Foodie Pro Theme by Shay Bocks · Built on the Genesis Framework · Powered by WordPress