Eat Simply, Eat Well

Healthy recipes & tips to help you live the good life. by Ann Plough

Moving beyond “Täytekakku” to Finland’s ‘secret’ cake – Brita-kakku

July 8, 2013 by aplough

A summer cake worth waiting for:  Brita-kakku

If you’ve lived in Finland, visited Finland, had/have a Finnish friend, or have been to a formal Finnish celebration of any kind, chances are good you’ve had a täytekakku (filled cake). The cake is made of eggs, sugar, flour and baking powder, baked as one large cake, sliced into three layers, and then filled.  Each layer is then soaked in either milk or fruit juice.  Upon each layer is spread a generous portion of whipped cream, topped by a variety of fruit:  strawberries, raspberries, blueberries, kiwi, pineapple, peaches…followed by another layer with more whipped cream and fruit until you run out of layers, and then the whole thing is covered in a layer of whipped cream and is a beautiful thing to behold.

Would you look at that?   Brita-kakku.

But the truth is, täytekakku is not my favorite thing in the world.  It’s not bad; it’s just not amazing either.  There’s a lot of cream and not a lot of substance, and I’m perfectly fine with one small piece and a cup of strong coffee.  This is very unusual for me:  that one small piece of cake is perfectly fine.  Usually I want a “reasonable” size slice of cake – on the slightly larger but not huge side.

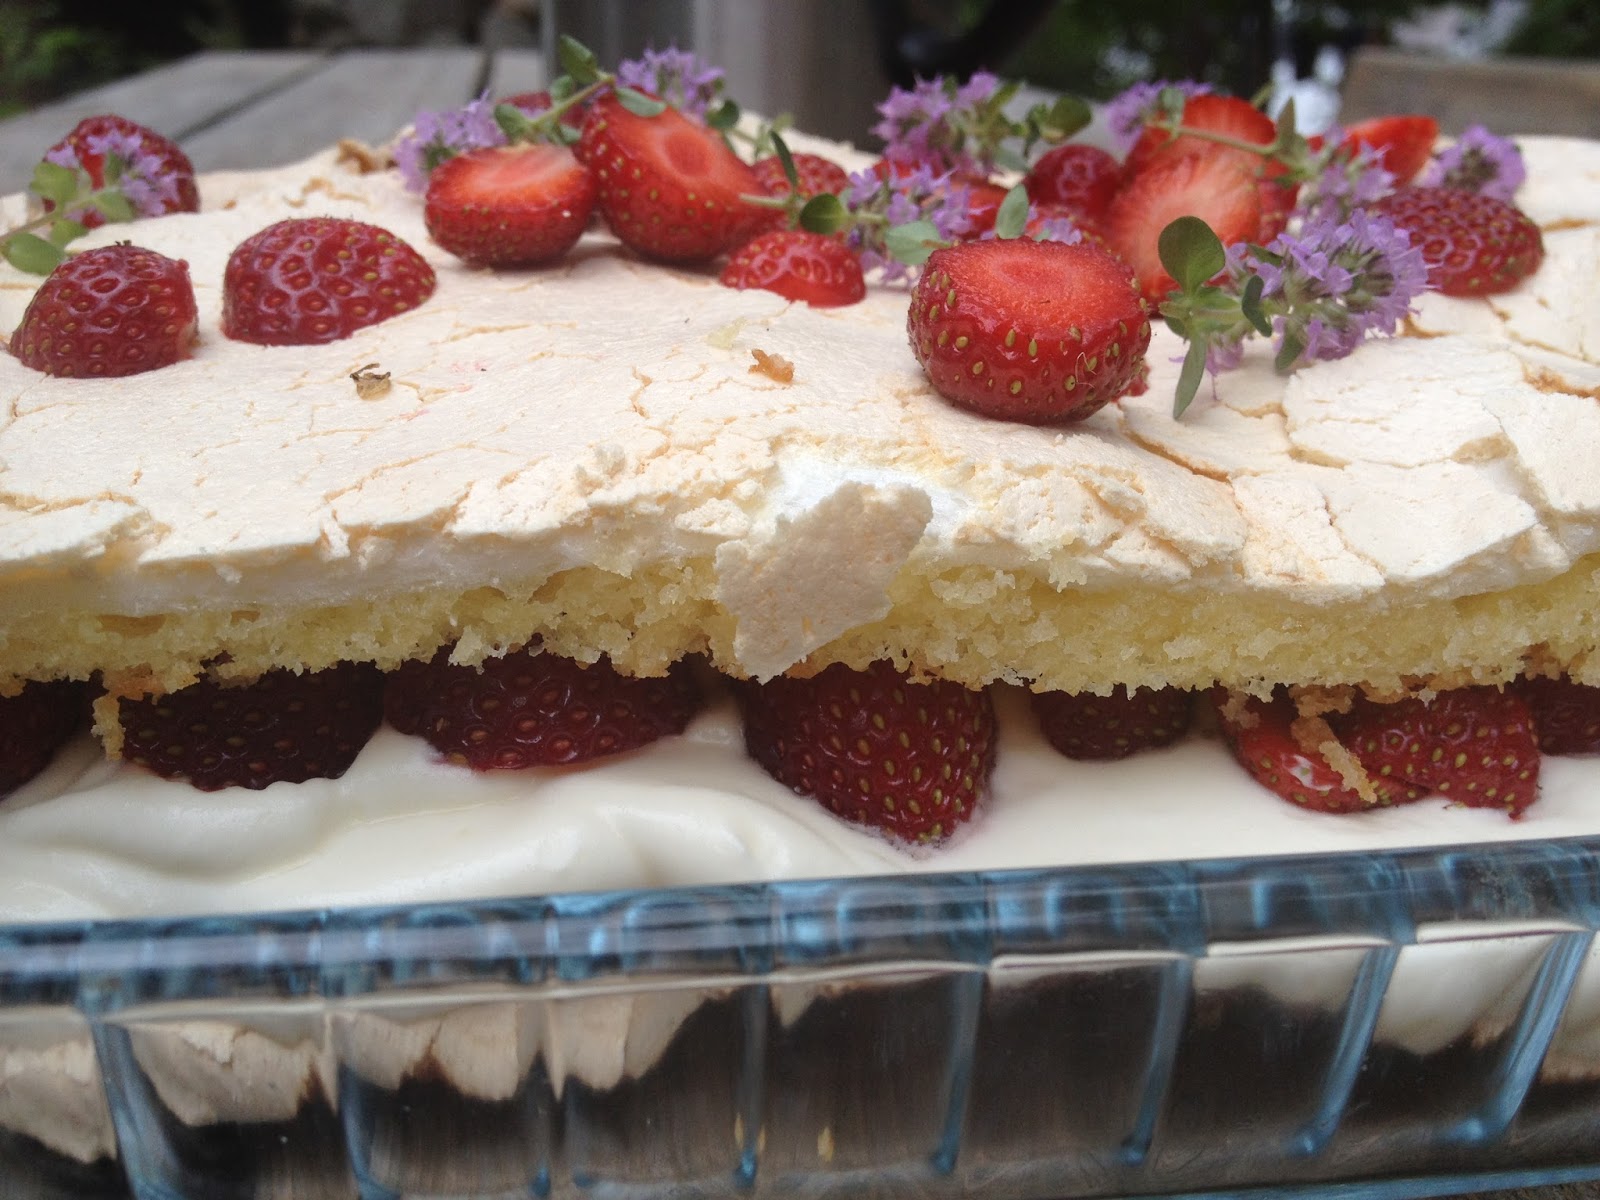
Summer cake for a summer day.

What I have discovered is that Finns have another card to play – one they don’t pull out very often. It’s a delicious and beautiful cake, which I’ve never seen on the menu at any restaurant or in any coffee shop, but I’m not sure why since it’s excellent. It’s a summer cake – and summer happens to coincide with someone’s birthday around here.   The question “what kind of birthday cake do you want” receives the same answer every time:  “ahhh – a Brita-kakku (Brita cake) would be nice…with raspberries!”  Brita-kakku.   This is the one to get excited about.

Summer’s first strawberries along with thyme flowers make for a happy cake

Raspberries are definitely the berry of choice with this cake.  If you don’t have them, freshly picked strawberries won’t disappoint.  You can use all whipped cream for the filling, or you can lighten it up and add a nice tang by subbing half of the whipped cream with Greek yogurt or quark (rahka), which I much prefer.

I used thyme flowers as garnish, and was pleasantly surprised at how well the flavor of thyme worked with the strawberries and the cake overall.  Give it a try – and let me know what you think!

The cake can be made on a large cookie sheet / jelly roll / oven pan which has been lined with parchment paper, or you can grease and flour two cake pans, line the bottoms with parchment paper, and divide each portion of the batter between them.

Happy Birthday.  Happy, happy any day.

You don’t have to reserve this cake for summer days only, but there’s a lot to be said for sitting at a picnic table with the wind blowing off of the lake or the sea, enjoying a “reasonable” size chunk of Brita-kakku topped with the best of Finland’s summer berries and a strong cup of java.

Forget the täytekakku.  This cake is where it’s at.

Summer.

Brita-kakku

There are so many posted recipes for this cake out there.  I couldn’t figure out who the original author is, anymore than I know to whom we can give credit for the täytekakku.  You can find it through Valio, maku.fi, Martat, and any number of blogs.  It pops up in magazines occasionally and in newspapers as well.  Here’s the version I typically use after a few modifications, and it’s very close to the version I found on the Martat website.  Some people top the meringue layer with slivered almonds; I don’t – but you can add them if you wish.  And one more note:  use real butter here.  There are very few ingredients and each of them has to shine.  Most recipes call for margarine – that is just a bad idea anytime in my opinion – but especially bad with this cake.  The recipe looks long, but this comes together really quickly and puts a smile on everyone’s face.

Prep:
Preheat the oven to 350°F / 175°C.  If using a sheet pan, line it with parchment paper.  If using cake pans, butter and flour two pans and line the bottoms with a round of parchment paper.

Separate two eggs:  put the whites into a stainless steel bowl, ready for whipping.  Put the yolks into a little cup – you’ll need them soon.

For the cake layer you’ll need:
125g / 4.5 oz / 1/2 cup + 1 tablespoon butter
1 dl / 1/2 cup sugar
1 teaspoon vanilla extract (preferred) or vanilla sugar
2 egg yolks
1.5 dl / 3/4 cup all-purpose flour
2 teaspoons baking powder
1 dl / 1/2 cup milk

In a medium bowl, using a hand-held mixer or a stand mixer, cream together the butter and sugar until it is light in color and fluffy.  Add the remaining ingredients and beat until well combined.  Spread the mixture evenly out onto your sheet pan, or divide evenly between your two cake pans and spread it evenly.

For the meringue layer you’ll need:
2 egg whites
1.5 dl / 3/4 cup sugar

Beat the egg whites until they start to fluff up and form a frothy mass.  Add the sugar all at once, and continue to beat the egg whites until they form stiff peaks, and you can turn the bowl upside down with out any movement from the egg whites.  Spread the meringue over the top of the cake layer – carefully so that you don’t mix the layers.

Bake the cake in the oven for 15 – 20 minutes or until the top is a nice golden brown.  Remove from oven and cool to room temperature on/in the pan.

For the filling you will need:
1.5 dl / 3/4 cup heavy whipping cream 
1.5 dl / 3/4 cup greek yogurt or quark (rahka)
2 tablespoons sugar

In a cold, stainless steel bowl, whip the heavy whipping cream until it is fluffy but not at all stiff.  Add the greek yogurt or quark and the sugar.  Beat again briefly to combine.

Assembly:

In addition to the above, you’ll need about 3 cups / 6 dl of your fruit or berry of choice.  I highly recommend strawberries, raspberries, or if you can find them, blackberries.

For the garnish:
Reserve 10-12 berries 
Lemon balm, mint or thyme flowers for garnish

Once the cake is cool, cut it in half lengthwise (if you have used a sheet pan.  Cutting is unnecessary if you have made two layers already using cake pans).  Place one layer onto a serving plate of the appropriate size and shape. Spread all of the filling over the bottom layer.  Top with fruit so that the filling is completely covered.  Lay the second layer on top.  Sprinkle over your reserved berries and your herb garnish of choice.

Serves 8.  Recipe works well when doubled.


Filed Under: Uncategorized

Make yourself a great Burger – Classic Hamburgers

July 5, 2013 by aplough

Letting the magic happen over open flame

On the Fourth of July, dreaming of grilling parties in America, as people celebrated Independence Day and waited for the fireworks to begin, I had thoughts in my head of burgers grilled over an open flame, and a few people to share them with.

I hadn’t had a “real” Fourth of July grillout since I moved to Europe from Seattle eight years ago.  So JJ called up H & R and hatched a plan to have a grill out near a little harbor in Lauttasaari.  I had a few hours on my hands, this ketchup from last week, and this hamburger bun recipe on my mind and started prepping for the feast.

Whole wheat burger buns and sharp cheddar cheese

When an American is somewhere overseas and feeling a little homesick, there are some things that help to ease the pain a bit:  namely, in this case, great grilled burgers, Cool Ranch Doritos, wonderfully renamed “Cool American Doritos” here in Finland and in other parts of Europe, and an ice cold can of Coca Cola – something I normally never drink since I’m not really a pop/soda fan, but when offered up by H on a warm summer evening on the Fourth of July by the grill – who would bother trying to resist?

Getting closer…

A few notes:

  • Make the ketchup!  It’s just so good.  H ended the evening dipping Cool American Doritos into the stuff – it goes with a lot more than just hamburgers.
  • If you make those hamburger buns, and I highly recommend that you do, divide the dough into 20 equal rounds, not 10 as the recipe says.  If you make only 10, they’ll be HUGE, and you’ll feel sick trying to make it through one.  Also, I made mine 3/5 whole wheat on my second go-around, and preferred that to the lighter version
  • If you use a hamburger basket / halstari to cook these – brush or spray the frame with olive or vegetable oil, otherwise they’ll stick like crazy
  • Warm and toast your burger buns over the grill too – they are just better that way.  And butter them lightly if possible – don’t be scared! A little real butter goes along way and is so good here.  Also, the butter keeps the ketchup from soaking into the bun – a very good thing.
  • Use sharp cheddar cheese, and lay it on the bottom of the bun, place the searing hot burger on top, and proceed with dressing up your burger as you wish…
  • …speaking of which, I like:  ketchup, pickled red onion, dill pickle, and very crisp lettuce on mine
  • This probably goes without saying – but enjoy them outside!  Nothing like having a good burger in hand and feeling the fresh air around you as you enjoy.
Happy Moments.  Big Burger.  Cool Ranch Doritos.  Coca Cola.  Some days are like this.
Classic Hamburgers
400g / 1 lb organic ground beef
1/2 onion, diced fine
1 egg
2 tablespoons fresh parsley, chopped fine
1 teaspoon salt
1/4 teaspoon ground pepper
Mix all the ingredients together with your hands in a medium bowl.  Cover; let rest for 30 minutes at room temperature. 
Make sure the grill is nice and hot.  Brush oil on the kind of grilling device you’re using to prevent the burgers from sticking.  
Using your hands, divide the seasoned meat into four portions and form palm-size patties with your hands.  Lay on the hot grill, and grill to your desired level of doneness (I like a slightly pink center).  
When the burgers are nearly done, split the burger buns in half and lay them on the grill to toast.  Let them toast until the just begin to turn golden brown – shouldn’t take more than a minute.  Pull them off, butter both sides.  Put a slice or two of cheddar cheese on the bottom half of the bun and top with a hot burger.  Proceed to dress up your burger in a way that makes you happy.  Serve with chips and an ice cold drink of choice.
Happy Summer Days!
Serves 4.

Filed Under: Uncategorized

Strawberry Shortcake

July 3, 2013 by aplough

Strawberry Shortcake

Strawberry Shortcake – a classic summer treat in the USA.  When the strawberries are at their perfect pitch of sweetness and abundantly available, as they are now in many parts of the world as well as here in Finland, it’s time to gather yourself a nice big pile of them to pour over this shortcake.

It’s something that is often served up around this time of the year:  the days surrounding the Fourth of July and the related picnics, fireworks shows, grilling parties and other Independence Day celebrations. Add a few blueberries in with the strawberries and you’ve got a dish as red, white and blue as the good old American flag.

Typically, strawberry shortcake is served up on nice little plates with a cup of coffee or tea on the side and eaten close to a place that provides refrigeration and electricity because one of the key ingredients here is freshly whipped cream.

But…

…it’s summer, so I say take the fun with you in a jar and shake it up in a place more exciting than your dining room or backyard.  With a little prep in advance, you too can enjoy these treats in fresh air with sea views, and hopefully, with great company as well.

For the enjoyment of this treat, we planned an weekday evening trip to Suomenlinna, located on a group of islands just of the coast near Helsinki.  Built in the middle of the 18th century during the Swedish rule of Finland as a maritime fortress and a base for the Archipelago fleet, Suomenlinna is now listed as a UNESCO World Heritage Site and is one of Finland’s most popular tourist destinations.  And with good reason.  Easily accessible from the city by water ferry, with a permanent population of around 800 people, it’s a delightful place to spend an afternoon or an evening enjoy the beauty of the Finnish archipelago.

For the shortcake part, I turned to my trusty Joy of Cooking and used the classic currant scones recipe there with minor modifications.  (If you are looking for an excellent, all-around cookbook that covers nearly everything, Joy of Cooking is definitely it.  I’ve used mine for years and years, adding notes in the margins and have been inspired over and over again.)

Cut the shortcake into triangles
Bake and cool

I washed, trimmed and cut the strawberries at home, and stored them in a tightly sealed plastic container for the ferry ride to Suomenlinna.  I chilled a 3/4 liter/quart glass jar, poured in a quarter cup of fresh whipping cream for two people, and sealed it tightly with a lid, popped it in a thermal bag along with ice packs and a little jar with coffee cream.  The shortcakes are prepped and baked in 15 minutes; cool them for 10 minutes on a wire rack in open air, pack them up in a breathable paper bag and you’re off.

If you live in Helsinki, get yourself, your friend(s) and your picnic down to the Helsinki harbor near Kauppatori.  If you haven’t had time to buy strawberries yet, you can pick them up from one of the vendors here before you head out.

Water ferry approaching Suomenlinna

You can ride the ferry for the price of a metro ticket, or just use your metro pass if you already have one.  It’s a beautiful 15 minute or so float out to Suomenlinna, a great place for a picnic all spring, summer and fall long.  The boat is typically full of people out to enjoy the scenery and peaceful atmosphere.  But don’t worry, the island is large and there are abundant walking paths out to a spot saved up just for you.  There is a new grocery store just off to the right of the harbor, so if you haven’t already picked up your cream, you can buy it here, along with most basics you might need for a picnic.

Viking Line passing through the archipelago

Enjoy an afternoon or an evening watching the boats come and go as you sip coffee from your thermos and satisfy your sweet tooth with this lovely summer treat.

For my American friends, dig into this as you wait for the fireworks show to begin.  Happy Fourth of July!

Strawberry Shortcake

Strawberry Shortcake with freshly whipped cream
I used 2 of the scones for 2 people and brought along the appropriate amount of strawberries and cream.  The remaining scones are excellent the next day served up with a little jam – or of course, you can just make shortcake again!

You’ll need:
Whole wheat scones (recipe below) – makes 8
Fresh strawberries, washed, cored & sliced – 2 quarts/liters for 8 people
Freshly whipped cream – 1/2 pint/2 dl for 8 people

Grab your jar of chilled whipping cream, make sure the lid is tightly secured, and start shaking.  Shake vigorously.  Get that cream moving around in the jar.  Put some joy into it.  Check your progress every now and again – you want a nice, softly drooping whipped cream, not stiff, and definitely not butter.

When your cream is properly whipped into a fluff…

Slice each scone in half and lay them face up on a plate.  Top with sliced fresh strawberries and spoonfuls of fresh cream.  Look out across the distance at the view.  Dream of spending days like this in Hawaii in January.  Breathe deeply.  Take another bite. Enjoy the summer and the moment while they last.

Serves 8.

Whole wheat scones
adapted from Joy of Cooking’s  Classic Currant Scones recipe

In a medium-sized bowl, combine:
1 cup whole wheat flour
1 cup all-purpose flour
1/3 cup sugar
1 tablespoon baking powder
1/2 teaspoon salt

Add
6 tablespoons / 90g chilled butter, cut into pieces

With a fork or a pastry cutter, mix the butter into the flour mixture until butter pieces are the size of peas and are well incorporated.

In a small bowl combine:
1 egg, beaten
1/2 cup heavy cream or buttermilk
1 teaspoon grated lemon zest 

Pour the cream mixture over the flour mixture and combine with a fork until it starts to come together.  With your hands, fold and press the mixture together against the sides of the bowl until it forms a ball.

Turn the mixture onto a parchment lined baking sheet.  Divide the dough into two equal portions.  Flatten each portion into a round disk and make a cross cut with a knife to form 4 equal triangles from each disk.  Separate the scone triangles so they are spaced at least 1 inch /2.5 cm apart.

Bake until they are golden brown; 12 -15 minutes.

Makes 8 scones.


Filed Under: Uncategorized

  • « Previous Page
  • 1
  • …
  • 22
  • 23
  • 24
  • 25
  • 26
  • …
  • 50
  • Next Page »

Find me on social media

  • Bloglovin
  • Facebook
  • Instagram
  • Pinterest
  • Twitter

Looking for something?

Eat Simply, Eat Well 's gallery on Punk Domestics
  • Bloglovin
  • Facebook
  • Instagram
  • Pinterest
  • Twitter

Copyright © 2025 · Foodie Pro Theme by Shay Bocks · Built on the Genesis Framework · Powered by WordPress