Eat Simply, Eat Well

Healthy recipes & tips to help you live the good life. by Ann Plough

Make it Yourself: Pumpkin Puree and how to roast a pumpkin or squash

October 27, 2014 by aplough

Roasted Hokkaido Squash

I’ve received several questions lately about how to roast a pumpkin and how to make your own pumpkin puree.  Here’s a quick, simple, step-by-step to tell you how it’s done.  When choosing a pumpkin to roast, avoid the huge pumpkins grown for carving Jack O’ Lanterns out of.  Instead, buy a sugar pumpkin, Hokkaido (also known as Uchiki Kuri), Mosquee de Provence or Butternut Squash so that the end product has good flavor and texture.

The squash you see in this post is a 1.3 kg Hokkaido.

Step 1:  Preheat your oven to 375°F/190°C.  Line an oven pan with parchment paper.

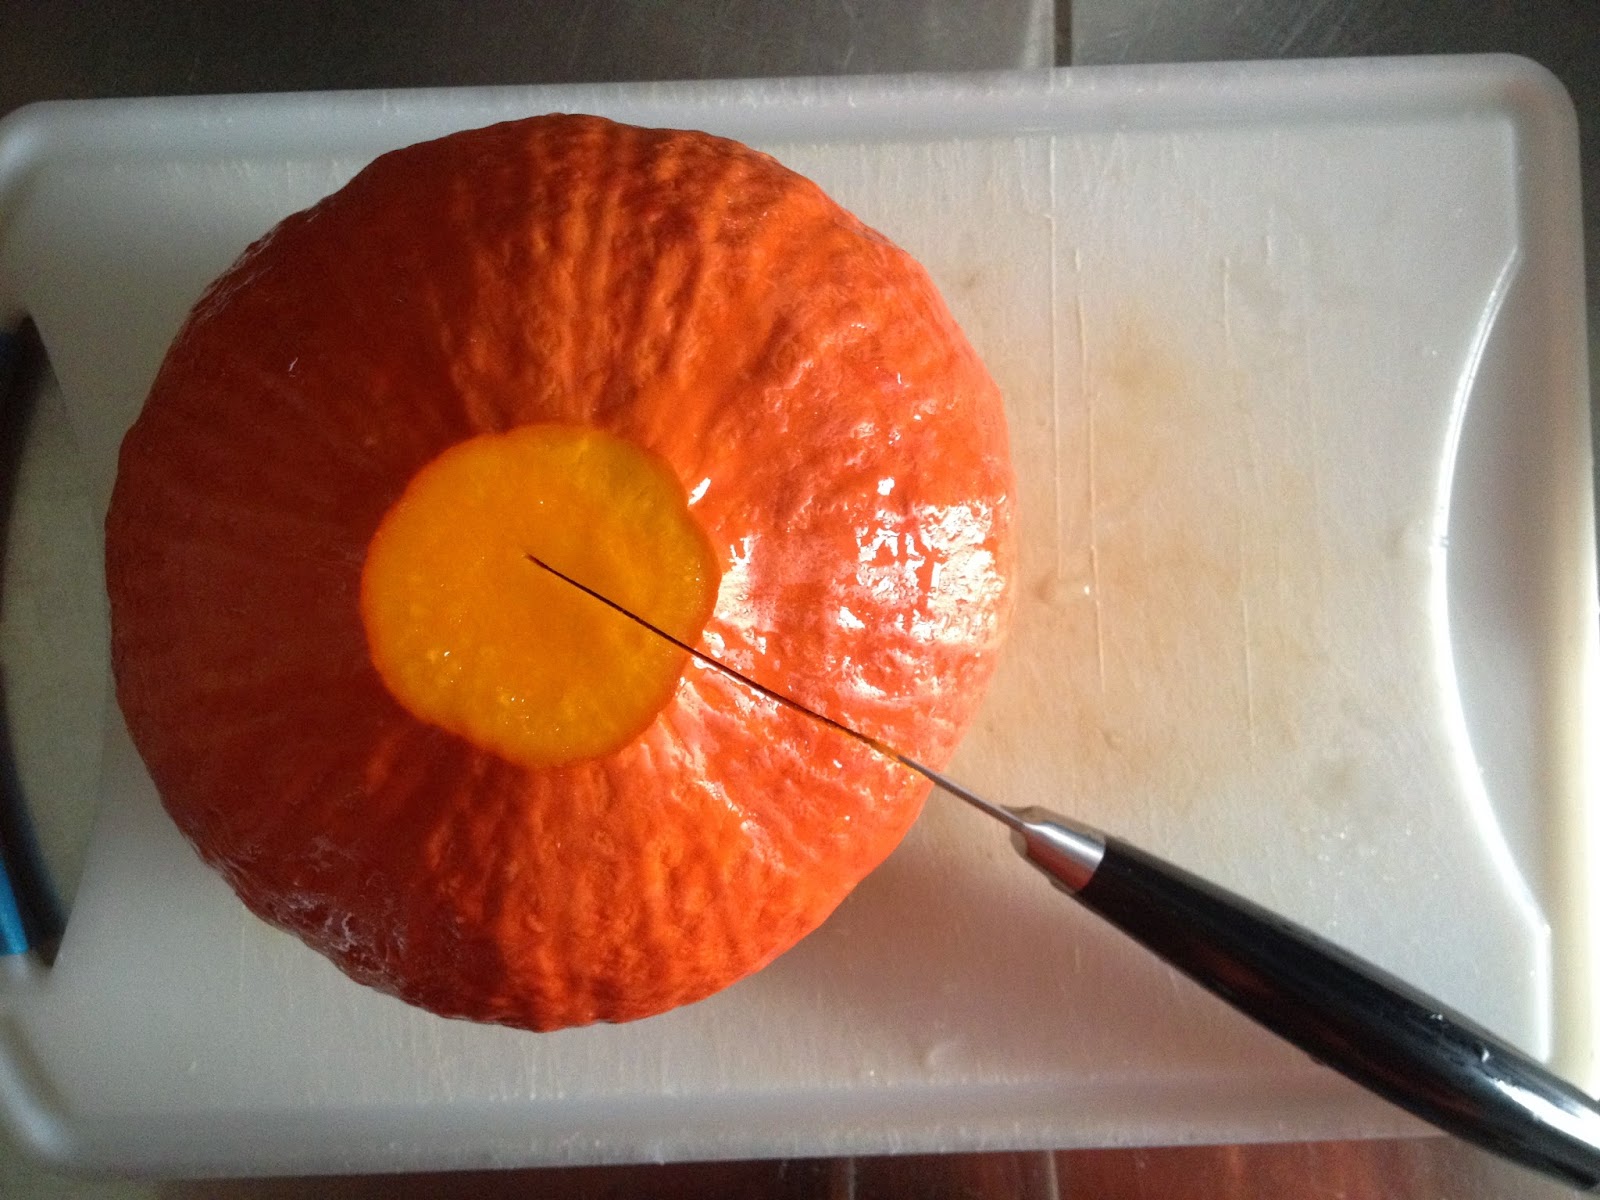
Making the first cut.

Step 2:  Cut the stem and a small piece of the bottom off of your pumpkin.  The stem is extremely tough and hard to cut through, so this makes the process easier.  Cutting a piece off the bottom gives you a stable surface while cutting.  Take a heavy chef’s knife and point the tip into the center of the cut at the top of the pumpkin where the stem was.  Press the knife about 1″ (2.5cm) into the pumpkin, and then angle the knife downward and push your way through the pumpkin and down toward the bottom.  When your knife hits the cutting board, pull the knife out of the pumpkin, rotate the pumpkin 180° with the top still up, and repeat, cutting in the same way exactly opposite your first cut, down and through, slicing the pumpkin in half.

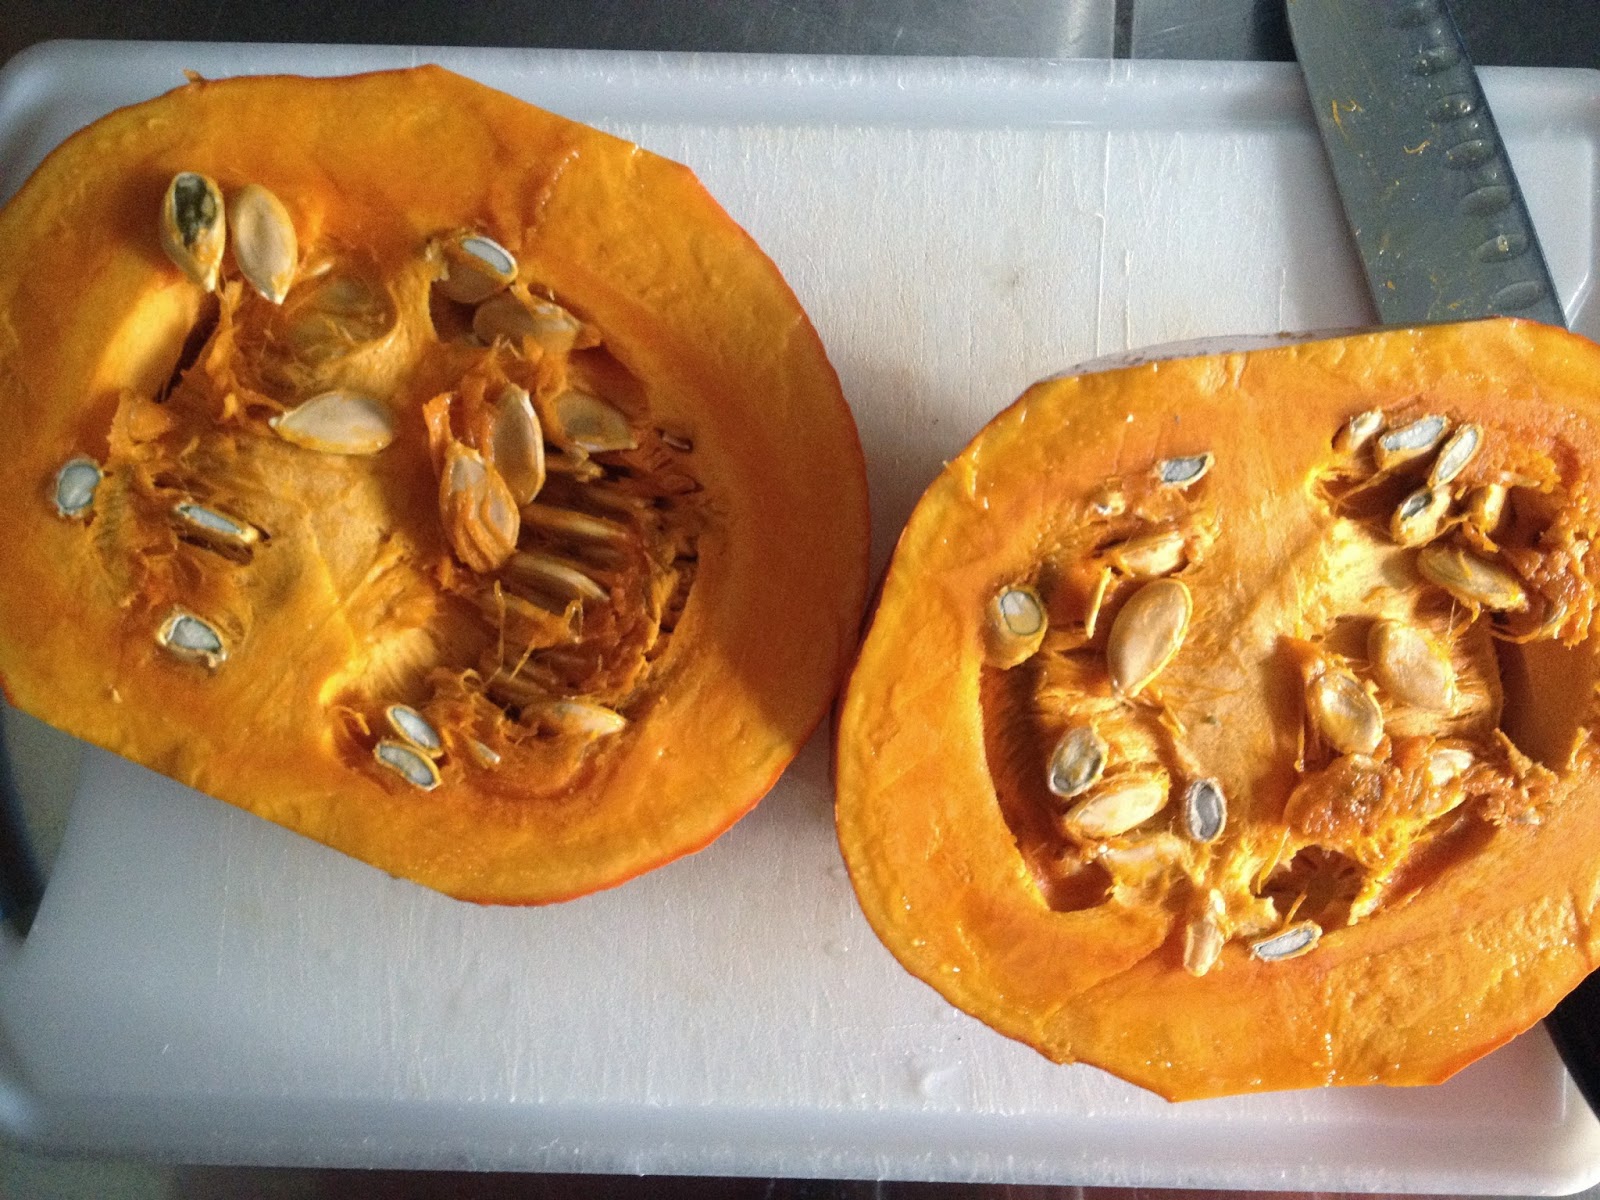
Full of beautiful, flavorful seeds

Step 3: Using a heavy, sturdy spoon, scoop the pumpkin seeds out and into a bowl.  Save these for later – roasted pumpkin seeds are an excellent snack.

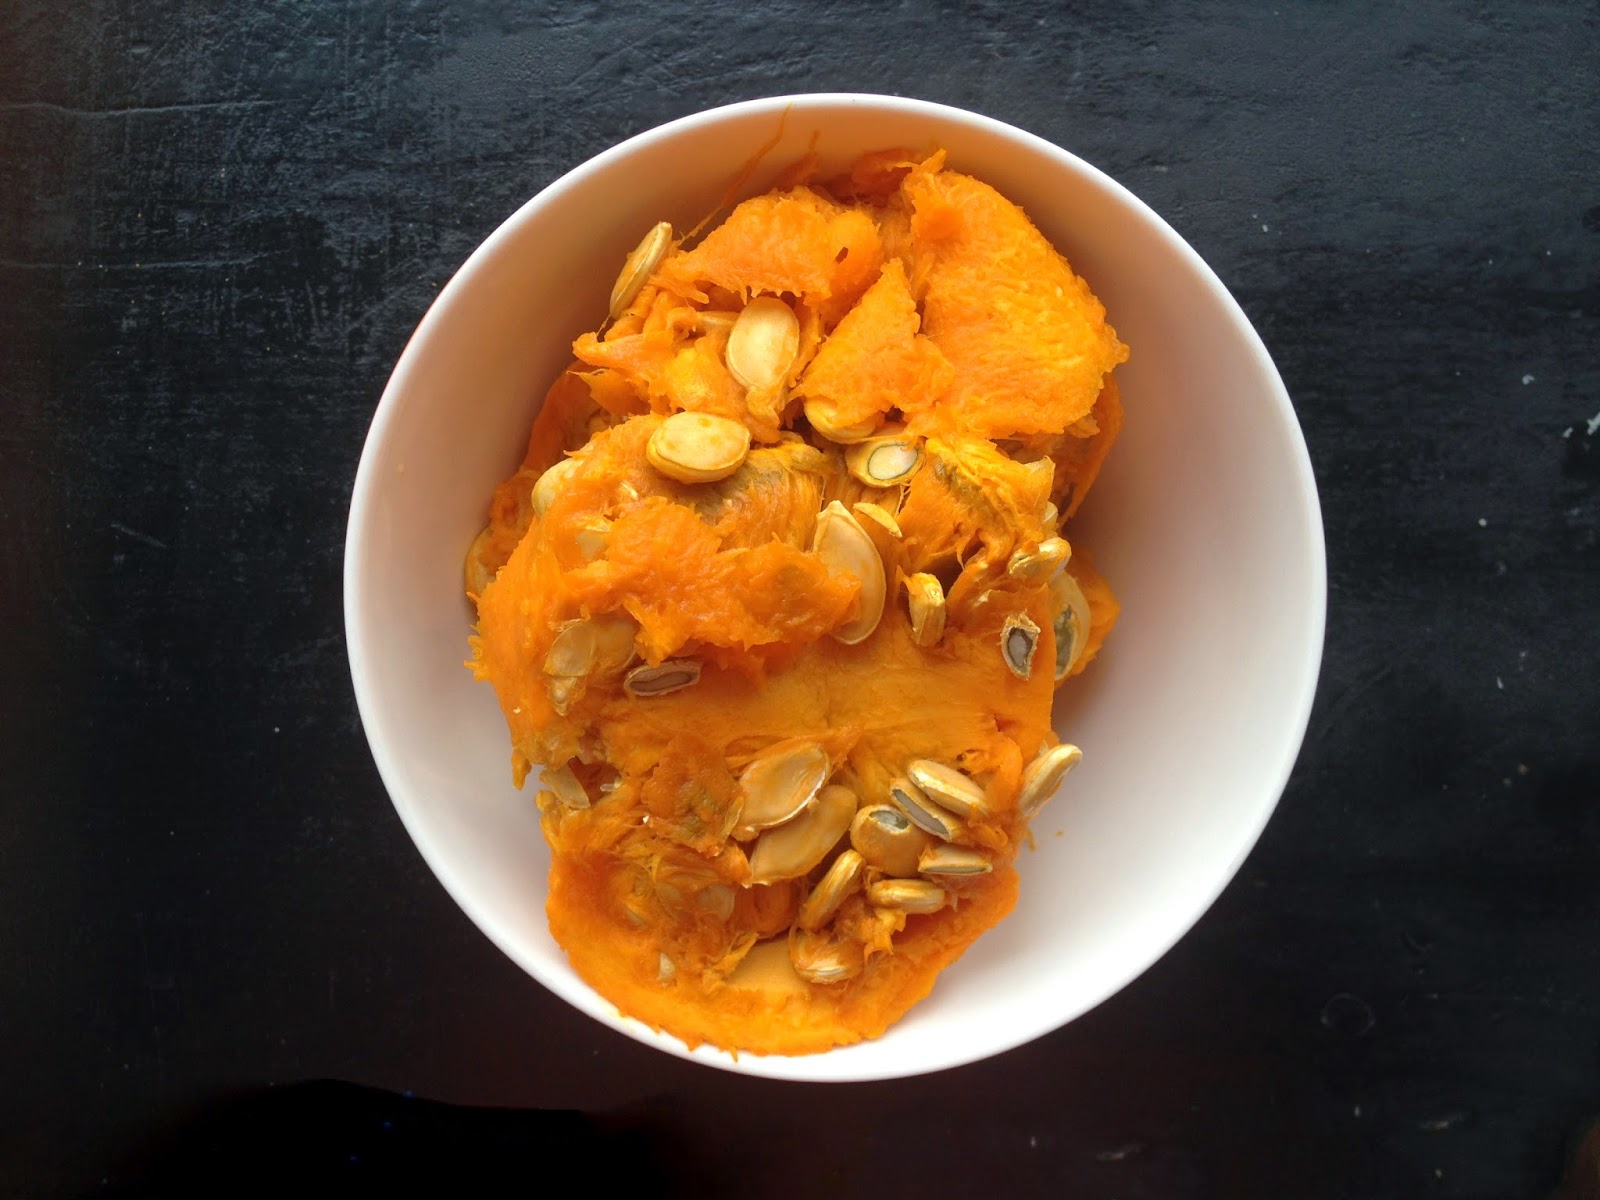
Remove the flesh from around these seeds and save them for roasting later

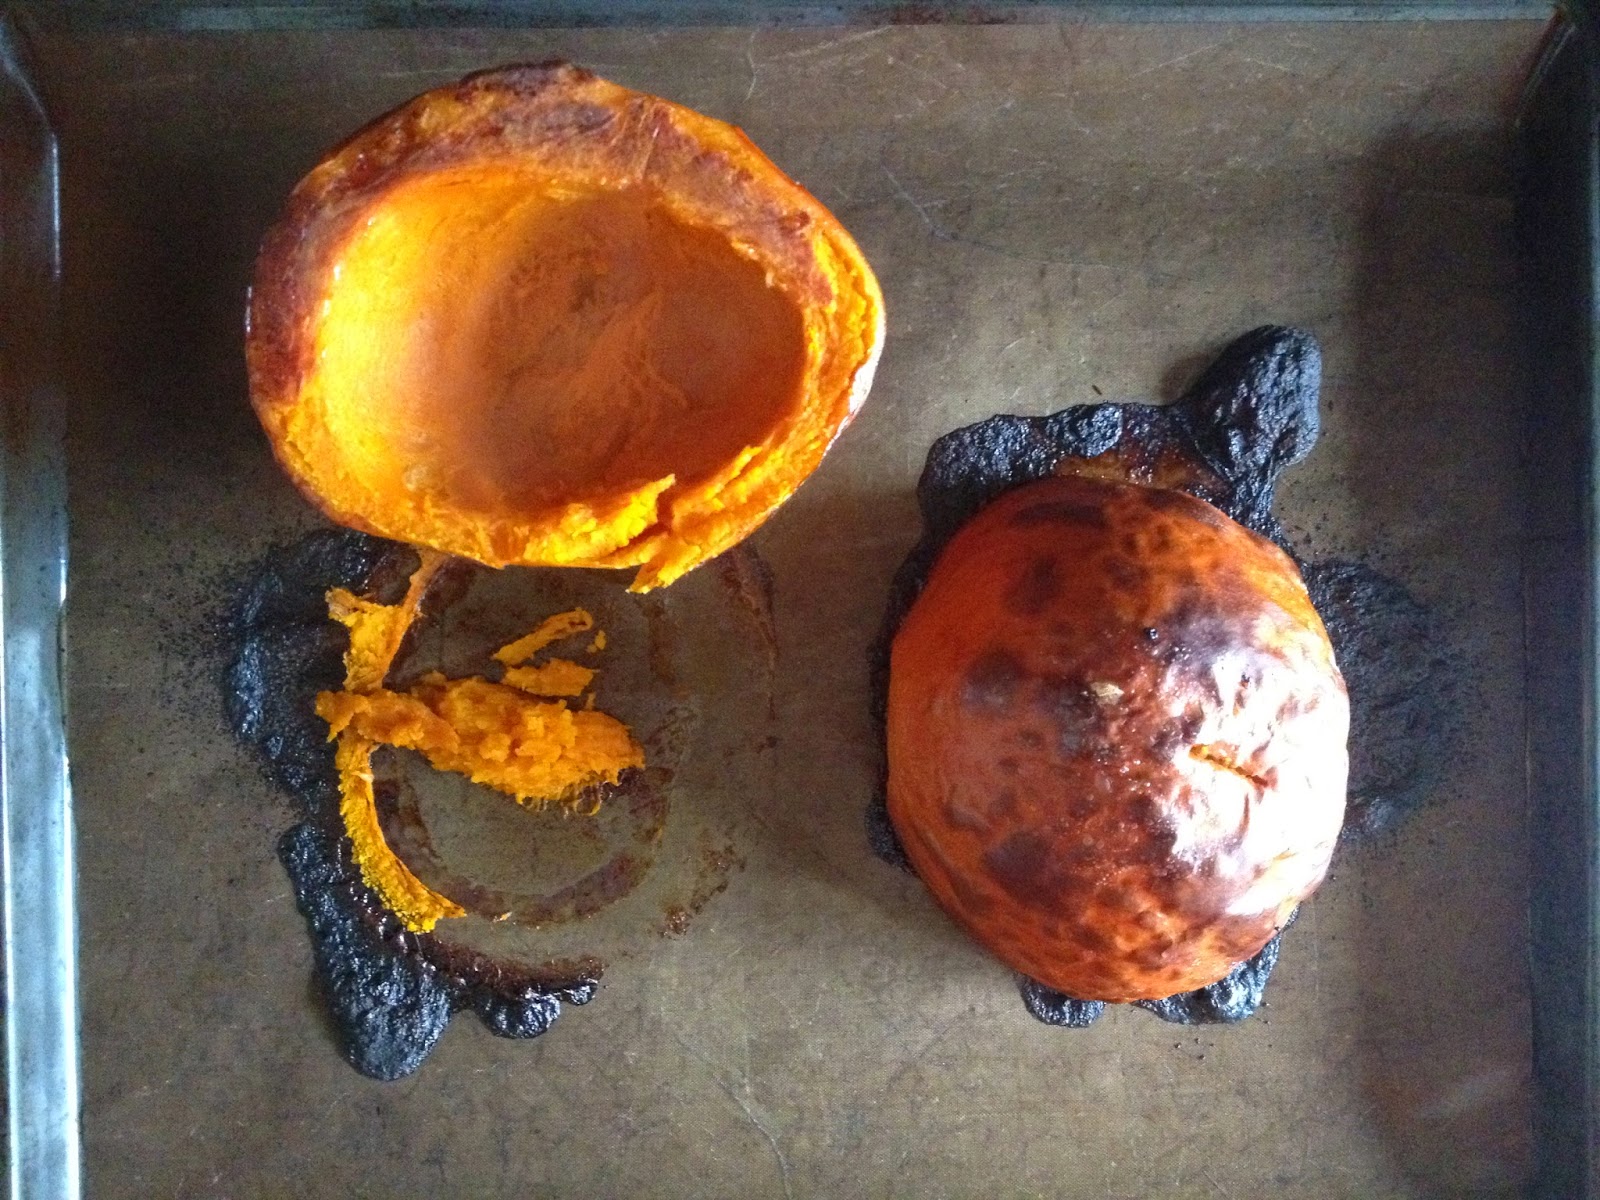
Step 4: Lay the pumpkins on the baking sheet cut side down.  Place them in the hot oven and bake for 45 – 60 minutes, or until the pumpkin skin can be easily pierced with a fork.

Ready for the oven.

Step 5:  Allow the pumpkins to cook for 15-20 minutes so that you don’t burn your fingers when taking out the pumpkin meat.  You can remove the meat one of two ways:  Either peel the skin off of the pumpkin meat using a knife, or scoop the pumpkin meat out of the shell using a spoon.

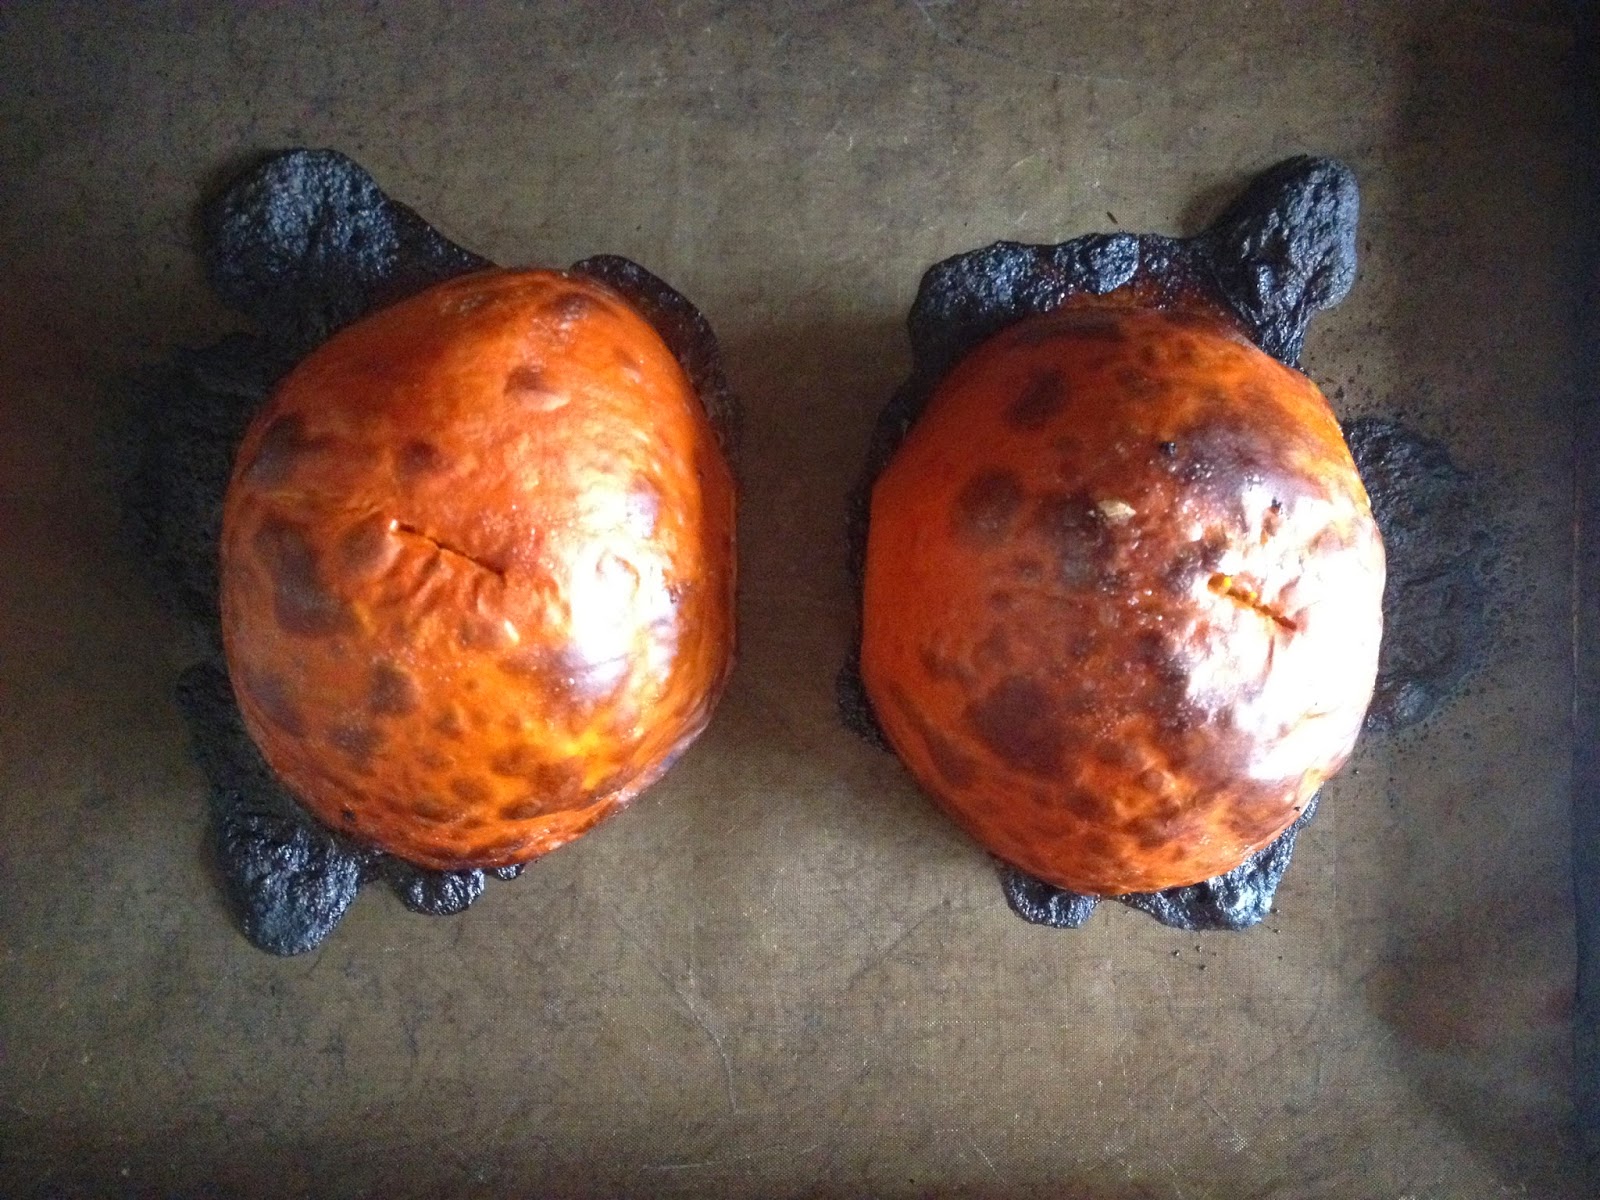
Note the fork holes where the readiness of the pumpkin was tested. These are perfect.

Step 6:  Place the pumpkin meat into a food processor and process until very smooth.  Do not add water – you don’t want your pumpkin puree to be watery.  A thick pumpkin puree is what you are looking for when cooking.  If your pumpkin puree is really watery, you can either use it for soups where the water content doesn’t make a big difference and can be compensated for by adjusting the other liquids you add, or you can drain the pumpkin puree through a sieve for several hours to remove the liquid.

Roasted Hokkaido Squash

Step 7:  Measure out your pumpkin puree and mark the storage containers with the quantity.  I usually freeze the puree in one cup/250 ml quantities as I typically need 1 or 2 cups in the recipes I use.

How much pumpkin puree will you get?  It depends on the size of your pumpkin.  My 1.3 kg Hokkaido yielded just over 2 cups / 500 ml of pumpkin puree.  

Filed Under: Uncategorized

Brussel Sprouts, Potato and Cheddar Gratin

October 27, 2014 by aplough

Brussel Sprouts, Potato and Cheddar Gratin 

I had actually planned to post a different recipe today, but then the mail arrived.  Jamie Oliver Magazine’s Christmas issue arrived with a clunk and a thump through the mail slot in the door.  As I turned the magazine over to pull off the plastic covering protecting it during its ride from the UK to Finland, I came face-to-face with brussel sprouts.  Laid out in the shape of an evergreen tree, they looked nice and jolly, until I registered the meaning of the script printed across the top of them:

Trust me: treated well, brussel sprouts need no febreze™

Having just waxed poetically in a blog post published one day earlier about the virtues of this much maligned vegetable, I felt compelled to give it one more push out from under its undeserving reputation as the most unworthy brassica and into, perhaps, the realm of your holiday table.

Brussel Sprouts, Potato and Cheddar Gratin

Yes, my friends, these are brussel sprouts dressed up for your Harvest, Thanksgiving or Christmas dinner.  Brussel sprouts like you’ve never had them before.  If you’ve been hiding sad little frozen green beans under a layer of canned fried onions smothered in canned cream of mushroom soup; please, just put that recipe aside, load up on a nice pile of brussel sprouts, a hunk of fine cheddar cheese and a few potatoes, and make this dish for your friends and family.  Crisp this it up during a long bake in your oven, and settle it next to that roast chicken or turkey, crown of lamb chops, holiday ham, black bean burgers.  Whatever it is you plan to serve as a main course, make sure this gratin is riding along as the supporting act.  You can even make it a day or two ahead and reheat it in the oven on the day of your celebration.

You’ll thank me later when, after your first mouthful, you realize that brussel sprouts have come a long way, baby, and you were there to witness the transformation.

Brussel Sprouts, Potato and Cheddar Gratin

Brussel Sprouts, Potato and Cheddar Gratin

Preheat oven to 375°F/190°C.  Have a large, ceramic, oven-safe casserole dish ready.

2 tablespoons cooking oil
1 yellow onion, minced
2 teaspoons minced, fresh rosemary
2 tablespoons butter
2 tablespoons flour
3 cups / 800 ml milk (oat milk works well here, too)
2 cloves garlic, minced
1 teaspoon salt
1/4 teaspoon fresh ground black pepper
1 1/4 cup / 3 dl shredded cheddar cheese
1/2 lb / 200g brussel sprouts, cut into thin slices
2 large potatoes, shredded (do this just before you need them so they don’t turn brown)
1/2 cup bread crumbs

1.  In a large frying pan, over medium-low heat, heat the oil and add the onion and rosemary.  Cook until the onion is completely soft, about 20 minutes.

2.  While the onion cooks, make the béchamel.  In a medium, heavy-bottomed saucepan over medium-high heat, melt the butter.  Once the butter has melted, whisk in the flour until the flour and butter are completely combined.  They will form little lumps that look like pebbles on the bottom of the pot.  Add 1 cup of the milk and whisk vigorously until the flour-butter lumps disintegrate into the milk. Pour in the remainder of the milk and add the garlic, salt and pepper. Set the whisk aside, and using a flat-bottom wooden spoon, continue stirring the mixture until it comes to a boil.  Turn off the heat and add 1 cup of the cheddar cheese.  Stir well to combine the melted cheese with the milk.  Set aside.

3.  Once the onions have cooked, add the slices of brussel sprouts to the pan, breaking the slices up into thin shreds as you go.  Cook over medium-high heat, covered, until the brussel sprouts start to soften.  Turn off the heat.

4.  Assembly:  Pour a generous spoonful of béchamel into the bottom of your casserole dish.  Spread 1/3 of the shredded potatoes over the béchamel.  Top with 1/2 of the brussel sprout-onion mixture.  Pour another generous scoop of béchamel evenly over the top, add 1/3 potatoes, the remaining half of the brussel sprouts and the last 1/3 of shredded potato.  Pour another scoop of béchamel over the top.  Finish by sprinkling the bread crumbs and the remaining 1/4 cup of cheddar cheese evenly across the surface, and top with any remaining béchamel.  Bake for 40 minutes.

Serves 6 as a side dish.

Filed Under: Uncategorized

Brussel Sprouts Avocado Salad with Creamy Dressing

October 26, 2014 by aplough

Brussel Sprouts Avocado Salad with Creamy Dressing

I’ve been in the mood for brussel sprouts.  I ate them three times last week and will be coming back for more.

What?!?  Did you say brussel sprouts? As in, those stinky, little, cabbage-like, weird little vegetables?

I am actually feeling a little sorry for brussel sprouts – they get a bad rap.  Since I know that most people turn their mouths down in disgust when this miniature cruciferous vegetable is mentioned, declaring emphatically “I hate brussel sprouts….”, I decided to do a quick check on just how badly they are disliked.  The answer:  top of the list of most hated vegetable here, here, and here.  And here, too.  Ok, so maybe try them on kids?  No chance.

And I have to admit, the first time I had brussel sprouts, I was far from enamored. “Not my thing,” was my response to the squishy, smelly pile of overcooked vegetables snuggling up next to the rather nice looking beefsteak on my plate, and it was the response of most people I knew who had tried them. This is no surprise since most of the time they are on offer anywhere they have been cooked within an inch of their life, the once lovely sage green cabbage fading away into a dull, gray, soggy orb and, having been typically boiled, the flavor watered down and unpleasantly sulfurous.

Raw, sliced brussel sprouts. Seriously. Aren’t they gorgeous?

It doesn’t have to be this way.  In fact, you don’t need to cook them at a all (though there are excellent options for doing so and resulting in a dish that will delight you).  And definitely, definitely do not boil them forever. You can use them raw, in a salad.  Steam them lightly (here’s how to do it right)and toss with a nice vinaigrette.  Roast them with olive oil, salt and herbs for a wonderful appetizer, use them as a base for satisfying gratin.  The possibilities are endless.

Once you’ve gotten over the grim memories of poorly presented brussel sprouts and sink your teeth into a dish that treats them right, you can begin enjoy all the good things they bring with them.  They provide your body with antioxidant support, better digestive health, and help reduce inflammation in the body.  A single 1-cup serving of this powerhouse vegetable provides with 249% of your recommended daily amount of vitamin K and 129% of vitamin C  They are also a good source of folate, manganese, copper, choline, vitamins B6 and B1, potassium and other many other valuable nutrients.  (Source:  whfoods.com)

Go easy on yourself and your palate as you start your relationship with brussel sprouts anew.  This addicting salad is a good side dish for a soup or sandwich or savory tart – or you could even put it ON a sandwich – who am I to judge?   Oh, my oh my is this a good one.  You have the crunch of the brussel sprouts.  The bite of the onion.  The creaminess of the avocado.  And a smooth, tangy dressing elevating this humble veggie to a whole new level.

Serve with or without roasted pumpkin seeds, your call.

Serve it along side a Pumpkin Sage Tart, perhaps

Brussel Sprouts Avocado Salad with Creamy Dressing

12 brussel sprouts, sliced thinly
1/2 avocado, diced
2 green onions, diced
2 tablespoons red wine vinegar
2 tablespoons creme fraiche or greek yogurt
1 tablespoon olive oil
1 teaspoon liquid honey
1 teaspoon salt
1/4 teaspoon freshly ground black pepper
Sprinkle with toasted pumpkin seeds or sunflower seeds, optional

Combine the brussel sprouts, avocado and onions in a medium bowl, breaking apart the brussel sprout slices with your fingers as you mix.

Combine the vinegar, creme fraiche or yogurt, olive oil, honey, salt and pepper in a small bowl.  Whisk well to thoroughly combine ingredients.

Pour the dressing over the salad greens and toss with your fingers to combine well.  Sprinkle with toasted pumpkin seeds or sunflower seeds, if desired

Serves 2-4.

Filed Under: Uncategorized

  • « Previous Page
  • 1
  • …
  • 8
  • 9
  • 10
  • 11
  • 12
  • …
  • 50
  • Next Page »

Find me on social media

  • Bloglovin
  • Facebook
  • Instagram
  • Pinterest
  • Twitter

Looking for something?

Eat Simply, Eat Well 's gallery on Punk Domestics
  • Bloglovin
  • Facebook
  • Instagram
  • Pinterest
  • Twitter

Copyright © 2025 · Foodie Pro Theme by Shay Bocks · Built on the Genesis Framework · Powered by WordPress