Eat Simply, Eat Well

Healthy recipes & tips to help you live the good life. by Ann Plough

Cinnamon, Vanilla & Oranges

December 30, 2014 by aplough

Christmas is over and all of the decorations are safely back in their boxes in storage; the tree has been removed and all the needles (mostly) vacuumed away; and only a few scattered Christmas treats (caramels, orangettes) linger in the kitchen. Christmas is a beautiful time; yet somehow, I always breathe a sigh of relief when it’s over and gone, and we can move on with our lives and plan for a new year.

My living room feels huge, for one thing – now that the decorated fir tree is no longer stretching its lower branches across my carpet and now that the frenzy of gift buying and giving have been put aside for the moment, it’s a time to pause and reflect, and to start off fresh.

There will be people around the world making New Year’s resolutions tomorrow – promises to do this, not that.  Lose weight, save money, exercise more, accomplish a specific goal, learn something new, go somewhere they’ve always dreamed of, and to eat a more healthy diet.

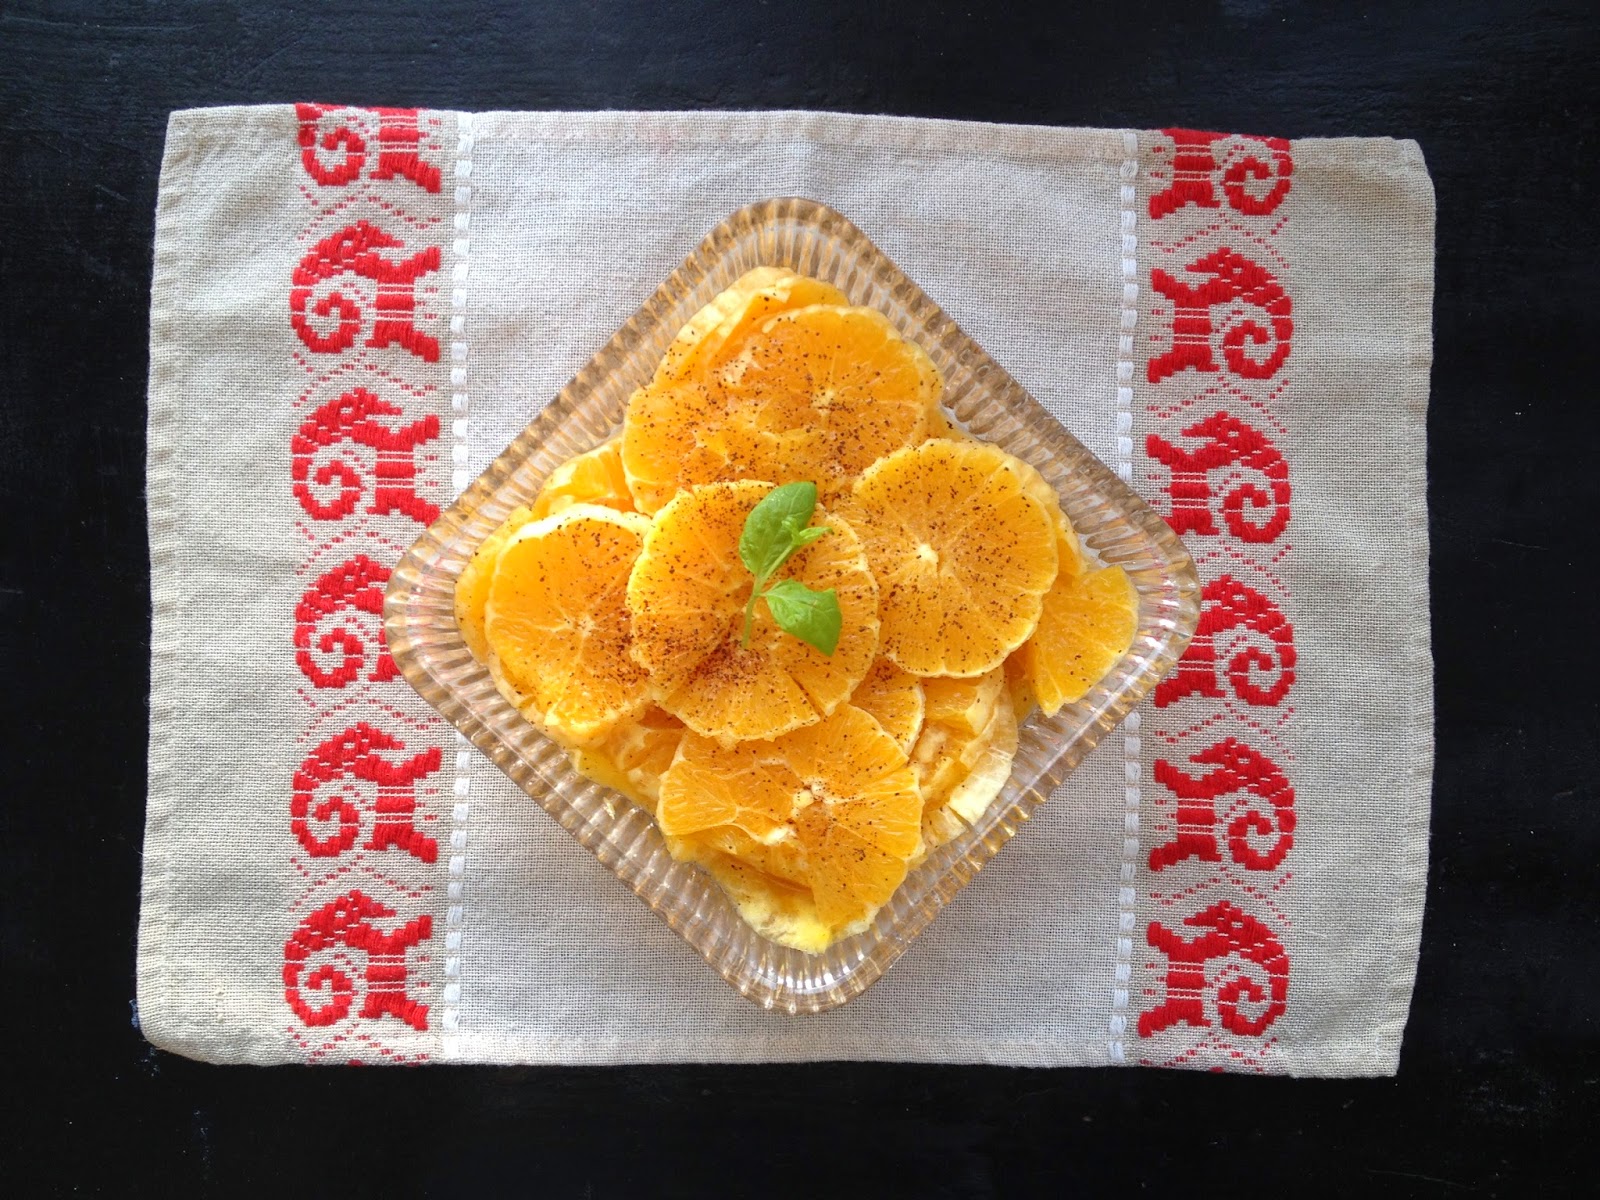
I can help with that last one, starting off with one simple dessert.  This is the salad I made for Christmas Morning – tired of the chocolate and sweets and heavy foods for a moment and inspired by the grapefruit and orange slices served with cinnamon at a pre-Christmas breakfast at a friend’s house, I arranged a pile of beautiful, bright, fresh oranges and added cinnamon, vanilla and a sprig of mint.  Never has a pile of fresh, raw fruit been so welcomed.

As you close out this year with a bang and start the new year off fresh with high hopes and promising dreams, take a moment to stir together this salad and serve it for yourself or for guests as you contemplate Auld Lang Syne.  This one couldn’t be easier.  You’ll get a bit of a zing from the cinnamon and a perfumed softness from the vanilla, both of which combine to elevate the orange to a new, dessert level.  If you wish, add a dollop of greek yogurt or creme fraiche for a true indulgence.


Cinnamon, Vanilla & Oranges

4 oranges, peeled and sliced into 1/4 inch slices
1/2 teaspoon ground cinnamon, plus more for sprinkling
1 tablespoon vanilla extract
a few mint sprigs for garnish

Combine the oranges and vanilla in a small bowl.  Sprinkle the 1/2 teaspoon cinnamon over the top.  Flip the oranges over a few times to coat them completely with the vanilla and cinnamon.  Sprinkle a little more cinnamon over the top, add a mint sprig for beauty, and serve.

This dish can be made in advance and refrigerated for up to two days.

Serves 4.

Filed Under: Breakfast, Dessert, Salad Tagged With: citrus, vegetarian

Walnut Orange Sandies

December 15, 2014 by aplough

I suppose we all have strong memories of certain smells and tastes and treats from our family holiday table.  For us, the days leading up to Christmas were certain to find all of my siblings and I sampling any number of the treats that came rolling out of the kitchen, made mostly by my oldest sister or my mom.   Peanut Butter Balls were a major favorite of my brothers’ – they’d eat them straight out of the freezer before they were dipped in the semi-sweet chocolate coating that made them taste like a big round peanut butter cup, and then eat more once they’d been freshly dipped, the chocolate barely having time to firm up against the frozen peanut butter filling.  Fudge was always on the menu too; and I sometimes made Peanut Brittle or Caramel Corn with or without peanuts.  On Christmas Eve we nearly always had a big buffet of treats which included my sisters luscious cherry tarts – just two bites big and the perfect combination of crispy shell, creamy vanilla custard and the sweet-tart cherry topping – a glistening, festive red.

And then there were Pecan Sandies – sometimes called Russian Tea Cakes or Mexican Wedding Cakes – a well-loved child has many names.  These were sometimes overlooked for the flashier option on the table, but make no mistake: one bit of these crumbling, pecan and butter filled, powdered sugared orbs would soon have you reaching for another.  My mom told me that a few years ago, she was asked to make them for every party she attended – 6 batches or so.

I hadn’t had Pecan Sandies in years; in fact I’d forgotten all about them until a few days ago when I saw a picture that I thought had to be these old-time cookies but turned out to be powdered sugar-covered truffles instead.  I couldn’t get the image out of my head, though, so I decided to rework the old recipe to make use of the whole grains and raw sugars readily available now.

Now I know your thinking: “wait a minute – we’ve got walnuts in the post title and now we’ve moved onto pecans…??”.  That wasn’t the plan.  Except I realized as I moved into the kitchen intent on making a batch of these fine cookies that I’d used up the last of the pecans when I made Ina Garten’s Chipotle Rosemary roasted mixed nuts.  In fact, the only nuts left in the house were cashews in walnuts, and the latter were the only chance of making this recipe work.   And work it did – beautifully and deliciously.  I like the slightly more crumbly texture the whole grain barley flour provides, but you could also use whole grain spelt or Kamut flour.  The Indian sugar and coconut sugar are a slightly healthier option to refined white sugar – but sugar is sugar, so go easy, if you can (full confession: I ate four as soon as they were fully cool…the addition of orange zest makes them especially addictive).

You can make these with pecans and leave the rest of the recipe as is.  It’ll be fantastic.  Or use walnuts as I did for a new twist.  Or make a batch of each, and share.  It’s up to you.  I deliberately designed this recipe to make a small batch of cookies because I find that with so many different kinds of treats this time of year, I always have way too many of everything, and I prefer to eat these cookies as freshly baked as possible.  But, if you prefer, this can be double, tripled, quadrupled – whatever fits your needs.

The only rule you need to follow is to let these cool completely before you eat them.  The flavor improves dramatically once they are fully cooled, so it’s worth the wait.  One crumbly, melt-in-the-mouth bite in and you’ll understand where the term “sandies” comes from.  Enjoy.

Walnut Orange Sandies

1/2 cup / 115g butter at room temperature
1/4 cup / 1/2 dl + 2 tablespoons Indian sugar or coconut sugar (you can use standard white sugar if you prefer)
1/2 tablespoon water
1 teaspoon vanilla
1/4 teaspoon salt
1 cup / 250 ml whole grain barley flour
1/2 packed teaspoon freshly grated orange zest (use an organic orange)
1/2 cup chopped raw walnut

In a mixing bowl, using a stand mixer or a hand-held mixer, cream together the butter and sugar until the mixture is light and fluffy.  Add the water, vanilla and salt, and beat together again to combine.  Add the flour all at once and beat on low speed until the flour begins to bind with the butter mixture.  Add the walnuts and continue beating until the cookie dough is uniform.  Scrape down the sides of the mixing bowl with a rubber spatula, and make a few turns underneath the dough in the bowl to make sure there is no flour left there.  Refrigerate the dough for 30 minutes.

Remove the dough from the refrigerator and using a 1 ounce scoop or a couple of soup spoons, drop 1-2 tablespoon sized rounds of dough onto a parchment-covered baking sheet, evenly spaced at 1″/2.5cm apart.  Rub each lump of dough lightly between your palms to form a smooth, round ball of dough.  Place each dough back onto the parchment (see second picture, above).

Bake for 20-25 minutes until lightly golden brown. Remove from oven and allow the cookies to cool on the pan completely.  Spoon 1-2 tablespoons of powdered sugar into a fine-mesh sieve and shake it gently over the cookies to very lightly dust the cookies with a decorative touch of sugar.

Makes 20 cookies.

Filed Under: Dessert Tagged With: nuts, whole grain

Chocolate Cake with Chocolate Butter Glaze, Raspberry Sauce and lightly whipped Cream

December 4, 2014 by aplough

One of my favorite people and dear friend is moving away. For her going away party, she asked that I make a chocolate cake – a “real chocolate cake”.  I love a good chocolate cake and so was happy to oblige.  The cake I made is a combination of several recipes:  A chocolate cake base courtesy of the Mast Brothers from the February 2014 issue of Bon Appetit, made gluten-free with the use of an all-purpose gluten-free flour mix so that all the guests could enjoy, and a chocolate butter glaze from my favorite chocolate resource,  Fran Bigelow‘s cookbook Pure Chocolate published in 2004.  To complement the rich flavor of the chocolate, I served the cake with a raspberry sauce and unsweetened, lightly whipped heavy cream.

Since so many people have asked for the recipe, and because I’d like to make it again myself, I’m posting it here.  It’s good for parties as it serves a crowd: the chocolate flavor is intense, so you may only need a small sliver – that is, until later in the evening, after a few nibbles on olives, nuts, cheese…when you’ll surely want another taste or two.

The cake is really easy to make, with just a few tips:

  • Don’t overcook it or it’ll dry out.  You want it to be tender and slightly fudge-like, so once the cooking time is up, test with a toothpick, and if it comes out clean, you are good to go.
  • Make sure the cake is completely cooled before you glaze it, but not cold, as the glaze will stiffen and set up as you pour, making it harder to spread.  If you are making it one day and glazing the next, wrap the cake in plastic wrap at room temperature.  If you are making several days ahead, you can refrigerate; just bring back to room temperature before glazing.
  • Let the glaze cool until it is the texture of runny yogurt: slightly thickened but still pourable.  If it is too thick, put it back over the double boiler/bain marie to warm it up slightly and continue
  • If the glaze on the top doesn’t end up smooth, don’t worry:  use the flat edge of an off-set spatula to make even lines across the top, decorate with a few flowers, and your guests won’t care that glaze isn’t perfect!
  • Don’t be tempted to over whip the cream, nor sweeten it.  The cake is rich and sweet on it’s own, and a soft whipped cream is so perfect with it.

Chocolate Cake with Chocolate Butter Glaze, Raspberry Sauce and lightly whipped cream

For the cake:  Preheat oven to 160°C/325°F.  Lightly butter and flour a 9″/25 cm springform pan. Take a piece of parchment paper, cover the removable bottom of the cake pan, seal it into the pan, and cut away the excess with scissors.  (this will make the cake easier to transfer to your serving platter after glazing.

1 cup / 225g butter, cut into pieces
1/3 cup all-purpose flour: regular or gluten-free
8 oz / 225g bittersweet chocolate, chopped at least 70% (I’ve used both Valrhona and Fazer with good success; Valrhona is noticeably better, so use if you can find it)
1 cup/250 ml sugar
4 large eggs
3/4 teaspoon salt

Set a medium-sized bowl over a pot of lightly simmering water (make sure the bowl doesn’t touch the water).  Add the chocolate, sugar and butter to the bowl and heat until the chocolate is almost completely melted.  Remove from heat and continue stirring until the chocolate and butter are completely melted and the mixture is smooth and uniform.  Cool completely; about 15 minutes.

It is easiest to use a hand-held mixer for the next step, but if you are using as stand mixer, transfer the chocolate mixture to the bowl of the stand mixer, or, even easier, use the bowl of the stand mixture for melting the chocolate in the first place.

With the mixer on medium speed, add the eggs to the chocolate mixture, one at a time, making sure each thoroughly mixed in before adding the next one.  Beat until the mixture has a mousse-like consistency.  Add the salt and flour; mix until smooth.  Pour the batter into the prepared springform pan and smooth the top.

Place pan in the hot oven, and bake 55-65 minutes until the top is firm and the edges slightly darkened. I found that my cake was perfect after 55 minutes, but ovens are different, so watch it closely toward the end of cooking time.

Remove cake from oven and place on wire rack.  Allow the cake to cool completely in pan before removing.

For the chocolate butter glaze:

4 oz / 115g bittersweet chocolate, chopped at least 70% (I’ve used both Valrhona and Fazer with good success; Valrhona is noticeably better, so use if you can find it)
1 stick/8 tablespoons/4 oz/ 115g butter at room temperature, cut into pieces

Set a medium-sized bowl over a pot of lightly simmering water (make sure the bowl doesn’t touch the water).  Add the chocolate to the bowl and heat until the chocolate is almost completely melted.  Remove from heat and continue stirring until the chocolate is smooth.  Add the softened butter and stir slowly and gently with a rubber spatula until no visible pieces of butter remain.  The glaze should be glossy and smooth with a temperature of 80-85°F / 26-29°C.  When stirred, it will hold a line on the surface for about 10 seconds before disappearing.  If the glaze starts to harden, warm it briefly over the pan of simmering water.

To glaze the cake: 

Set the cake, still on the removable, parchment-covered tray, onto a wire rack set over a parchment-lined oven pan to catch any chocolate glaze drips.

Starting about 1″/2.5 cm from the edge of the cake, begin pouring the glaze and allow it to run slowly and smoothly down the edge of the cake.  Continue pouring until you have poured the glaze all the way around the edge.  Then pour the remain glaze evenly into the middle of the cake and out toward the outside edges, letting any extra glaze run down the sides of the cake. If necessary, smooth the top of the glaze with an off-set spatula. Allow the glaze to set completely before transferring to a cake platter.

Garnish with fresh roses and fresh mint leaves. Serve with raspberry puree and lightly whipped cream.

To make the raspberry sauce:
2 pints/1 quart/1 liter/4 cups fresh or frozen raspberries
2/3 cup sugar
1 tablespoon fresh lemon juice

Combine all of the ingredients in a small saucepan.  Bring to a boil, reduce heat to a simmer, and cook over a low heat until the sauce thickens slightly; about 10 minutes.  Stir regularly so the sauce doesn’t scorch.  Set aside to cool.

Serve in a small bowl alongside the cake.

For the lightly whipped cream:
1 cup/250 ml heavy cream

Pour the cold cream in to a mixing bowl.  Using a mixer on high speed, beat the cream until it forms light, soft mounds.  Be careful to not over whip.

Serve in a small bowl alongside the cake.

Serves 15-20.

Filed Under: Dessert Tagged With: cake, chocolate

  • « Previous Page
  • 1
  • …
  • 3
  • 4
  • 5
  • 6
  • Next Page »

Find me on social media

  • Bloglovin
  • Facebook
  • Instagram
  • Pinterest
  • Twitter

Looking for something?

Eat Simply, Eat Well 's gallery on Punk Domestics
  • Bloglovin
  • Facebook
  • Instagram
  • Pinterest
  • Twitter

Copyright © 2025 · Foodie Pro Theme by Shay Bocks · Built on the Genesis Framework · Powered by WordPress