Eat Simply, Eat Well

Healthy recipes & tips to help you live the good life. by Ann Plough

My Favorite Tuna Fish Sandwich

April 24, 2012 by aplough

… means more time for this.
A quick lunch…

Sometimes simple is good.  Out in the country at the cabin, things are simpler.  Especially when the nights still have a chance of freezing over, we don’t pour water down the drain, and we don’t pump water in from the lake (at present, the lake is still under ice, and last weekend we were dunking post-sauna in the hole cut for that specific purpose).  Because a lack of running water makes doing dishes difficult, we tend to keep the food as simple as possible, and make the more complicated (read: more dirty dishes) types of foods at home before we go. This time I’d made Rosemary Macaroni & Cheese which was a great side dish but not a a great main course (next time I’ll add peas) – I mixed it up & put it in a casserole dish, and baked it in the oven at the cabin.  We had lemon & garlic marinade for our chicken fingers:  the chicken sat in the marinade for 4 hours or so while we basked in the sun, enjoyed the sauna & our dips in the lake, and then we grilled them over the open fire in the grill house to enjoy.

grilling the Lemon Garlic Chicken

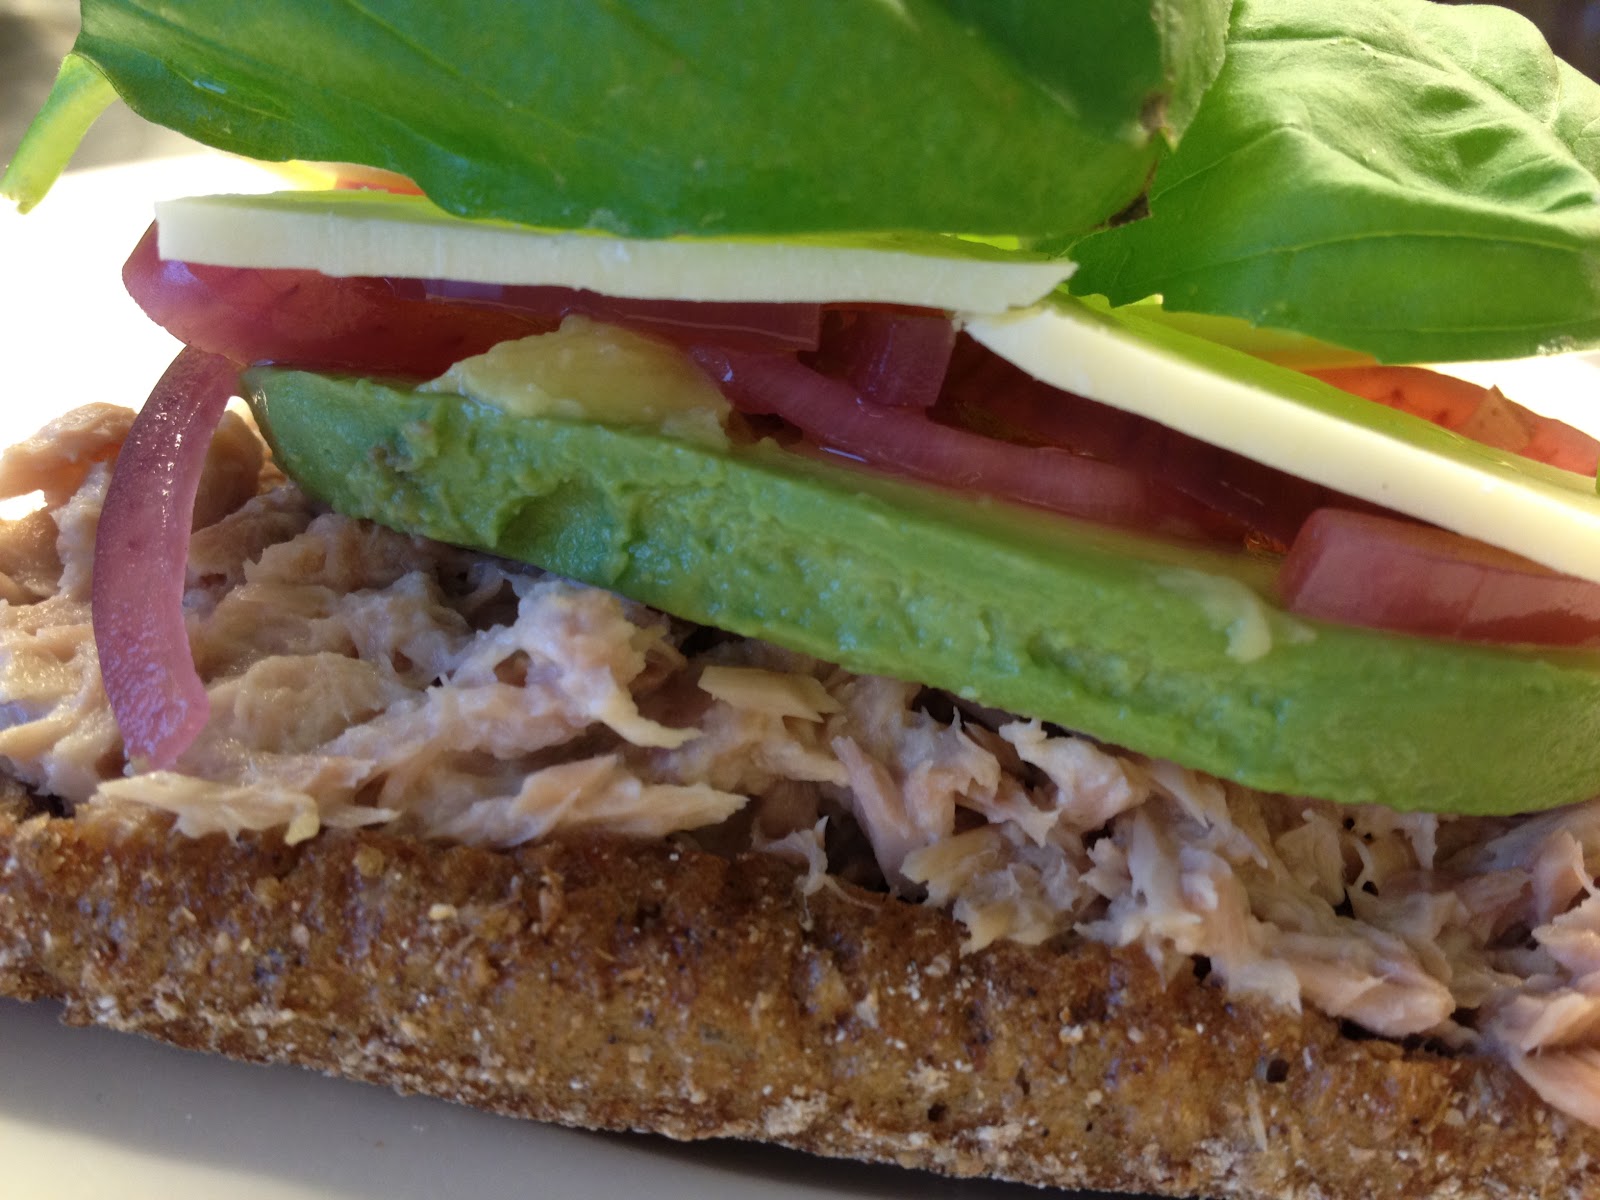
But sometimes, the perfect cabin meal isn’t cooked at all.  It’s put together with a few simple but delicious ingredients, whose combination raises them from the ordinary to the extraordinary.  Such is the case with this Tuna Fish sandwich.

I have actually been making a version of this sandwich for years now; the pickled red onion is a new addition.  It came about because I was planning on making a tuna fish sandwich back during my Seattle days, and out of the corner of my eye, spied the basil plant as I was pulling the tuna fish out of the cupboard.  As it happens sometimes with food, the avocado was sitting next to the yogurt tub in the refrigerator, and so this sandwich was born.

The view while lying on my back in the sun.

In Seattle, I used to eat this on the Winter Wheat bread made by Orowheat.  They don’t sell it everywhere of course, so if you don’t have it where you are, any good multigrain bread, or  – really any good bread will work – wherever you are in the world.  In Finland, I usually use the ruispalat – the rectangular shaped rye rolls that come pre-split so you don’t even have to slice them.  I like the bread slightly toasted for this, but I’ve had it untoasted last weekend on Sysmä rye bread and it was still excellent.

The ice will be gone next time….
This is not tuna.

I served these up for a late lunch at the cabin last weekend, and MP proclaimed “this is now on the list of something you need to eat before you die!”  I am sure it was the pickled red onion that did it – but even without the red onion, it’s a doggone good sandwich.  I’ve somehow misplaced the recipe I used to make the pickled red onions, so I’ve included a link to the ones Molly from Orangette made based on the Zuni Cafe Cookbook back in 2004.  They look great.  I haven’t tried Molly’s version – the ones I made were a simple project with a few spices…so I need to experiment and see if I can recreate them since I’ve lost the recipe.  Update:  I’ve added a pickled red onion recipe below.  You may be able to find them on the shelves at your local grocery store.  Or…you can go without…this time – until I can drum up the recipe and put it here for you.  Either way, the sandwiches will be great!

Best seat in the house!

Here’s what’s in it:  Good bread topped with:  tuna fish (mixed with plain yogurt), slices of sharp cheddar cheese, slices of perfectly ripe avocado, pickled red onion, basil.  If you like your sandwiches open-faced, stop here.  If you prefer them to have a lid, add another slice of bread.  I like them open-faced if possible because they are so pretty to look at, but if you are packing them off to somewhere, the second bread slice makes travel a lot easier.

Tuna Fish Sandwich pumped up

4 slices of very good bread (or 8 if you want a closed sandwich)
2 cans of tuna
1/4 – 1/2 cup of plain yogurt – depending on how moist you like your tuna sandwiches.  (use mayonnaise if you prefer)
4 slices of sharp cheddar cheese (more if the slices are small)
1 perfectly ripe Haas avocado, sliced
pickled red onions (recipe below)
fresh basil leaves

1.  Toast the bread.
2.  Drain the tuna fish and mix with the yogurt (or mayonnaise if you prefer).  Divide the tuna fish between four slices of bread and spread it across evenly.
3.  Top the tuna with the remaining ingredients, in whatever order you want, ending with the basil leaves (or bread, your choice).
4.  Enjoy.

Serves 4.

Pickled Red Onions
there are a lot of recipes out there for pickled red onions, at the the choice of spices is up to you.  I like the flavor of these – there is enough zing and heat with a really great flavor from the bay & juniper.


2 red onions, thinly sliced
1 cup basic vinegar
1/2 cup white wine vinegar
1/2 cup water
2 tablespoons sugar
1 teaspoon salt
1 bay leaf
4 juniper berries
8 black peppercorns
1/4 teaspoon red pepper flakes

Peel and thinly slice the red onions.  Place the onions in a bowl and cover with boiling water.  Let sit for 5 minutes.  Drain; set aside

In a 2-3 quart pot, heat the vinegars, water, salt and sugar over medium heat until the sugar dissolves completely.  Add onions and bring to a boil.  Remove from heat immediately, and add the spices.  Pour onion mixture into a glass jar and seal tightly with a lid.  Allow to cool to room temperature, and then place in the refrigerator.  Refrigerate at least overnight before using.

These will store for at least a month in the refrigerator.

Makes 2 cups.

Filed Under: Uncategorized

(Rosemary Chocolate) Olive Oil Cake

April 20, 2012 by aplough

So easy to make, so delicious.
Every once in a while a recipe comes along that is so perfect, you can hardly believe your good fortune.  This is one of those recipes. 
I was reading the blog 101 Cookbooks  by Heidi Swanson – a blog I love for it’s excellent photography and the fantastic recipes that utilize natural ingredients to create beautiful, delicious food.  She’d posted a recipe from the book Good to the Grain by Kimberly Boyce for Rosemary Olive Oil Cake.  I love rosemary, and olive oil does something fantastic to baked goods, so I was already intrigued.  Then I got to the part about the dark chocolate chunks, and started writing a shopping list. 
I made it for the Secret Garden meeting (more on that later, but not today – it’s still a secret), using organic Farro flour (also known as emmer wheat) from Malmgård because I didn’t have any Spelt flour, and baking the cake in and 8″ by 8″ square pan, but otherwise following the recipe as modified by Heidi from Kimberley’s original. 
A note on farro flour:  Farro is one of the oldest known grains on the planet.  It belongs to the same family as hulled grains, but has an unusually high amount of fiber, and is lower in gluten and higher in protein than regular wheat.  Because farro’s husk is tougher, farmers need fewer insecticides and the nutrients are protected better than with regular wheat.  This is good stuff!  Definitely worth a try if you can find it.  More on farro here, if you are interested in learning more about this ancient grain.  
 
evening snack
The rosemary is a surprising flavor in the cake – it tastes almost like mint in the beginning, but then you inhale as you bite into the cake, and the rosemary scent comes through first, and then the distinctive rosemary flavor – paired with the deep dark chocolate and a lovely moist crumb from the mixture of flours up against the olive oil.  It really is perfect.
For those of you who requested the recipe – here it is!  And for those of you who haven’t tried this yet, don’t wait.  This is a winner to make again and again.
Olive Oil Cake
by Kimberly Boyce in Good to the Grain

I noticed when I came home to write this blog that the original title doesn’t have rosemary or chocolate in it – but I feel like it should, so I’ve added it in parentheses as an artistic license. The chocolate and rosemary are such a key ingredients here, they shouldn’t be ignored.  Use some really good dark chocolate – around 70% cacao.
Preheat oven to 350°F/175°C
Coat an 8″x8″ square pan with olive oil (you can use any size pan you want:  a tart tin or a loaf pan would work – you just need to adjust the baking times.
Chop and set aside:
5 oz/140g bittersweet chocolate (70% cacao), roughly chopped (you want some big chunks here)

In a bowl combine:
3/4 cup / 3 oz / 80g spelt flour (I used farro flour)
1 1/2 cups / 7.5 oz / 210 g all-purpose flour
3/4 cup / 4 oz / 115g sugar
1 1/2 teaspoons baking powder
3/4 teaspoon kosher salt

wrapped and ready to go
In another bowl combine:
3 eggs
1 cup/240 ml olive oil
3/4 cup/180 ml whole milk
1 1/2 tablespoons rosemary, finely chopped

Pour the egg mixture into the flour mixture and stir until just combined.  Stir in 2/3 of the chocolate until just distributed throughout.  Pour the batter into the prepared pan, and top with the remaining chocolate.  Press the chocolate down with a fork until it’s pressed slightly into the batter.  Sprinkle the top with one tablespoon of granulated sugar.  Bake in the oven for 35 minutes until the top puffs up and is a nice golden brown and a toothpick, skewer or knife inserted into the center of the cake comes out clean.  

Cool and serve.  Makes 12 – 16 servings


Filed Under: Uncategorized

Blackcurrant Bran Muffins with Lemon & Cardamom

April 20, 2012 by aplough

We enjoyed the Bilberry Muffins so much, that I thought I’d try a variation on the theme and use up some of the black currants in my freezer.  Black currants are something I’d never tasted nor heard of except related to cassis syrup (syrup made from black currants and commonly used in liquor), but in Finland most people who have a garden will also have several black currant bushes as well (occasionally they’ll grow red currants and white currants as well, but these are less common).  The plump, black berries are ready in mid to late August depending on where you are in Finland, and they have sweet/tart flavor that to me is reminiscent of both cinnamon and anise.  I made a black currant, lemon & star anise jam the other day to test the theory of how well the black currants would go with those spices, and it was lovely – though perhaps next time I’d use a little less lemon. Maybe I’ll post that jam here at a later date.

Black currant jam is most typically served with meats – usually chicken.  JJ is looking forward to pairing my black currant jam with a Chicken Curry one of these days, and I’m looking forward to trying it!  I tried the jam with these muffins, though, with a small spoonful of plain yogurt, and I really liked the extra burst of blackcurrant flavor.

But I wanted to try black currants for something that didn’t include meat.  I also wanted a muffin that was dense, not too sweet – and healthy enough to eat without guilt for breakfast.  If you like a sweeter muffin, you’ll want to increase the sugar to 3/4, though I don’t think they need it.  The lemon balances the flavor of the black currants, and the cardamom is a very subtle but welcome addition, that you notice only after the second or third bite.  The buttermilk makes these nice & moist – if you don’t have it you can substitute a cup of runny plain yogurt or milk mixed with 1 teaspoon of lemon juice.

If you don’t have black currants, try these with blackberries.  I think the lemon & cardamom would go well with them also.  These freeze well, and you can keep them in an airtight container on the countertop to enjoy for up to 4 days.

Black Currant Bran Muffins with Lemon & Cardamom

Preheat oven to 400°F/200°C

In a large bowl combine:
1 1/2 cups all-purpose wheat flour

1/2 cup wheat bran (you could also use whole wheat or oatmeal if you don’t have wheat bran)
1/2 cup packed light brown sugar
2 teaspoons of baking powder
1/2 teaspoon salt
1 teaspoon ground cardamom

In a separate bowl whisk together:
1 egg
1 cup buttermilk 
3 tablespoons of olive oil
zest of one lemon

Pour the egg mixture into the flour mixture and stir until just combined.  Do not over mix.  Add:

1 1/2 cups  frozen blackcurrants (frozen blackberries would be excellent here as well)

Mix until the berries are distributed throughout.  Line a 12-cup muffin tin with cupcake liners and divide the batter evenly among the liners.  Bake for 25 minutes or until the tops are golden brown and a toothpick inserted in the middle comes out clean.
Remove from oven and allow to cool for 5 minutes before eating.

Makes 12 muffins.

Filed Under: Bread, Breakfast, Muffins

  • « Previous Page
  • 1
  • …
  • 70
  • 71
  • 72
  • 73
  • 74
  • …
  • 79
  • Next Page »

Find me on social media

  • Bloglovin
  • Facebook
  • Instagram
  • Pinterest
  • Twitter

Looking for something?

Eat Simply, Eat Well 's gallery on Punk Domestics
  • Bloglovin
  • Facebook
  • Instagram
  • Pinterest
  • Twitter

Copyright © 2025 · Foodie Pro Theme by Shay Bocks · Built on the Genesis Framework · Powered by WordPress