Eat Simply, Eat Well

Healthy recipes & tips to help you live the good life. by Ann Plough

Savory Perch & Nettle Hand Pies / Ahven-Nokkos Piirakka

November 17, 2012 by aplough

Hand Pies have a long tradition in cultures all around the world.

The English have their pasties, developed by loving wives for their husbands working in the mines in Cornwall in Southern England:  the thick “croust” gave the miners something to hold onto without getting their lunch dirty with their grubby hands, and was tossed down into the mine shaft to keep the bad spirits away after the meal was finished.  Pasties are still consumed throughout England with a  variety of savory fillings, and were brought to Northern Michigan by Cornish Miners who moved there to work in the Copper Mines.  These were the hand pies of my childhood – except we never ate them with our hands.  No – those pies were large enough to need two hands to hold them with a fair amount of overlap.  They were filled with a savory blend of potato, carrot, rutabaga, ground beef, onion and salt and pepper, and served hot from the oven with ketchup.  I still eat them this way!

And when I finally visited London on an exchange program as a student, one of my favorite memories includes sitting on a cliff in St. Ives, eating a savory, paper-wrapped Cornish pasty as I looked out at the sun glinting off of the sea.

The Scottish have Scotch Pies:  a round sturdy pie with a thick crust and a savory filling of mutton, beans and the like – it was created around the Industrial Revolution and has since become a favorite for school children, sports fans, and late-Friday night revelers in need of a quick, cheap snack to keep their stomachs settled. The Spanish have Empanadas:  a wonderful little pie with spicy meat or vegetable fillings – I first tasted one in the Ferry Building in San Francisco, and it disappeared so quickly that I had to buy another one so I could slow down and appreciate the beauty and perfection of the little gastronomic package.  Around the world you will find them everywhere:  Polish Pirogi,  Russian Piroshki, Chinese Dim Sum – you have probably seen them more than you realize.

Fresh from the oven.

Hand pies are fantastic for many reasons.  They are portable and can be wrapped and taken anywhere.  They are individual servings, so you can make a few or many.  They look beautiful served individually on a plate with salad, or work well on a hiking trip.  They freeze well and are open to a variety of sweet and savory fillings, limited only by your imagination.

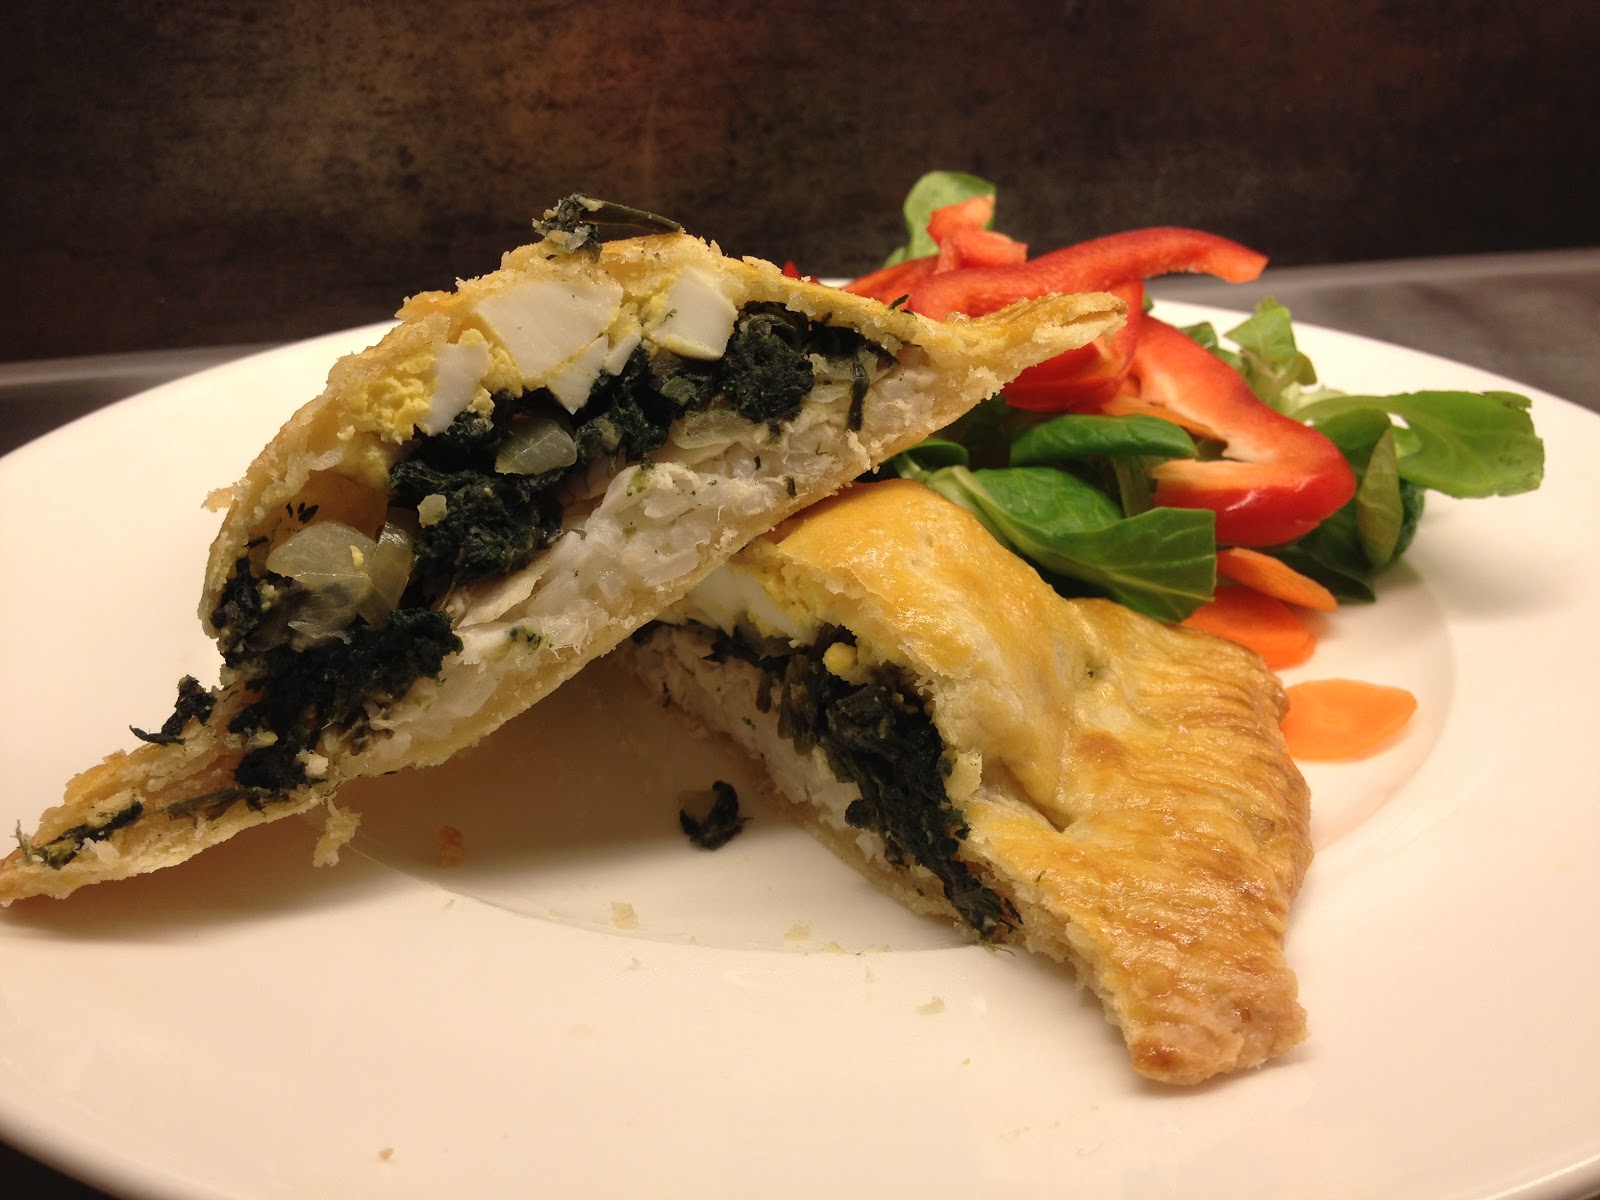
My hand pies use a simple butter crust and local Finnish ingredients:  perch (ahven) and steamed stinging nettle (nokkonen).  I have added onion because I like the flavor, and have used both rice and egg, inspired by the Russian piroshki.

Perch, or Ahven in Finnish, is one of the most common fish in Finland.  At the wonderful summer cabin that I’ve mentioned so many times in this blog, the many fishing trips yield large quantities of perch, so our freezer is stuffed with perch filets from last summer.  The marinade is a the perfect way to infuse the fish with flavor – and in fact each segment of the pie is flavored individually which insures that the flavor is even and pleasant throughout.  It makes a fantastic midday snack if you share it, or a great dinner with a green salad.

One note:  don’t be afraid of the long ingredient and directions list below.  The prep work in steps 1-3 come together quickly and can be done the night before.  Assembly on the day of takes about 15 minutes.

Savory Perch & Nettle Hand Pies

1.  In a small bowl or plastic container with a lid, combine:

1 lb/ 400g perch (ahven) filet
2 cloves of garlic, minced
1/4 cup / 1/2 dl olive oil
2 teaspoons salt
1/4 teaspoon fresh ground black pepper
Juice of one organic lemon

Cover tightly with a lid or plastic wrap and place in the fridge to marinate for at least 4 hours or overnight.

2.  In a small pot, combine:

1/2 cup / 1 dl short-grain white rice
1 cup / 2 dl water
1/2 teaspoon salt
1/4 teaspoon fresh ground black pepper

Bring to a boil; reduce heat and cover; and cook for 15 minutes or until water is evaporated.  Remove from heat and cool completely.

3.  Bring water to a boil in a small pot.  Add
3 eggs 

and cook for 12 minutes.  Remove from heat; drain hot water away and fill pot with cold water.  Allow to cool.  Peel and chop eggs.  Set aside.

Note:  Steps 1-3 can be done around the same time – either the night before or in the morning on the day you want to make the hand pies.

4.  In a large frying pan over medium heat add:
1 Tablespoon olive oil
1 medium onion, roughly chopped

Cook until onion is translucent, then add:
1/8 cup / 1/4 dl water
150 g chopped cooked nettles (can substitute spinach)
1/4 teaspoon fresh ground nutmeg
1/2 – 1 teaspoon salt, to taste
1/4 teaspoon fresh ground black pepper, or to taste.

Cook until the nettles are heated through.  Remove from heat and add:
1/2 cup / 1 dl shredded Edam, Gouda, or other mild white cheese.

5.   Preheat oven to 425°F / 200°C.

Make the dough:

2/3 cup / 150 g cold butter
1 1/2 cups / 3 dl flour
1/3 cup / 3/4 dl cold water

with a fork or a pastry cutter, cut the butter into the flour until it forms small crumbs.  Add the cold water all at once and stir with a fork to loosely combine.  Dump the dough onto a floured countertop and mix with your hands until smooth.  Divide dough in half.

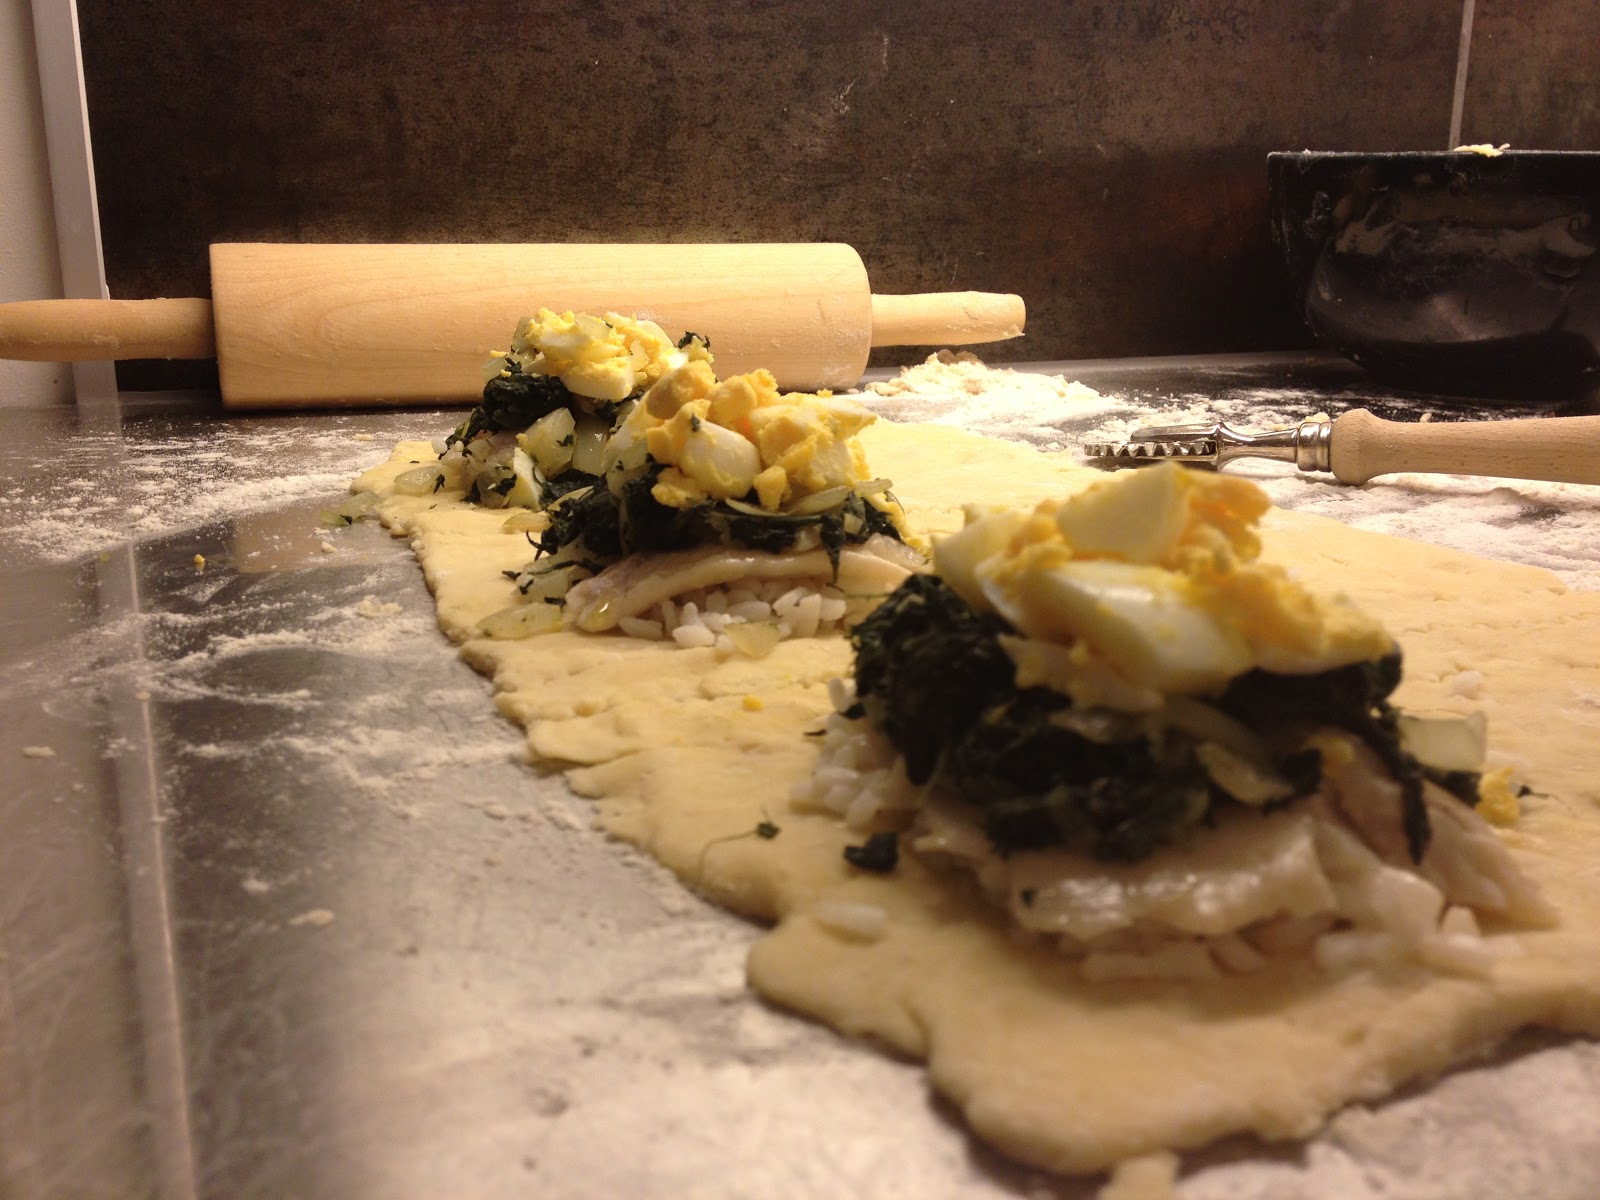
6.  Roll one half of the dough into a 8″ by 12″ rectangle (for Europeans:  this is about the size of an A4 paper!) Cut the rectangle into thirds.

Layers all stacked up:  Rice, Fish, Nettle&Onion, Egg

7.  Line up your filling ingredients on the counter in the following order:  Rice, Fish, Nettle-Onion Mixture, Chopped Egg.  Layer the ingredients, starting with the rice, on top of each other on one half of each dough third (see picture).   You may need to cut the fish into smaller pieces so the filets are the right size.  Press the ingredients onto each other firmly, and leave room around the edge of the filling so you can seal the packet when you fold the dough over.  Once you have added all of the layers, fold the uncovered half of the dough over the filling and press to seal the edges.  Press all around the 3 sides (exclude fold) with the tines of a fork to seal.  Place finished pies onto a baking pan covered with parchment paper.  Repeat with the other half of the dough and remaining filling ingredients.

Hand Pie Assembly

8.  Crack one organic egg into a small bowl and beat with a  fork until well combined.  Using a pastry brush, cover the surface of each small pie with egg.  Pierce the top of each pie 4 times with a fork.  Place in preheated oven and cook for 18-10 minutes until golden brown.

Ready for the oven.

Remove from oven and allow pies to cool for 5 minutes.  Serve with a green salad.

Makes 6 pies.   Pies freeze well both baked and unbaked.

Filed Under: Uncategorized

Apple Almond Cake with Nut Crumble Topping

October 20, 2012 by aplough

After the first few slices…

Wandering through the local cottage gardens on our walk earlier this week, I found apples.  For full disclosure, I have to admit that I had a strong suspicion that this would happen, being that it’s apple season and in previous years there have been apples lying all over the yards in the cottage area, and occasionally, one or more of the owners, instead of hauling his or her apple crop off to the compost heap, will place a box or basket full of apples outside of the cottage gate, free for the taking.  So stuffed into the pocket of my bright pink down jacket, was a plastic bag in the off-chance that this year would prove to be as bountiful as the previous ones.  Without my own apple tree, I love when I can get a pile of “local organic apples” just down the trail from where I live.  And for further disclosure:  since I love wandering around in the outdoors, and I know that there is nearly always something I can forage, there is is nearly always a plastic bag stuffed into the pocket of whatever item of clothing it is that I happen to be wearing on the trek.

But now I digress.  Back to the apples.  All 8 kilograms of them.

It rained all week, hard.  The wind blew vigorously.  The mercury levels were up and down.  The leaves on the birches all around are a golden yellow, and slowly departing the branches and covering the ground with a brilliant carpet.  The apples went much the same way as the leaves, and the ground underneath any apple tree is now covered with apples.  It’s been unseasonably warm: this time last year we’d seen frost already, but now I’ve been wearing a spring coat over my suit to work most days – partly because we haven’t pulled the winter clothes out of storage yet, and partly because it’s been unusually balmy.  I love this time of year!

But it’s also been a busy week, month, season.  Friday night I came home and all I wanted was a big cup of tea and a nice piece of apple cake.  Since I hadn’t baked or blogged in a while (sorry guys!) I decided it was high time to take advantage of that apple windfall (no pun intended, really.)

So I combined different flours, including almond flour, because if felt like a good idea.  I added spices I associate with fall, stuffed as many apples, sliced with the skin on, as I could fit in there, added a crumble topping for crunch, and tossed it in the oven to bake.

We ate half of one of the cakes 10 minutes after I pulled it out of the oven, topped with vanilla ice cream.  I had another small slice for breakfast with morning coffee (hey – it’s Saturday!).  It was fabulous warm – with the ice cream melting over the warm cake and pooling on the plate.  It was fabulous this morning, cool and moist with the apple flavors blending in with the spice flavors in the cake and contrasting nicely with the buttery crunch of the nut crumble.  And, ah, it wasn’t bad a few moments ago either as I finished off what was left of cake #1 in the pan on the counter when I went to the kitchen to stir the apple butter cooking there.

Mighty fine with a scoop of vanilla ice cream

I think you’re going to like this one.  It’s really easy to throw together; takes about 40 minutes to bake and you’ll be left with two 8″ cakes to enjoy.  I was planning to freeze one of the cakes – I think it would freeze beautifully – but I won’t know this time as I’m afraid there will be no cake left…

Apple Almond Cake with Nut Crumble Topping

  • Preheat oven to 190°C / 375°F
  • Lightly oil and flour two 8″ round cake pans.  Cut two pieces of parchment paper to fit the bottom of each pan and place one in the bottom of each pan.  


Apples:  Core, halve, and slice 8 medium-size tart organic apples.  Do not peel.  Set aside.  (If you are not using organic apples, I recommend peeling them)

Nut Crumble:  In a small bowl, combine well and set aside:
1 cup oatmeal
1/4 cup flour
1/3 cup lightly packed brown sugar
1 teaspoon cinnamon
1/4 cup chopped nuts (I used half pecans and half walnuts)
1/4 cup butter, melted

Cake Batter: 
In a large bowl combine:

1 cup spelt flour
3/4 cup whole wheat flour
3/4 cup almond flour
1 cup lightly packed brown sugar
2 teaspoons baking powder
2 teaspoons cinnamon
1 teaspoon salt
1/2 teaspoon ground ginger
1/4 teaspoon ground nutmeg

In a small bowl combine:
3 eggs, beaten
1 cup milk
3/4 cup olive oil

Pour egg mixture over flour mixture and stir with a rubber spatula or spoon to combine well.   Add the apples and stir until all apple slices are coated with the cake batter.  Divide between the 2 round pie pans.  Divide the crumble evenly over the two cakes.  Bake 40 – 45 minutes or until a toothpick inserted comes out clean.  Let rest at least 10 minutes before serving.  If you want to remove cakes from pan, do so after the cooling period (you may lose some of the crumble topping in the process).  The cakes will keep at room temperature, tightly covered, for up to 3 days, if you don’t eat them before then.

Makes two 8″ cakes

Filed Under: Uncategorized

Roasted Chiogga Beets

October 3, 2012 by aplough

“The days are just packed!” Calvin & Hobbes would say.  And they are.  So you need take time for the little moments – with family or friends or simply with yourself – in between the rushed seconds and the quickly passing days.  The mornings are dark when we wake up now at 6 AM – I’ve been lighting candles and enjoying a few quiet moments with my cup of coffee before the day begins.  The evenings are dusky but not dark when we sit down to dinner at 6 PM, and I try to make/take the time to cook up something to warm the belly so we can enjoy a simple yet satisfying dinner together.   On the busiest of days, I am reminded that good food eaten while sitting down together is an important part of a balanced day.

Some foods make it easy – especially when the oven does the work, as with so many root vegetables.

Of all the root vegetables, I love beets the most.  This year was the first time I’ve ever tried to grow them and I opted to try the traditional dark red beet as well as the charming pink and white striped showoff beet called Chiogga.  I was lucky:  a mild summer full of warm rainy days meant very little hand watering at the cabin garden and a big pile of chubby beets to take home at the end of the season.

If you visit a farmers market now, you’ll see mounds of beets piled up on the tables.  Grab yourself a small bagful and prepare to make the perfect side dish.  These roasted beets are dead simple to make, take 5 minutes of prep time and 1 hour to roast, so you can do all kinds of things in the meantime.  And they are so good you may want to eat them standing up at the stove, dripping the beet juices back down into the pan you cooked them in.  If you have leftovers, the are great sliced cold over a nice green salad with a  bit of goat choose and a drizzle of aged balsamic an good extra virgin olive oil.  I rarely have extra, though, unless I consciously cook an abundance of them and hide a few before they hit the table.

Roasted Chiogga Beets

6 – 8 Chiogga beets, washed, leaves trimmed to 2″ / 5 cm and skin left on
1/4 cup / 1/2 dl water
3 tablespoons extra virgin olive oil
1 teaspoon Herbes de Provence
1/2 teaspoon sea salt
1/4 teaspoon fresh ground black pepper

Place the beets into a ceramic oven-proof baking dish.  Pour in the water, drizzle beets with olive oil, and sprinkle with the Herbes de Provence, sea salt and black pepper.  Toss to coat the beets thoroughly.  Cover the pan with aluminum foil or an oven-proof lid and bake at 200°C / 400°F for one hour or until the beets are tender when pierced with a fork.  Remove from oven.  Allow the beets to cool for five minutes.  Being careful to leave the stem of the beet greens intact, carefully remove the skin with the blade of a sharp paring knife – it should come off easily in a thin layer.  Serve as a side dish.  Serves 2 – 4, depending on the size of the beets – and your appetite!

Filed Under: Uncategorized

  • « Previous Page
  • 1
  • …
  • 63
  • 64
  • 65
  • 66
  • 67
  • …
  • 79
  • Next Page »

Find me on social media

  • Bloglovin
  • Facebook
  • Instagram
  • Pinterest
  • Twitter

Looking for something?

Eat Simply, Eat Well 's gallery on Punk Domestics
  • Bloglovin
  • Facebook
  • Instagram
  • Pinterest
  • Twitter

Copyright © 2025 · Foodie Pro Theme by Shay Bocks · Built on the Genesis Framework · Powered by WordPress