Eat Simply, Eat Well

Healthy recipes & tips to help you live the good life. by Ann Plough

Dusky Wax Cap Mushroom Coconut Chili Soup / Mustavahakas Kokos Chili Keitto

September 15, 2014 by aplough

Dusky Wax Cap Coconut Chili Soup / Mustavahakas Kokos Chili Keitto with Black Sesame Sourdough Bread

Oh, what a mushroom season this has been!  And oh, how I love heading deep into the woods, basket in hand, searching for edible mushrooms.  For those of you who haven’t yet been caught by the fever of finding edible mushrooms, you may think it crazy, but for those of you whose baskets and jars and freezers and spare containers are slowly, steadily and repeatedly filling with mushrooms, you’ll understand the joy of coming across a mushroom that you’ve seen pictures of, wondered about, and perhaps picked once or twice in the forest, only to toss it away again, because you “weren’t 100% sure”.  Or of finding a much-loved mushroom once again:  nothing beats the thrill of the first flush of boletus edulis in the dim light of the shady forest, standing proudly at the foot of a pine or fir, or spotting the unmistakable gold of chanterelle out of the corner of your eye against the dark green moss of the forest floor, the first mushrooms a new season.

New to me this year, Mustavahakas (Finnish) or Dusky Wax Cap Mushrooms, Hygrophorus Camarophyllus, is the black tie dresser of the mushroom world.  It has an elegant, dark gray/brown cap, a clean natural  white undercap with elegant, waxy, sturdy, curved, gills and a slender, strong gray stem.  Once you’ve seen one, you will always know them, though it’s easy to miss them at first in the autumn forest among fallen leaves and debris, since they sit close to the grown, the dark heads just above forest floor.  They have a mild pleasant smell, reminiscent of honey, and the flavor is excellent.  They are considered to be a three-star mushroom, right up there with porcini for flavor.  I found mine growing in a mixed forest filled with fir, pine and birch, in the center of a mossy patch not too far from a patch of yellow foot chanterelles (suppilovahvero).  They are a fall mushroom in Finland, Scandinavia and Russia, with a growth season from the end of August through October.  In the US they are found in northern North America.  If you know of them growing in other parts of the world, please let me know!

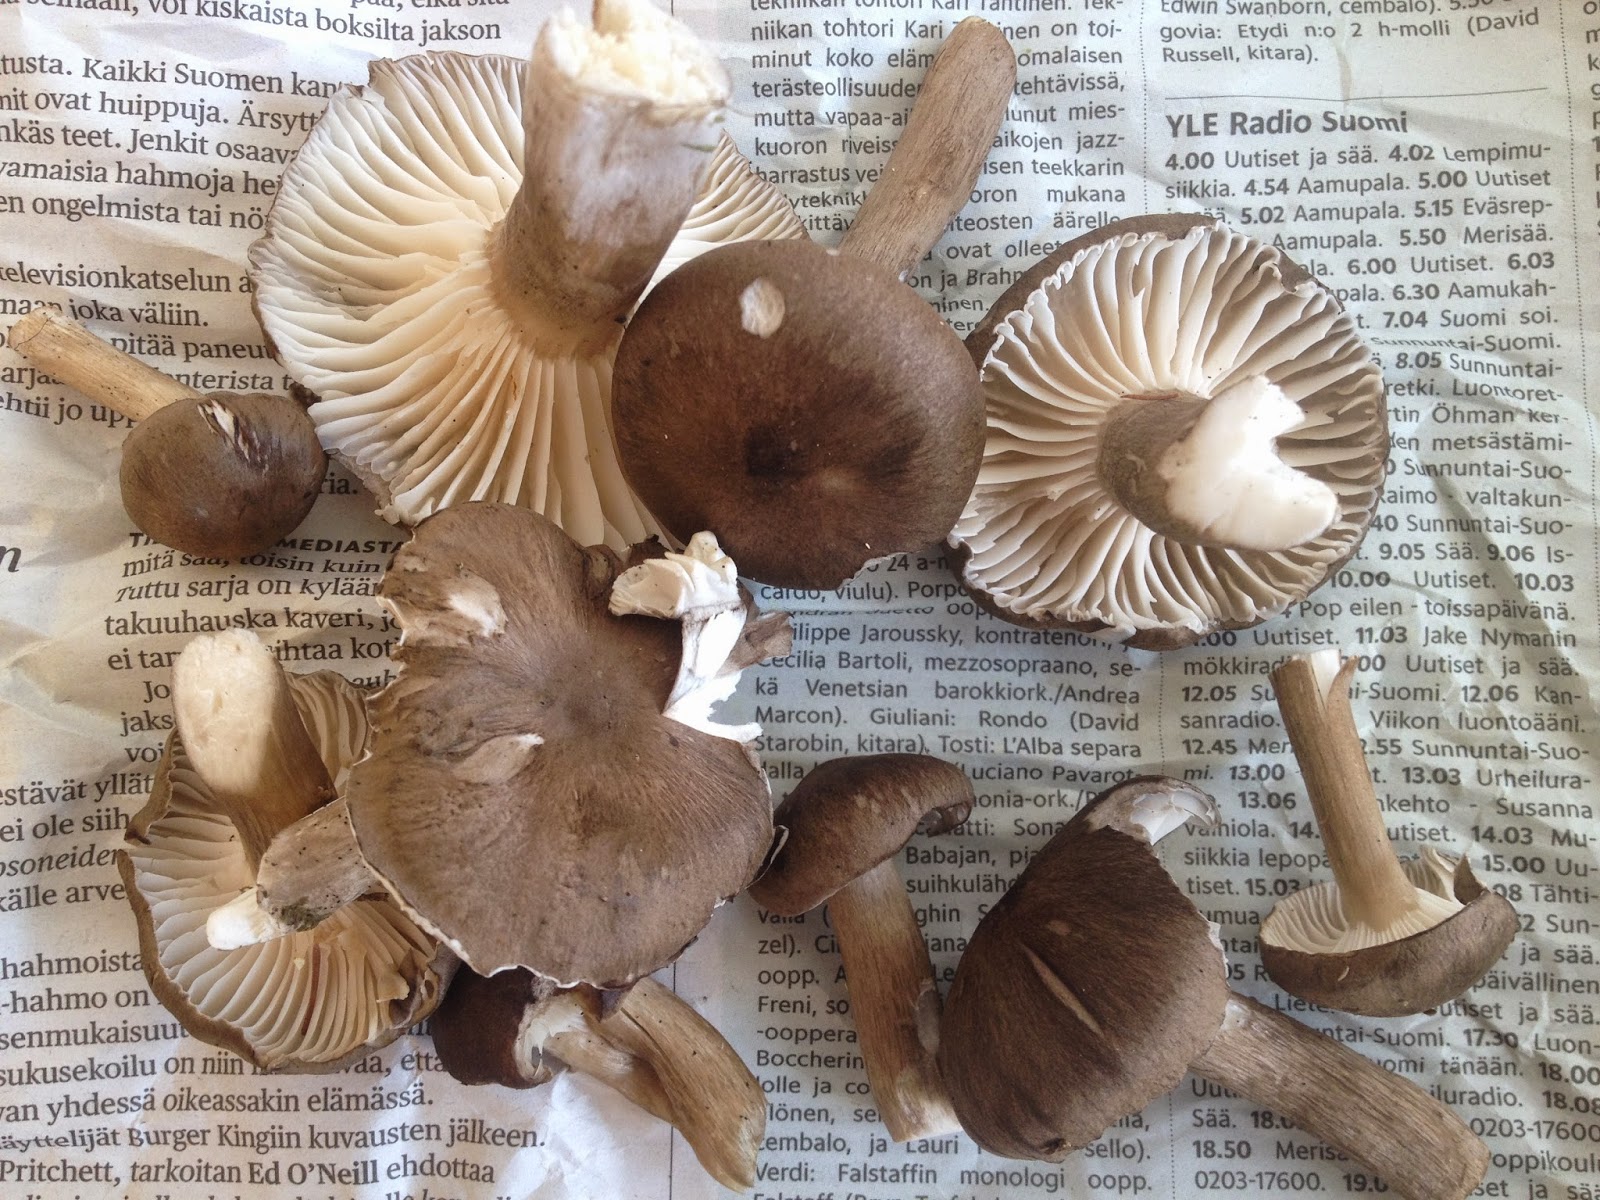
Mustavahakas, Dusky Wax Cap, Hygrophorus Camarophyllus

I didn’t find many out on my last trek: just under 1/2 liter of good ones, but enough to fry up in the pan and create a soup.  I left a portion of them behind in the woods since the worms had found them before I did, so slice them completely in half as you pick them so you know which to bring home and which to leave behind; the worms tend to get there early.  If you are lucky enough to find a lot of them, they freeze well.  Fry them in a dry pan over medium heat until they release their juice, and then store them in a labeled plastic bag or container.

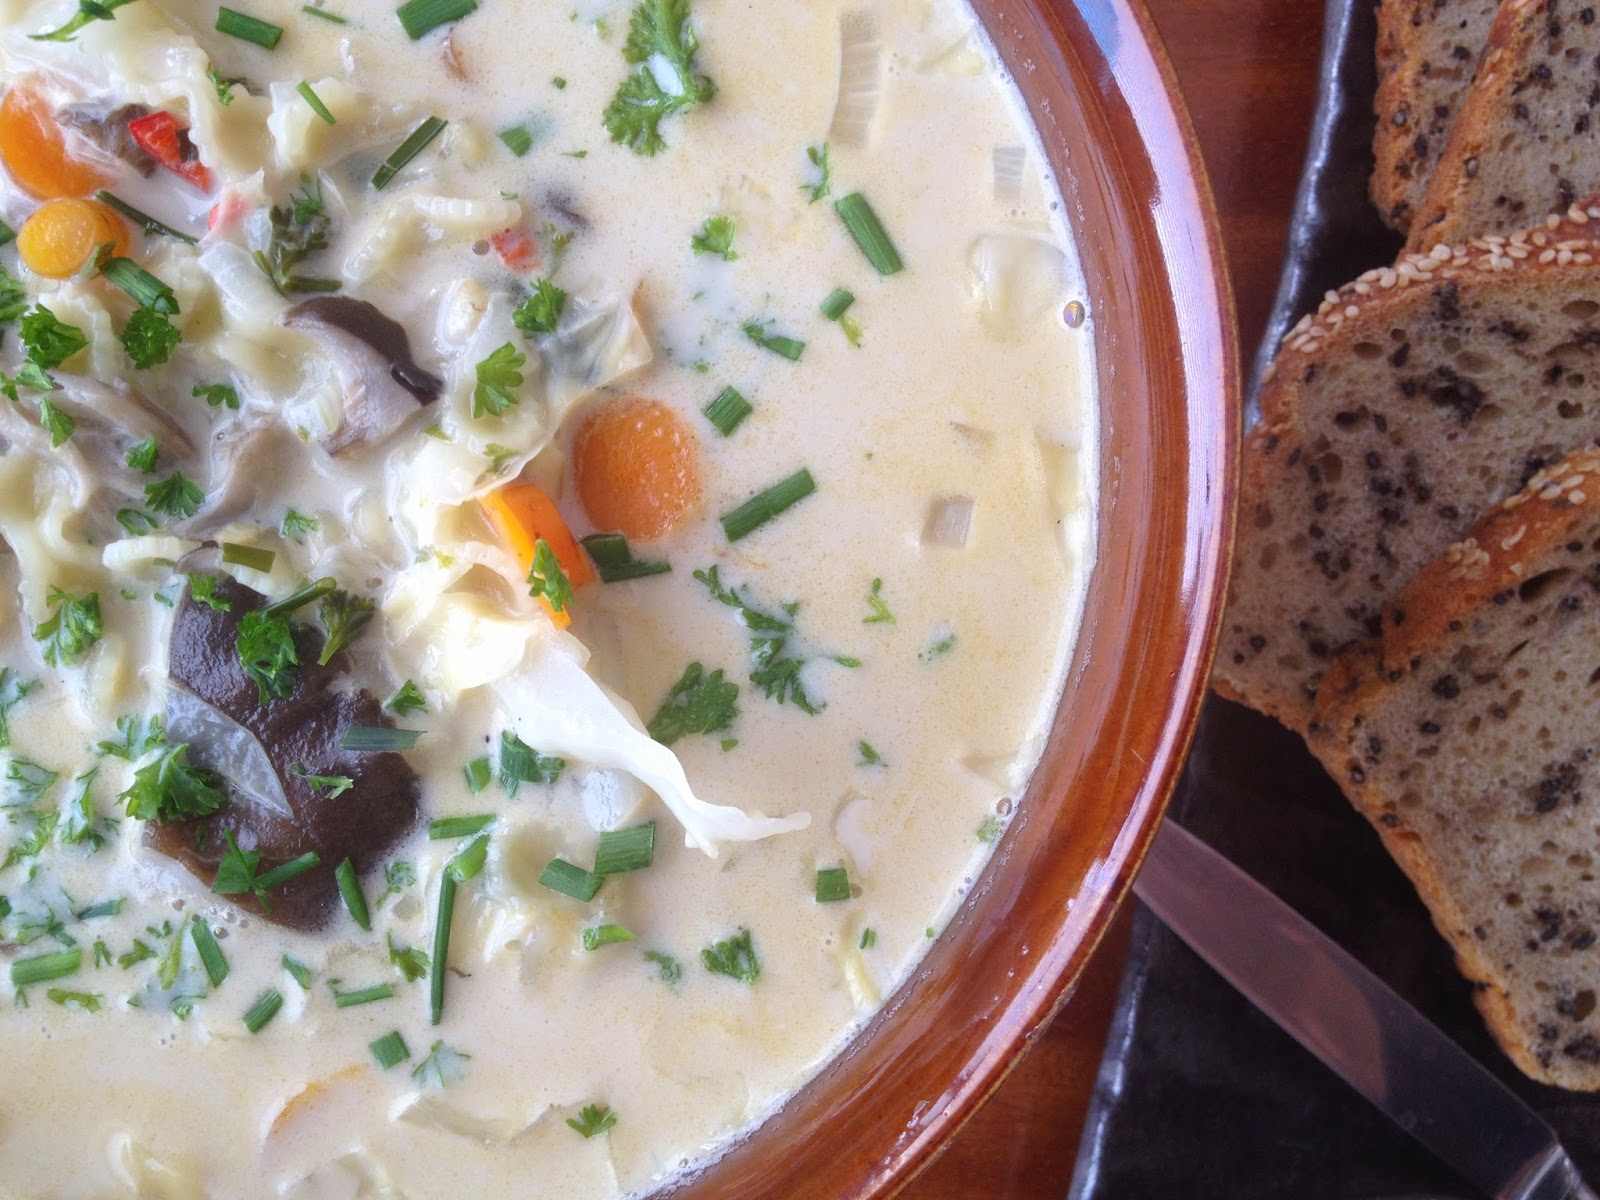
So how to cook them?  I’d read somewhere that they suit Asian recipes well, so I decided to make a nice soup for lunch.

I fried the mushrooms first and salted them lightly so I could taste them before adding them to the soup. The flavor reminded me a bit of the way oyster sauce smells, and the scent that came off as I cooked them was that of raw honey.  This soup uses simple ingredients to create a warming soup with fiery chili undertones that is really satisfying.  I give a range for the amount of chili as I found I made it a bit too fiery at first, and ended up removing some of the liquid before adding the coconut milk.  I hoping to find more of this beauties on my next trip out – I am thinking they’d be great in a curry stir fry over steamed brown rice.

If you don’t have Dusky Wax Caps anywhere near you, you could substitute store-bought Shitakes or Matsutakes for this recipe.

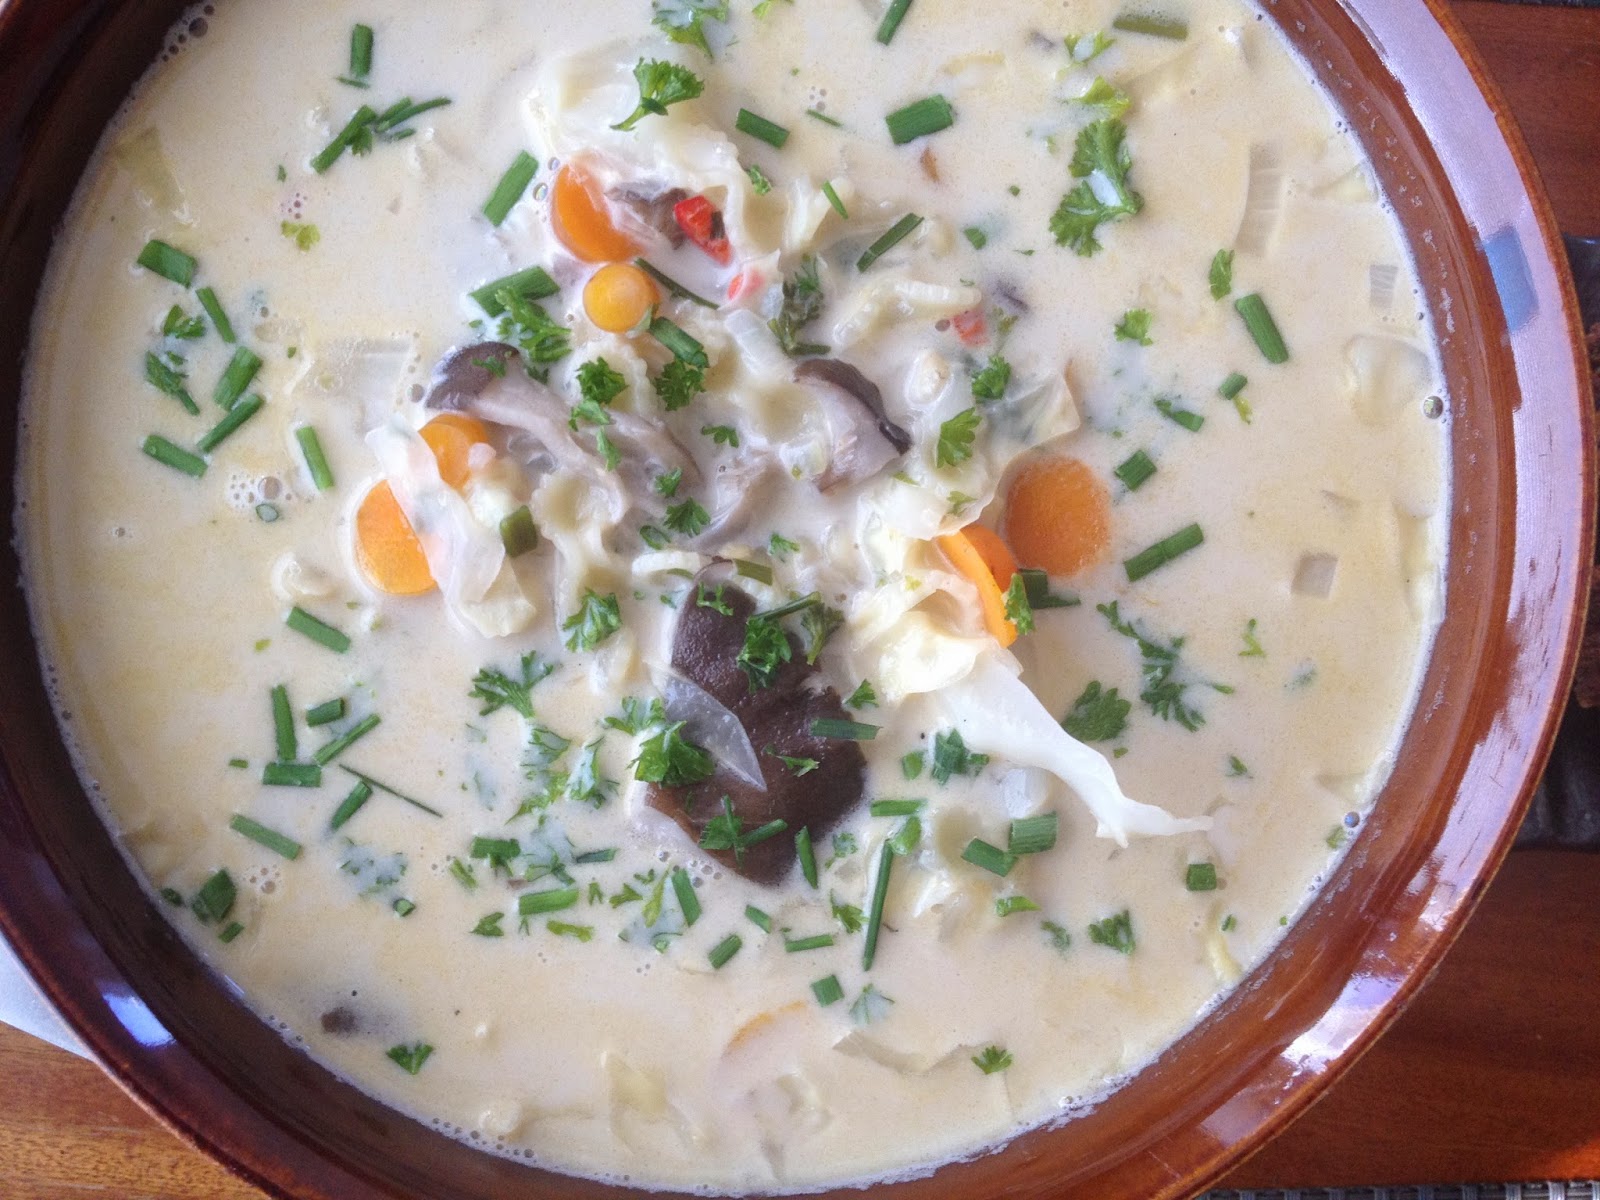
Dusky Wax Cap Coconut Chili Soup – Mustavahakas Kokos Chili Keitto

Dusky Wax Cap Coconut Chili Soup

2 cups / 1/2 liter fresh waxy cap mushrooms
2 tablespoons + 2 tablespoons sesame oil
1/2 + 1 teaspoon salt
1/2 yellow onion, diced
1 clove garlic, minced
2 carrots, sliced into thin circles
1 cup / 2.5 dl thinly sliced white cabbage
1 – 2 teaspoons red chili pepper, depending on how spicy you like it
3 cups / 750 ml water
1 tablespoon soy sauce, preferably Tamari
2 teaspoons of oyster sauce; optional, but adds a nice extra depth to this soup
1 tablespoon of chopped chives
1 tablespoon of chopped parsley
1 cup / 250 ml coconut milk
1/2 cup / 3/4 dl of small egg noodles, pasta, or rice noodles (I used mini bow tie pasta)

In a heavy-bottomed, medium-sized pot, heat 2 tablespoons of sesame oil, then add the mushrooms and cook until the mushrooms release most of their liquid and are cooked through, about 5 minutes.  Add 1/2 teaspoon of salt.  Pour the mushrooms onto a plate and set aside; set the pot back on the stove.

To the pot, add 2 tablespoons of sesame oil and the onion.  Saute the onion until it is slightly translucent and tender, 2-3 minutes.  Add the garlic, carrots, cabbage and pepper, stir well, and allow to cook for another five minutes.  Add the water, soy sauce and oyster sauce, and allow the mixture to cook for 10 minutes.  Add the chives, parsley and coconut milk, stir well, and bring back to a boil.  Add the pasta/noodles and cook them in the pot per manufacturers instructions or until they are al dente.  Taste and add salt & pepper if needed.  Pour into bowls and serve.

Serves 4.

Filed Under: Uncategorized

Beet, Carrot, Rosemary & Goat Cheese Galette

September 11, 2014 by aplough

My friends, it’s time to eat your root vegetables.  In a pie.  For dinner.
Beet, Carrot, Rosemary and Goat Cheese Galette

I have been dreaming of this recipe since early spring when I planted my beets.  I had grand plans of harvesting loads of beets:  a few golden ones; dark red round ones, and the prettiest of them all, the lovely striped Chiaggio beets… and then along came a cold, rainy, long spring followed immediately by a long, dry, extremely hot summer.  I was away for the first three weeks of really hot weather, and nearly every living thing in my garden died.  The sole survivors were the mint which grew with great vigor and abundance everywhere; the oregano which has taken over the bed into which it was planted 3 years ago, 1/2 liter of strawberries, and a whole load of rhubarb.  Not exactly a smashing success.

My local food market, thankfully, was stocked with beets harvested by those with better luck and far greater skill than I, so I was finally able to gather the elements of this recipe floating around in my mind, and produce a dinner for my dearest and me.

I know, first I call it a galette, and then I talk about pie, so what’s going on, here?  A galette is French term for a flat, round, free-formed crusty pie or cake.  In this case, an open-faced, free-form pie, using flaky crust dough, baked on a flat pan with the dough arranged an a relaxed fashion around and partially over the ingredients, and then baked.  It’s easy to make and not at all fussy, so it doesn’t matter if it isn’t perfect; in fact, it shouldn’t be.  The more rustic it looks, the better.

The first night we ate it all by itself, with no accompaniment.  It was warm from the oven with the golden, flaky crust breaking under the edge of the of fork and dissolving in our mouths.  The tanginess of the goat cheese balanced the sweet honey and earthiness of the beets and carrots, while the small bit of rosemary added a welcome perfume. It was delicious.  The next day I had one of the remaining slices for lunch, served slightly warmed, together with a fresh green salad.  The crust wasn’t as crisp on day two, but it was still delicious, so feel free to make this a day ahead and rewarm it to serve if needed. Warming it in a 200°C/425°F oven for 10 minutes would re-crisp the crust, as well.

It may look like a lot of work, but really, you expend a little bit effort and then wait while the action happens.  So go ahead, get that crust started and you’ll be enjoying this in no time.

Beet, Carrot, Rosemary & Goat Cheese Galette

Beet, Carrot, Rosemary & Goat Cheese Galette

Flaky Tart Crust
1 teaspoon / 5 ml salt
2/3 cup / 150 ml cold water
3 cups + 2 tablespoons / 455g all-purpose flour
1 cup + 5 tablespoons / 300 g very cold butter

In a small bowl, combine the salt and the water and stir to dissolve. Keep cold until ready to use.

You can make the dough in a food processor or by hand.  To use a food processor, but the flour in the work bowl.  Cut the butter into pieces and scatter over the flour.  Pulse briefly until the mixture forms large crumbs, and some of the butter pieces are about the size of peas.  Add the water-salt mixture and pulse briefly until the dough starts to form a ball, but is not completely smooth.  You should still see butter chunks.

To make by hand, put the flour in a bowl.  Cut the butter into pieces and scatter over the flour.  Using your hands, a fork or a pastry blender (my preferred tool), work the butter into the flour until the mixture forms large chunks and some of the butter pieces are about the size of peas.  Pour in the water-salt mixture and, using your hands, work the dough together so it forms a ball but is not smooth.  You should still see butter chunks.

On a floured work surface, divide the dough into two equal balls and shape each ball into a disk about 1 inch / 2.5 cm thick.  Wrap each disk in plastic wrap and chill for at least two hours or up to overnight.

You will need only one disk of dough for this recipe.  If you do not plan to use the other disk immediately, place the disk in a plastic bag, label with contents and date, and freeze.  Remove from the freezer and thaw in the refrigerator one night before you’d like to use it.

Make the filling:
5 medium-sized beets
2 large carrots, cut in half lengthwise
1 container of soft goat cheese
1 teaspoon chopped, fresh, rosemary
1/2 teaspoon Maldon salt or orange citrus salt
1 teaspoon of runny honey
1 egg, beaten

Preheat oven to 200°C/425°F.

Wash the beets if they are muddy, cut off the long thin root end but leave the stem end intact.  Place on an oven-proof tray and place in the hot oven for 30 minutes.  While the beets roast, peel and slice the carrots and toss them with a drizzle of olive oil.  After the beets have been in the oven, add the carrots to the same try and cook for another 15 minutes.  The beets should be tender when pierced with a fork; if they are not, cook them a little longer.  The carrots should be slightly caramelized and brown; remove them before the beets if needed.

To assemble:

On a lightly floured surface, roll 1 disk of crust (recipe above) out into a large circle measuring 40 cm / 15 inches in diameter.  Don’t worry if it’s not a perfect circle, or if the edges are a bit rough.  The great thing about a galette, is that it is supposed to be a bit rustic.   Place the crust onto a parchment covered tray.

Spread the center of the crust with a layer of goat cheese – use all of it, and spread it out so it’s 1.5cm / 1/2 inch from the edge.

Slice the beets into thin layers and lay them out across the the goat cheese, starting 2.5 cm / 1 inch in from the edge of the goat cheese, letting them overlap slightly.  Leave a small empty circle of goat cheese in the middle.  Cut the carrots into small chunks or strips and arrange them in the center.  Sprinkle the chopped rosemary and the Maldon salt over the top of the carrots and the beets.  Drizzle honey over the top.

Fold the edge of the crust over the outside section of the beets, working from one point in the circle and turning the crust slightly under itself as you work the dough up and over.  Brush the crust with beaten egg.  Place the tray with the galette into the hot oven and bake for 20-25 minutes or until the crust is golden and crisp.

Serves 6-8 as a main course.  I recommend you serve it with a nice green salad.  Also makes a wonderful appetizer.

Filed Under: Uncategorized

Zucchini Potato Gratin

August 18, 2014 by aplough

Zucchini Potato Gratin

What are gonna do if you’ve planted even one zucchini plant, and it just keeps producing one zucchini after another, faster than you can keep up, and faster than you can give it away?  You may have made zucchini bread or cake and zucchini soup and grilled zucchini, and are running out of ideas.

But then even more seriously, what are you gonna do if you have a head full of zucchini recipe ideas and no zucchini in sight?  The second feels like a far worse predicament this year, I have to say – since my zucchini plants produced…absolutely nothing.  I was away for the hottest weeks of Finland’s summer, and my poor plants dried out from neglect.  I received a few zucchini’s by someone trying to get rid of some of their excess, and happily started cooking.  No worries – there is always another great way to utilize this raw ingredient in my house.  Anyone looking to unload a few?  😉

If you happen to have access to potatoes as well, here’s a dish that can be served as a main course or side dish and will have you coming back for seconds.  The creamy béchamel sauce can be made with any kind of milk from non-fat to whole milk; or oat milk as a non-dairy alternative, and really ties the whole dish together well.

Dig in while the Zucchini Potato Gratin is still warm.

Zucchini Potato Gratin

1 medium zucchini
6 new/small potatoes
1 onion, peeled and diced
4 tablespoons fresh parsley, minced
2 tablespoons fresh oregano, minced, or 2 teaspoons dried
1 teaspoon + 1 teaspoon salt
1 teaspoon garlic powder or 2 garlic cloves, minced fine
3 tablespoons butter
3 tablespoons whole wheat flour
3 cups milk
1 cup grated white, mild cheese (Emmental, Gouda or Mozzarella all work well here)

Heat the oven to 175°C / 350°F.

Using a box grater or mandolin, slice the zucchini into very thin rounds.  Toss with one teaspoon of salt and place into a colander over a bowl.  Allow to sit while you prepare the rest of the ingredients.

Using a box grater or mandolin, slice the potatoes into very thin rounds.  Place into a small bowl and cover with cold water to prevent browning.  Prep the onion, parsley, and oregano and mix them together in a small bowl.

Squeeze the zucchini over the colander to release as much water a possible, making sure to collect the zucchini water in a bowl.

To make a béchamel: in a small saucepan, melt the butter and whisk in the flour until blended.  Add the zucchini water and whisk until smooth.  Add all of the milk, whisk until smooth, and bring the mixture to a boil over medium heat.  Once the mixture is thickened and just begins to bubble, remove from heat.  Whisk in the salt and pepper, and garlic or garlic powder.

Assembly:

Butter the bottom and sides of a 2 quart, oven-safe casserole dish; any shape will do.  Layer potatoes across the bottom, Sprinkle with 1/3 of the onion mixture and 1/3 of the cheese.  Layer half of the zucchini rounds over the top and ladle 1/3 of the béchamel over the top.  Repeat to layer potatoes, then onion mix, then cheese, then zucchini, then béchamel, then potatoes, onions, béchamel, ending with the last 1/3 of the cheese.

Place the mixture in the oven and make for 45 minutes until the potatoes are tender when poked with a fork and the top is golden brown.

Serves 4 as a main dish.

Filed Under: Uncategorized

  • « Previous Page
  • 1
  • …
  • 42
  • 43
  • 44
  • 45
  • 46
  • …
  • 79
  • Next Page »

Find me on social media

  • Bloglovin
  • Facebook
  • Instagram
  • Pinterest
  • Twitter

Looking for something?

Eat Simply, Eat Well 's gallery on Punk Domestics
  • Bloglovin
  • Facebook
  • Instagram
  • Pinterest
  • Twitter

Copyright © 2025 · Foodie Pro Theme by Shay Bocks · Built on the Genesis Framework · Powered by WordPress