Eat Simply, Eat Well

Healthy recipes & tips to help you live the good life. by Ann Plough

Chicken Coconut Curry Casserole with Savoy Cabbage & Carrots

October 14, 2014 by aplough

Chicken Coconut Curry Casserole with Savoy Cabbage and Carrots
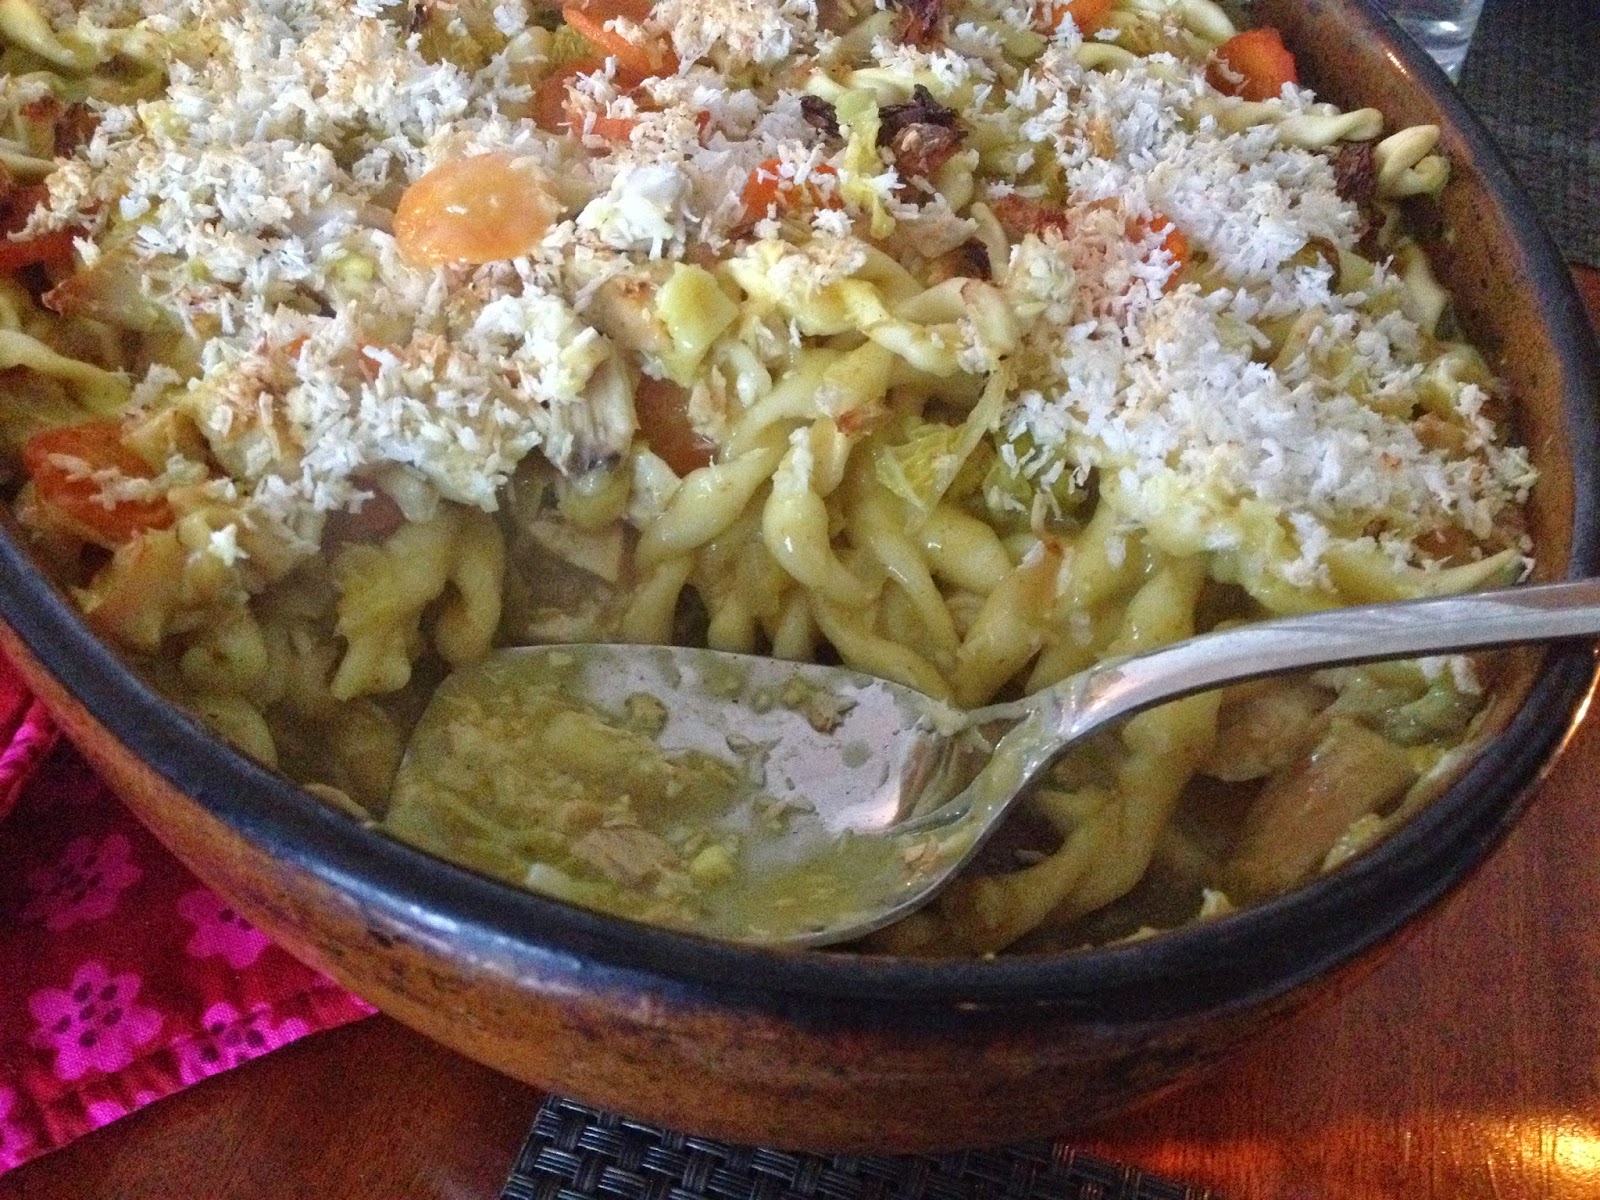
Fresh from the oven

After the previous (long) discussion on the virtues of and reasons for making your own coconut milk, I wanted to also give you the recipe for which I needed the lovely coconut milk in the first place.

This is the perfect recipe to enjoy after a day spent outside when you are feeling really hungry, or to eat on a day when you need some nice, warm comfort food.  I created a twist on coconut curry by cooking the coconut milk into a curry béchamel, and combined it with the beautiful busiata sicilian pasta I’d picked up in Sicily over the summer.  If you can find busiata, I’ve listed other pastas that will stand in well – basically anything that can stand its own among thick vegetables and sauce.

Ready to assemble

I also threw in Savoy cabbage and carrots, because they are in season right now and taste really amazing in this dish.  You get a little bite of carrot; the cabbage goes nice and soft, the chicken and pasta add a nice bite and the creamy, spicy coconut curry hums in and around pulling the whole thing together nicely.

Enjoy!

Chicken Coconut Curry Casserole with Savoy Cabbage & Carrots

Preheat oven to 375°F/ 190°C

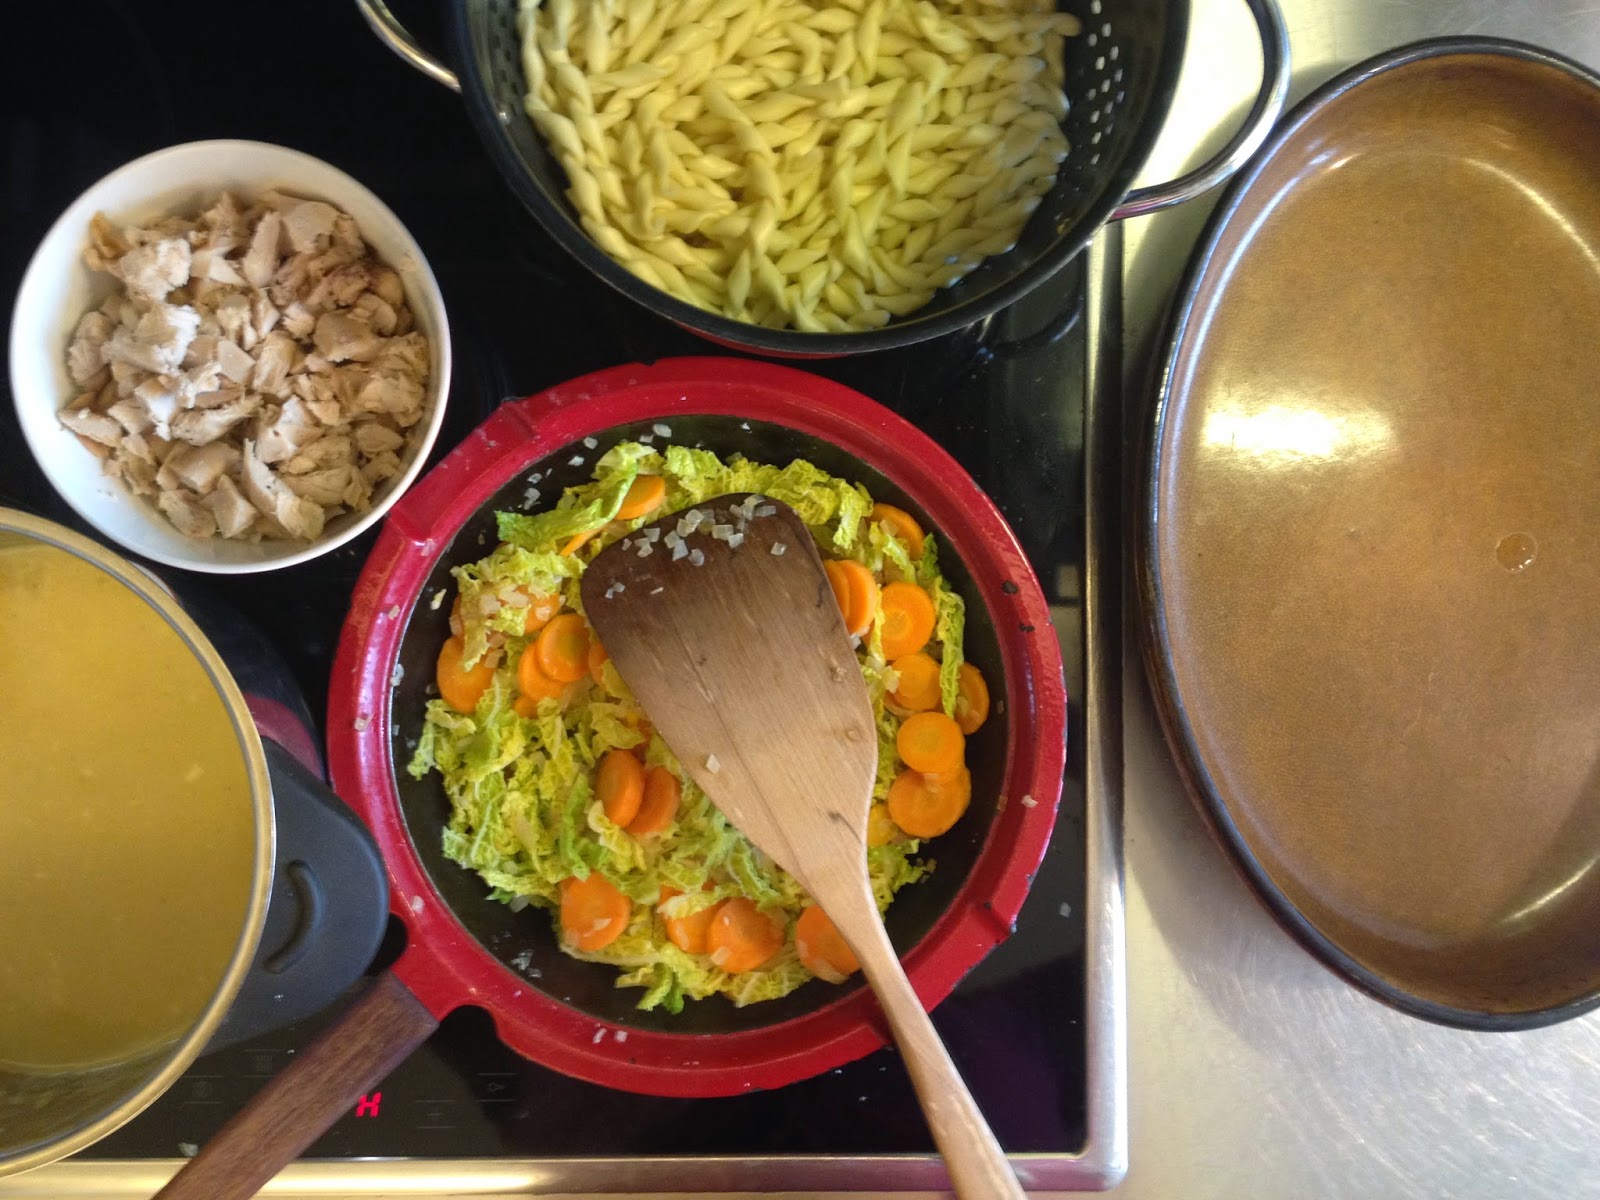
1. Gather your ingredients:

250 g pasta (busiata siciliana, fusilli, farfalle or casarecce – something with twists and turns and heft but no tubes – you want the rest of the ingredients to stick to and around it)
2 cups cooked chicken (see step 2)
3 tablespoons butter or coconut oil
3 tablespoons of all-purpose flour
2 cups coconut milk (500 ml can, or make your own)
1 teaspoon + 1 teaspoon of salt
1.5 cups of pasta water
2 garlic cloves, minced
3 teaspoons mild curry powder
2 tablespoons of cooking oil (I used rapeseed)
1 onion, minced
3 cups shredded Savoy cabbage
4 carrots, peeled and cut into thin rounds
1/2 teaspoon fresh ground black pepper
1/2 cup coconut flakes

2.  Cook the pasta:

Bring water to a boil.  Add two teaspoons of salt.  Pour in the pasta and boil for two minutes fewer than the package suggests.  Remove from heat.  Reserve 1.5 cups / 3 dl of the pasta water.

3.  Prepare the chicken:

You will need 2 cups of cooked chicken for this recipe.  You can either cut up a previously cooked chicken into a dice, or cook 2 raw chicken breasts.  To do this, dice the chicken breasts into 1/2″ / 1.25 cm chunks.  Heat 2 tablespoons of oil in a frying pan, place the chicken into the pan, sprinkle with 1 teaspoon of salt, and cook and stir until done.  Pour the chicken onto a plate to cool slightly.

4.  Make the coconut curry béchamel

In a heavy stockpot over medium-heat, melt the butter or coconut oil.  Once fully melted and simmering, add the flour and whisk until completely combined.  Pour in 1/2 cup of coconut milk and whisk vigorously to combine.  Pour in another 1/2 cup and whisk vigorously again until smooth.  Pour in the remaining cup of coconut milk and the pasta water and bring to a boil.  Remove from heat and stir in the garlic and curry until fully combined. Set aside.

5.  Cook the vegetables

Pour the oil nto a heavy frying pan over medium heat.  Add the onion and cook until the onion is tender and translucent, about 5 minutes.  Add the cabbage and carrot and sprinkle 1 teaspoon of salt and the black pepper over the vegetables.  Stir; then cover the pan with a lid and allow the mixture to cook for 5 minutes.  Remove the lid and continue to cook, stirring occasionally, until the vegetables are tender.

6.  Assembly

Spread 1 cup of the béchamel over the bottom of a large baking dish.  Sprinkle half of the pasta over the béchamel.  Spread half of the vegetable mixture over the pasta, followed by the chicken.  Repeat by pouring béchamel, pasta, vegetables, chicken.  Pour the remaining béchamel evenly over the entire dish.  Sprinkle with coconut flakes.  Place into the hot oven and bake for 30 minutes.  Remove from oven and allow the casserole to rest for 10 minutes.  Serve hot

Serves 6.


Filed Under: Uncategorized

Make it Yourself: Coconut Milk

October 14, 2014 by aplough

DIY Coconut Milk

First I have to warn you that this post gets serious and it ain’t all pretty, but there is a really handy recipe at the end, if you want to skip straight to that.

I’ve been thinking about non-dairy milk a lot lately.  I’ve been on a simple detox program where I’ve cut out caffeine and dairy products.  Surprisingly, the coffee was a lot easier to let go of than the dairy products; good thing I save the grain detox for next week because there is a lot adjust to around here.

You may be wondering if I have allergies, or why else would I be denying myself my beloved morning cup of java and bowl of yogurt & muesli?  There are several reasons, but among them are these:  I find if I don’t have coffee right away in the morning, I suffer from withdrawal symptoms such as headaches, grogginess and fuzziness.  I don’t like that.  So I’m taking control back by going on a detox.  A little over a week in, I’m happily enjoying cups of herbal tea and no symptoms, though I definitely miss the ritual and flavor of coffee. I don’t plan to give up coffee because I really love a good cup of java, but will reduce it once I start drinking it again. So there’s that.

The reason I’m eliminating dairy and grains for a while is because I want to experiment how it is that a person with lactose, gluten or grain allergies can make good, healthy food at home without relying on store-bought products which are poorly labeled and may or may not be as healthy as they appear to be.  Furthermore, there have been days where my stomach has not been happy with something I’ve eaten, but it’s been difficult to pinpoint.  So I’d like to know more about what I’m eating and what is in everything, if possible.

Take milk and milk-subsitutes:  Mostly I’ve been making almond milk and oat milk and using them as substitutes for dairy, which has worked really well.  In the meantime, I also started reading about how healthy these products are (or are not in some cases) and came across multiple references to a natural additive that exists in many “health” products, carrageenen.

First, it’s important to know what it is and why carrageenan exists in so many products.  According to Wikipedia, “Carrageenan is an extract from red edible seaweeds, and is used widely in the food industry for it’s gelling, thickening and stabilizing properties.”  Basically what this means is that it makes the food feel smoother and thicker in your mouth, so when you buy almond milk, oat milk, soy milk or yes, even coconut milk, it helps to stabilize the product and give it the smooth, silky texture we associate with dairy milk drinks and instinctively hope for in dairy milk substitutes. Incidentally, carrageenan is also used in dairy and meat products too, because it binds really well with proteins.  That means it has a good chance of being in your ice cream, cottage cheese, deli meats, canned soups, or in your non-fat yogurt, too.

So what’s the problem?  A natural product that improves the texture without adding off flavors should be good, right?  Well, according to research, this may not be true.  Joanne K Tobacman, MD has studied carrageenen for two decades and believes it should be banned from food in the U.S. “Tobacman says that carrageenan, whether food grade or degraded, predictably causes inflammation because of its chemical structure and says thousands of studies over several decades have demonstrated this effect.  She adds that acidic conditions in the human digestive system likely will cause food-grade carrageenans to degrade in the body.”(source: todaysdietician.com).

What does this inflammation actually do to you?  One thing we know, according to Dr. Andrew Weil,  is that chronic inflammation is the root cause of heart disease, cancer, Parkinsons and Alzheimers, to name a few.  At this point, the studies have only been done on animals and on in vitro cell tissues or cultural models in labs, for the reason that, given the strong indication of negative impact, Dr. Tobacman believes it wrong to run the tests using humans.  As we already know, “natural” doesn’t necessarily mean “safe”.  In 2008, Tobacman presented her findings to the FDA along with a citizen petition requesting that the substance be banned from foods.

The FDA disagrees with Tobacman’s findings, while other scientists and doctors support it.  Still others are cautious, advising patients with gut problems to avoid carrageenan, but don’t necessarily encourage that carrageenan be banned.  There are watch groups such as Cornucopia Institute raising the red flag and warning consumers to steer clear.  The discussion continues, with the US and European officials differing on the safety of carrageenan; the US allows its use in baby formula while the EU does not.

So what should you do?  That’s entirely up to you, of course.  Take a look at articles like this one for clear coverage on carrageenan and both sides of the story.  Read your labels so you know what is in your food.  As for me, I try to keep my diet as healthy as possible.  I believe that our best bet is to eat real, whole foods that are made using ingredients that are as natural as possible.  While I have the occasional indulgence in really great dessert, I want it made with real butter or a healthy oil (hello chocolate cake!). I try to steer clear of ingredients that are known to have harmful effects.  This holds true for industrial trans fats (no thanks, margarine & shortening), artificial sweeteners (saccharine, aspartame and the like), and go for products that contain ingredients I recognize and which I could feasibly make at home.

Which is what lead me to blogging about carrageenan in the first place.

I needed coconut milk, and learned that this was another place where carrageenen lurks.  Not to mention the fact that most coconut milks are full of the E-codes I’d rather not consume (if you have an iPhone, here’s a link to a handy app to help you figure out what’s good and what’s bad with E-codes).

You may be delighted to know that coconut milk is simple and quick to make and requires only two ingredients, one of which you already have on hand and the other readily obtainable: Water and unsweetened coconut flakes.

Coconut Milk

1.5 cups / 3 dl unsweetened coconut flakes
4 cups hot water, just under the boil point.

Pour the coconut into a heatproof glass or stainless steel container.  Pour the hot water over the top and let the coconut steep for 20 minutes.  If you have a hand-held immersion blender (Bamix in Finland) you can use this; otherwise pour the mixture into your upright blender.  Blend for about 1 minute.  Strain through a fine-mesh sieve into a glass jar.  Squeeze the coconut pulp to extract all of that lovely milk.

Note 1:  Don’t throw away the leftover coconut pulp!  Save it to add to your homemade granola, smoothies, muffins, or other baked goods, or to sprinkle over the top of a coconut curry.

Note 2:  You can refrigerate for 3-4 days or freeze for up to three months.  Once cold, the coconut fat will float to the top of the mixture and solidify.  Don’t worry – this is completely normal.  If you are using the milk in soup, you can simply break through the layer and pour the coconut fat and liquid in together and heat it up.  If using it in bakery or smoothies, you may want to bring the coconut milk to room temperature first, and then shake to redistribute the mixture before using.

Filed Under: Uncategorized

Roasted Red Pepper Hummus

October 9, 2014 by aplough

Roasted Red Pepper Hummus snack plate

The rain was really coming down outside, beating and splatting against the windows, with a gust of wind every now and again causing a whistling howl against the window pane.  Even though only mid-afternoon, it was clear that this was going to be a day to stay In.  The type of day when it’s tempting to light all the candles in the house, curl up on the couch with a warm blanket over your lap, a good book in your hand, and a comfort snack by your side.

When days like these come my way, I always find my way to the kitchen at some point, and I usually end up making something sweet and something savory.  This time sweet came in the form of Teddie’s Apple Cake, found on Food52, created by an unknown author a long time ago, and loved by nearly all of the people who commented there.  It seemed the perfect recipe to use up a few more of my apples and to attempt a gluten-free conversion, something I’ve been playing with lately.

So as the Autumn rain pounded the windows, I stirred sugar, olive oil and eggs, vanilla & cinnamon; gluten-free flour mix and crisp, sweet-tart apples and poured them all into a bundt pan mold.  It wasn’t long before the cozy scent of baking cinnamon and apple filled the kitchen and wound its way around the corner into the living room by the chair where J, who was enjoying an afternoon read, perked up and realized that there were good things coming his way. (Side note: the cake was excellent, even made without the raisins, of which I am not a fan.  However, I would substitute applesauce for part of the oil and reduce the sugar by 1/3 next time).

Roasted Red Pepper Hummus with Life-Changing Loaf of Bread

As the cake baked, I moved onto Snack B, a Roasted Red Pepper Hummus that I created using the Preserved Red Peppers I found on Hank Shaw’s blog Hunter Angler Gardener Cook and chickpeas I soaked overnight and had boiled that morning.  On the counter sat the remaining half of a loaf of Sarah B’s Life-Changing Loaf of Bread, waiting to be slathered with something delectable. (If you haven’t made your own preserved red peppers, no problem: they are readily available in jars at your local grocery store).

As I chopped and stirred and baked, I thought about an interview I’d watched via Facebook of comedian Aziz Ansari talking about his chef girlfriend:  “Anyone who’s single, date a chef.  They’ll say amazing things like, ‘Oh, I don’t know if you’re hungry but I just made this delicious snack’, which is the greatest sentence I’ve ever heard.”

And I thought: that is a good sentence.  And I also thought: that’s Love.  Food is love.  Making food is a way of showing that you care.  After all, you gotta feed everybody.  I’m no chef; but for me, creating food is my absolute favorite pastime, especially if I have someone around to feed it to.  Especially if it’s pouring rain outside and nobody’s going anywhere.

Do you want a snack?

Try this one.

Roasted Red Pepper Hummus

Roasted Red Pepper Hummus

If you are starting with dry chickpeas, soak 1/2 cup / 1 dl chickpeas overnight in 1.5 cups/3 dl of water. Drain the remaining water and put them in a pot with enough water to cover by 1 inch/2.5cm.  Bring to a boil, and the reduce heat to medium.  Allow to simmer, uncovered, for 55 min.  Add 1 teaspoon of salt and boil for another 5 minutes.  Remove from heat, allow the chickpeas to cool, and then drain, saving the cooking water.

In a food processor or blender, combine:

Chickpeas from recipe above; or 1 can chickpeas, drained, juices reserved
3/4 cup roasted red pepper, drained 
1.5 tablespoons of fresh lemon juice
1 tablespoon of olive oil1 tablespoon Tahini
1 garlic clove, peeled and root end removed
1 teaspoon of salt, plus more to taste

Blend until completely smooth. If the mixture is too thick, add some of the reserved liquid until it reaches your desired consistency. Taste; add more lemon juice and salt as needed.

Makes 1.5 cups / 3 dl.

Serve on crackers, toast or with sliced vegetables for a delicious snack.


Filed Under: Uncategorized

  • « Previous Page
  • 1
  • …
  • 40
  • 41
  • 42
  • 43
  • 44
  • …
  • 79
  • Next Page »

Find me on social media

  • Bloglovin
  • Facebook
  • Instagram
  • Pinterest
  • Twitter

Looking for something?

Eat Simply, Eat Well 's gallery on Punk Domestics
  • Bloglovin
  • Facebook
  • Instagram
  • Pinterest
  • Twitter

Copyright © 2025 · Foodie Pro Theme by Shay Bocks · Built on the Genesis Framework · Powered by WordPress